HP 450c HP DesignJet 430/450C/488CA Printer - UserÂ’s Guide - Page 150
If there are color shadows
 |
View all HP 450c manuals
Add to My Manuals
Save this manual to your list of manuals |
Page 150 highlights
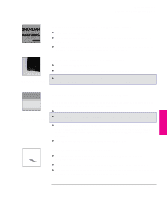
Troubleshooting Solving print quality problems If there are jagged vertical or horizontal lines If the problem is only with black or gray lines, check that you are using the correct settings to achieve printing at 600 dpi (see page 3-14). If problem is only with vertical black or gray lines, run the Black Cartridge Alignment Procedure, explained on page 5-4. 450C/488CA If problem is with any other color or orientation, run the Color Cartridge Test procedure, explained on page 5-8. If there are slightly warped lines The media itself may be warped. This can happen if it has been used or stored in an extreme environment. For all environmental specifications, see page 10-5. 450C/488CA If there are color "shadows" In the example on the left, a magenta "shadow", which is not part of the drawing, appears at the edge of a blue object. The cartridges need to be re-aligned. Run the Color Cartridge Test procedure, explained on page 5-8. If a cartridge is not printing at all Remove the faulty cartridge and check the print nozzles to make sure the protective tape has been removed. Look to see if the cartridge is out of ink. See page 7-2. Try priming the cartridge to clear the nozzles. See page 7-7. If the print quality appears to be poor just in one part of the print Did you raise the cover during printing? Although the print continues after the interruption, the print quality in the area of the interruption cannot be guaranteed. 9-14
-
 1
1 -
2
-
3
-
4
-
5
-
6
-
7
-
8
-
9
-
10
-
11
-
12
-
13
-
14
-
15
-
16
-
17
-
18
-
19
-
20
-
21
-
22
-
23
-
24
-
25
-
26
-
27
-
28
-
29
-
30
-
31
-
32
-
33
-
34
-
35
-
36
-
37
-
38
-
39
-
40
-
41
-
42
-
43
-
44
-
45
-
46
-
47
-
48
-
49
-
50
-
51
-
52
-
53
-
54
-
55
-
56
-
57
-
58
-
59
-
60
-
61
-
62
-
63
-
64
-
65
-
66
-
67
-
68
-
69
-
70
-
71
-
72
-
73
-
74
-
75
-
76
-
77
-
78
-
79
-
80
-
81
-
82
-
83
-
84
-
85
-
86
-
87
-
88
-
89
-
90
-
91
-
92
-
93
-
94
-
95
-
96
-
97
-
98
-
99
-
100
-
101
-
102
-
103
-
104
-
105
-
106
-
107
-
108
-
109
-
110
-
111
-
112
-
113
-
114
-
115
-
116
-
117
-
118
-
119
-
120
-
121
-
122
-
123
-
124
-
125
-
126
-
127
-
128
-
129
-
130
-
131
-
132
-
133
-
134
-
135
-
136
-
137
-
138
-
139
-
140
-
141
-
142
-
143
-
144
-
 145
145 -
 146
146 -
 147
147 -
 148
148 -
 149
149 -
 150
150 -
 151
151 -
 152
152 -
 153
153 -
 154
154 -
 155
155 -
156
-
157
-
158
-
159
-
160
-
161
-
162
-
163
-
164
-
165
-
166
-
167
-
168
-
169
-
170
-
171
-
172
-
173
-
174
-
175
-
176
-
177
-
178
-
179
-
180
-
181
-
182
-
183
-
184
-
185
-
186
-
187
-
188
-
189
-
190
-
191
-
192
-
193
 |
 |
