HP 9500hdn HP Color LaserJet 9500n and 9500hdn - Software Technical Reference - Page 163
Quick Copy, Stored Job, Require PIN to Print option, Job Notification Options, Job ID restrictions
 |
UPC - 808736429689
View all HP 9500hdn manuals
Add to My Manuals
Save this manual to your list of manuals |
Page 163 highlights
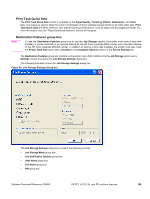
Quick Copy Note When you select Quick Copy option, a copy of the print job is stored on the hard disk, after which you can print additional copies of a print job by using the control panel. The number of quick-copy print jobs that can be stored in the printer is set from the printer control panel. The printer configuration can be set to hold a maximum of 50 quick-copy or proof-and-hold jobs. The number is set at the printer control panel in the Configuration menu, and the default is 32. When this preset limit is reached, a newer document overwrites the oldest document. Also, a document that has the same user and job name as one that is already stored on the hard disk overwrites the existing document. Quick Copy jobs are deleted if the power to the printer is removed. Stored Job Use the Stored Job option to send a print job directly to the printer hard disk. The print job is stored in the printer as if the printer is an electronic file cabinet. After the print job is stored in the printer hard disk, you can print the job by using the printer control panel. The job remains stored on the printer until it is deleted or overwritten by a document with the same user and job names. Stored jobs remain on the printer hard disk when power is interrupted. Use this feature for forms and other common or shared documents. Require PIN to Print option A stored job can be managed in two ways: as either a private or a public job. Use a private stored job to send a print job directly to the printer memory, which can then be printed only after you type in a PIN at the printer control panel. (You can set the PIN in the Print dialog box.) After the job is printed, the job remains in the printer memory and can be printed again by using the printer control panel. This feature is useful when you are printing sensitive or confidential documents that you do not want to leave in an output bin after printing. Private mode is initiated by clicking the Require PIN to Print check box. In this mode, a PIN typed at the control panel is required to release the job. Note The box labeled PIN is usually inactive. The Require PIN to Print option is activated if you click Stored Job. If selected, you must enter a PIN to make the stored job private. A Stored Job that has been made private is not the same as a Private Job. The Private Jobs are deleted from the printer memory after they are printed. The Stored Jobs that have been made private are retained in the printer memory after printing, but they require that you type in a PIN each time you want to print a private Stored Job. Job Notification Options The only control that appears in the Job Notification Options group box is the Display Job ID When Printing check box, which is selected by default. Selecting this option causes your document to be identified in the printer control panel by user name and job name when you print using a Job Storage feature. Click the Display Job ID When Printing check box to clear it if you do not want the user name and job name to appear in the printer control panel. Job ID restrictions The Job Name and the User Name fields can contain no more than 16 characters each, and are limited to A through Z and 0 through 9, because the name is displayed on the printer control panel. If you try to enter a lowercase character, it automatically shifts to uppercase. If you try to enter a character with an ASCII code of less than 32 or greater than 126 characters, the character is removed from the edit field, along with all of the characters that follow it. If you try to enter more than 16 characters, any character beyond 16 is truncated. When the dialog box is closed, or as soon as the focus is removed from the edit box (that is, when the Tab key is pressed or another control is selected), an empty string is replaced with "Untitled". In those languages for which "Untitled" cannot be translated without the use of invalid characters, the driver uses a string of three dashes. The acceptable characters for Job Name and User Name vary for each operating system. The string must meet requirements to be able to appear on the printer control panel display. Software Technical Reference ENWW HP PCL 6, PCL 5c, and PS unidriver features 161
-
 1
1 -
2
-
3
-
4
-
5
-
6
-
7
-
8
-
9
-
10
-
11
-
12
-
13
-
14
-
15
-
16
-
17
-
18
-
19
-
20
-
21
-
22
-
23
-
24
-
25
-
26
-
27
-
28
-
29
-
30
-
31
-
32
-
33
-
34
-
35
-
36
-
37
-
38
-
39
-
40
-
41
-
42
-
43
-
44
-
45
-
46
-
47
-
48
-
49
-
50
-
51
-
52
-
53
-
54
-
55
-
56
-
57
-
58
-
59
-
60
-
61
-
62
-
63
-
64
-
65
-
66
-
67
-
68
-
69
-
70
-
71
-
72
-
73
-
74
-
75
-
76
-
77
-
78
-
79
-
80
-
81
-
82
-
83
-
84
-
85
-
86
-
87
-
88
-
89
-
90
-
91
-
92
-
93
-
94
-
95
-
96
-
97
-
98
-
99
-
100
-
101
-
102
-
103
-
104
-
105
-
106
-
107
-
108
-
109
-
110
-
111
-
112
-
113
-
114
-
115
-
116
-
117
-
118
-
119
-
120
-
121
-
122
-
123
-
124
-
125
-
126
-
127
-
128
-
129
-
130
-
131
-
132
-
133
-
134
-
135
-
136
-
137
-
138
-
139
-
140
-
141
-
142
-
143
-
144
-
145
-
146
-
147
-
148
-
149
-
150
-
151
-
152
-
153
-
154
-
155
-
156
-
157
-
 158
158 -
 159
159 -
 160
160 -
 161
161 -
 162
162 -
 163
163 -
 164
164 -
 165
165 -
 166
166 -
 167
167 -
 168
168 -
169
-
170
-
171
-
172
-
173
-
174
-
175
-
176
-
177
-
178
-
179
-
180
-
181
-
182
-
183
-
184
-
185
-
186
-
187
-
188
-
189
-
190
-
191
-
192
-
193
-
194
-
195
-
196
-
197
-
198
-
199
-
200
-
201
-
202
-
203
-
204
-
205
-
206
-
207
-
208
-
209
-
210
-
211
-
212
-
213
-
214
-
215
-
216
-
217
-
218
-
219
-
220
-
221
-
222
-
223
-
224
-
225
-
226
-
227
-
228
-
229
-
230
-
231
-
232
-
233
-
234
-
235
-
236
-
237
-
238
-
239
-
240
-
241
-
242
-
243
-
244
-
245
-
246
-
247
-
248
-
249
-
250
-
251
-
252
-
253
-
254
-
255
-
256
-
257
-
258
-
259
-
260
-
261
-
262
-
263
-
264
-
265
-
266
-
267
-
268
-
269
-
270
-
271
-
272
-
273
-
274
-
275
-
276
-
277
-
278
-
279
-
280
-
281
-
282
-
283
-
284
-
285
-
286
 |
 |
