HP 9500hdn HP Color LaserJet 9500n and 9500hdn - Software Technical Reference - Page 165
Releasing private jobs stored at the printer, Deleting a print job, Document preview image
 |
UPC - 808736429689
View all HP 9500hdn manuals
Add to My Manuals
Save this manual to your list of manuals |
Page 165 highlights
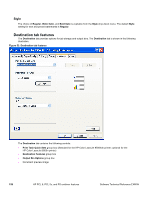
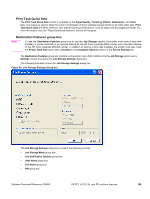
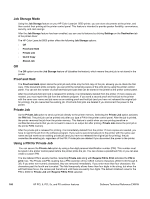
5. Click Settings... . The Job Storage Settings dialog box appears. 6. You can then select one of the Job Storage options described above by clicking the appropriate option button. These instructions are specific to the Windows 95, Windows 98, Windows Me, Windows NT 4.0, Windows 2000, Windows XP, and Windows Server 2003 environments when using the latest available PCL 5c, PCL 6, and PS drivers. Releasing private jobs stored at the printer After you send a print job using the Job Storage feature, you can release the job to print by using the printer control panel. 1. Press the select button (the one with the check mark) to enter the menus. 2. Press the up and down buttons to scroll to RETRIEVE JOB, and then press the select button. 3. Press the up and down buttons to scroll to your job and press the select button. 4. Press the up and down buttons to scroll to PRINT. (The PRINT selection might have an icon next to it indicating that the job is locked. If so, type the PIN, and then press the select button.) Press the select button. Deleting a print job Sometimes it is necessary to delete a print job from the printer memory. You can do this from the printer control panel. 1. Press the select button (the one with the check mark) to enter the menus. 2. Press the up and down buttons to scroll to RETRIEVE JOB. 3. Press the up and down buttons to scroll to your job name and press the select button. 4. Press the up and down buttons to scroll to DELETE. (The DELETE selection might have an icon next to it indicating that the job is locked. If so, type the PIN number, and then press the select button.) Document preview image The preview image is a color, line-drawn image of a page that represents graphics and text. The preview image appears in the upper-right corner of the Paper/Quality, Finishing, Effects, Destination, and Color tabs. For more information about the document preview image, see the "Paper/Quality tab features" section of this document. Software Technical Reference ENWW HP PCL 6, PCL 5c, and PS unidriver features 163
-
 1
1 -
2
-
3
-
4
-
5
-
6
-
7
-
8
-
9
-
10
-
11
-
12
-
13
-
14
-
15
-
16
-
17
-
18
-
19
-
20
-
21
-
22
-
23
-
24
-
25
-
26
-
27
-
28
-
29
-
30
-
31
-
32
-
33
-
34
-
35
-
36
-
37
-
38
-
39
-
40
-
41
-
42
-
43
-
44
-
45
-
46
-
47
-
48
-
49
-
50
-
51
-
52
-
53
-
54
-
55
-
56
-
57
-
58
-
59
-
60
-
61
-
62
-
63
-
64
-
65
-
66
-
67
-
68
-
69
-
70
-
71
-
72
-
73
-
74
-
75
-
76
-
77
-
78
-
79
-
80
-
81
-
82
-
83
-
84
-
85
-
86
-
87
-
88
-
89
-
90
-
91
-
92
-
93
-
94
-
95
-
96
-
97
-
98
-
99
-
100
-
101
-
102
-
103
-
104
-
105
-
106
-
107
-
108
-
109
-
110
-
111
-
112
-
113
-
114
-
115
-
116
-
117
-
118
-
119
-
120
-
121
-
122
-
123
-
124
-
125
-
126
-
127
-
128
-
129
-
130
-
131
-
132
-
133
-
134
-
135
-
136
-
137
-
138
-
139
-
140
-
141
-
142
-
143
-
144
-
145
-
146
-
147
-
148
-
149
-
150
-
151
-
152
-
153
-
154
-
155
-
156
-
157
-
158
-
159
-
 160
160 -
 161
161 -
 162
162 -
 163
163 -
 164
164 -
 165
165 -
 166
166 -
 167
167 -
 168
168 -
 169
169 -
 170
170 -
171
-
172
-
173
-
174
-
175
-
176
-
177
-
178
-
179
-
180
-
181
-
182
-
183
-
184
-
185
-
186
-
187
-
188
-
189
-
190
-
191
-
192
-
193
-
194
-
195
-
196
-
197
-
198
-
199
-
200
-
201
-
202
-
203
-
204
-
205
-
206
-
207
-
208
-
209
-
210
-
211
-
212
-
213
-
214
-
215
-
216
-
217
-
218
-
219
-
220
-
221
-
222
-
223
-
224
-
225
-
226
-
227
-
228
-
229
-
230
-
231
-
232
-
233
-
234
-
235
-
236
-
237
-
238
-
239
-
240
-
241
-
242
-
243
-
244
-
245
-
246
-
247
-
248
-
249
-
250
-
251
-
252
-
253
-
254
-
255
-
256
-
257
-
258
-
259
-
260
-
261
-
262
-
263
-
264
-
265
-
266
-
267
-
268
-
269
-
270
-
271
-
272
-
273
-
274
-
275
-
276
-
277
-
278
-
279
-
280
-
281
-
282
-
283
-
284
-
285
-
286
 |
 |
