HP Color LaserJet 4730 HP LaserJet MFP - Analog Fax Accessory Guide - Page 35
HP Color LaserJet 4730 - Multifunction Printer Manual
 |
View all HP Color LaserJet 4730 manuals
Add to My Manuals
Save this manual to your list of manuals |
Page 35 highlights
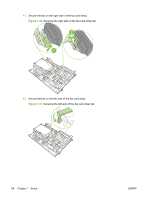
9. Align the fax accessory with the two guides. Make sure that the connector pins are aligned, and then push the fax accessory into place. Make sure that the fax accessory is securely connected to the formatter. Figure 1-34 Inserting the fax accessory 10. Replace the fax card strap. Figure 1-35 Replacing the fax card strap ENWW Installing the fax accessory 27
-
 1
1 -
2
-
3
-
4
-
5
-
6
-
7
-
8
-
9
-
10
-
11
-
12
-
13
-
14
-
15
-
16
-
17
-
18
-
19
-
20
-
21
-
22
-
23
-
24
-
25
-
26
-
27
-
28
-
29
-
 30
30 -
 31
31 -
 32
32 -
 33
33 -
 34
34 -
 35
35 -
 36
36 -
 37
37 -
 38
38 -
 39
39 -
 40
40 -
41
-
42
-
43
-
44
-
45
-
46
-
47
-
48
-
49
-
50
-
51
-
52
-
53
-
54
-
55
-
56
-
57
-
58
-
59
-
60
-
61
-
62
-
63
-
64
-
65
-
66
-
67
-
68
-
69
-
70
-
71
-
72
-
73
-
74
-
75
-
76
-
77
-
78
-
79
-
80
-
81
-
82
-
83
-
84
-
85
-
86
-
87
-
88
-
89
-
90
-
91
-
92
-
93
-
94
-
95
-
96
-
97
-
98
-
99
-
100
-
101
-
102
-
103
-
104
-
105
-
106
-
107
-
108
-
109
-
110
-
111
-
112
-
113
-
114
-
115
-
116
-
117
-
118
-
119
-
120
-
121
-
122
-
123
-
124
-
125
-
126
-
127
-
128
-
129
-
130
-
131
-
132
-
133
-
134
-
135
-
136
-
137
-
138
-
139
-
140
-
141
-
142
-
143
-
144
-
145
-
146
-
147
-
148
 |
 |

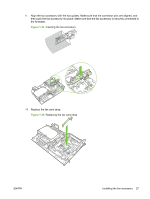
9.
Align the fax accessory with the two guides. Make sure that the connector pins are aligned, and
then push the fax accessory into place. Make sure that the fax accessory is securely connected to
the formatter.
Figure 1-34
Inserting the fax accessory
10.
Replace the fax card strap.
Figure 1-35
Replacing the fax card strap
ENWW
Installing the fax accessory
27