HP Color LaserJet 4730 HP LaserJet MFP - Analog Fax Accessory Guide - Page 96
Secure settings, Change your PIN
 |
View all HP Color LaserJet 4730 manuals
Add to My Manuals
Save this manual to your list of manuals |
Page 96 highlights
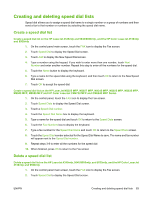
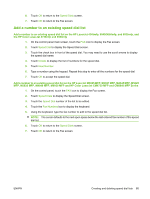
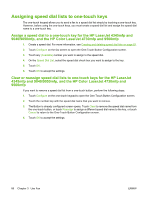
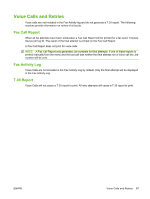
Secure settings Two settings, fax forwarding and fax printing, are secure features and require a PIN. The first time you access either setting, you will be required to create a PIN. After you create that PIN, it is used to access both features. That is, if a PIN that has been created for fax forwarding it is also used to access fax printing, or if the PIN was first created for fax printing, it must be used to access fax forwarding. Only one PIN can be created to access these secure settings. If fax call report is enabled with thumbnails, a report prints with a thumbnail of the first page of the fax when fax printing or fax forwarding is enabled. If you want secure fax printing, disable printing the thumbnail on the fax call report. Change your PIN This procedure describes how to change your existing PIN. CAUTION: Always save your PIN in a secure place. If you lose your PIN, you must contact HP Service Support for information about how to reset the PIN. For more information, see HP Customer Care on page 121. Change your PIN on the HP LaserJet 4345mfp and 9040/9050mfp, and the HP Color LaserJet 4730mfp and 9500mfp 1. On the control panel, press the Menu button to open the main menu. 2. Touch FAX to open the fax menu. 3. Scroll to and touch FAX RECEIVE. 4. Scroll to and touch FORWARD FAX or Fax Printing to open the settings screen. 5. Touch Change PIN to open the PIN screen. 6. Using the keypad, type the PIN (at least four digits), and then touch OK to open the Change PIN screen. 7. Type a new PIN by using the keypad, and then press OK. 8. Verify the PIN by typing it again, and then touch OK to save the new PIN. Change your PIN on the HP LaserJet M3025 MFP, M3027 MFP, M4345 MFP, M5025 MFP, M5035 MFP, M9040 MFP, M9050 MFP and HP Color LaserJet CM4730 MFP and CM6040 MFP Series 1. On the control panel, scroll to and touch the Administration icon to open the Administration menu. 2. Touch Default Job Options to display the Default Job Options menu. 3. Touch Default Fax Options to display the Default Fax Options menu. 4. Touch Fax Receive to display the Fax Receive screen. 5. Touch Fax Forwarding to display the PIN screen. 6. Using the keypad, type the PIN (at least four digits), and then touch OK to display the Fax Forwarding screen. 7. Touch Change PIN to display the PIN screen. 8. Using the keypad, type the new PIN (at least four digits), and then touch OK. 88 Chapter 3 Use Fax ENWW
-
 1
1 -
2
-
3
-
4
-
5
-
6
-
7
-
8
-
9
-
10
-
11
-
12
-
13
-
14
-
15
-
16
-
17
-
18
-
19
-
20
-
21
-
22
-
23
-
24
-
25
-
26
-
27
-
28
-
29
-
30
-
31
-
32
-
33
-
34
-
35
-
36
-
37
-
38
-
39
-
40
-
41
-
42
-
43
-
44
-
45
-
46
-
47
-
48
-
49
-
50
-
51
-
52
-
53
-
54
-
55
-
56
-
57
-
58
-
59
-
60
-
61
-
62
-
63
-
64
-
65
-
66
-
67
-
68
-
69
-
70
-
71
-
72
-
73
-
74
-
75
-
76
-
77
-
78
-
79
-
80
-
81
-
82
-
83
-
84
-
85
-
86
-
87
-
88
-
89
-
90
-
 91
91 -
 92
92 -
 93
93 -
 94
94 -
 95
95 -
 96
96 -
 97
97 -
 98
98 -
 99
99 -
 100
100 -
 101
101 -
102
-
103
-
104
-
105
-
106
-
107
-
108
-
109
-
110
-
111
-
112
-
113
-
114
-
115
-
116
-
117
-
118
-
119
-
120
-
121
-
122
-
123
-
124
-
125
-
126
-
127
-
128
-
129
-
130
-
131
-
132
-
133
-
134
-
135
-
136
-
137
-
138
-
139
-
140
-
141
-
142
-
143
-
144
-
145
-
146
-
147
-
148
 |
 |
