HP Deskjet 9800 HP Deskjet 9800 - User Guide - Page 35
If you are installing a new print cartridge, CAUTION
 |
View all HP Deskjet 9800 manuals
Add to My Manuals
Save this manual to your list of manuals |
Page 35 highlights
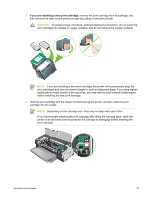
3 If you are installing a new print cartridge, remove the print cartridge from its package, and then remove the clear nozzle protective tape by pulling on the pink pull-tab. CAUTION To prevent clogs, ink failure, and bad electrical connections, do not touch the print cartridge ink nozzles or copper contacts, and do not remove the copper contacts. NOTE If you are installing a new print cartridge, the printer will automatically align the print cartridges and use one sheet of paper to print an alignment page. If you have higherquality photo media loaded in the input tray, you may want to load a sheet of plain paper before installing the new print cartridge. 4 Hold the print cartridge with the copper contacts facing the printer, and then slide the print cartridge into the cradle. NOTE Depending on the cartridge size, they may not align with each other. If you have trouble inserting the print cartridge after lifting the carriage latch, verify the printer is on and wait a few seconds for the carriage to disengage before inserting the print cartridge. Using the print cartridges 25
-
 1
1 -
2
-
3
-
4
-
5
-
6
-
7
-
8
-
9
-
10
-
11
-
12
-
13
-
14
-
15
-
16
-
17
-
18
-
19
-
20
-
21
-
22
-
23
-
24
-
25
-
26
-
27
-
28
-
29
-
 30
30 -
 31
31 -
 32
32 -
 33
33 -
 34
34 -
 35
35 -
 36
36 -
 37
37 -
 38
38 -
 39
39 -
 40
40 -
41
-
42
-
43
-
44
-
45
-
46
-
47
-
48
-
49
-
50
-
51
-
52
-
53
-
54
-
55
-
56
-
57
-
58
-
59
-
60
-
61
-
62
-
63
-
64
-
65
-
66
-
67
-
68
-
69
-
70
-
71
-
72
-
73
-
74
-
75
-
76
-
77
-
78
-
79
-
80
-
81
-
82
-
83
-
84
-
85
-
86
-
87
-
88
-
89
-
90
-
91
-
92
-
93
-
94
-
95
-
96
-
97
-
98
-
99
-
100
-
101
-
102
-
103
-
104
-
105
-
106
-
107
-
108
-
109
-
110
-
111
-
112
-
113
-
114
-
115
-
116
-
117
-
118
-
119
-
120
-
121
-
122
-
123
-
124
-
125
-
126
-
127
-
128
-
129
-
130
-
131
-
132
-
133
-
134
-
135
-
136
-
137
-
138
-
139
-
140
-
141
-
142
-
143
-
144
-
145
-
146
-
147
-
148
-
149
-
150
-
151
-
152
-
153
-
154
-
155
-
156
-
157
-
158
-
159
-
160
-
161
-
162
-
163
-
164
-
165
-
166
-
167
-
168
-
169
-
170
-
171
-
172
 |
 |
