HP Deskjet 9800 HP Deskjet 9800 - User Guide - Page 38
Maintaining the print cartridges - printer cartridge
 |
View all HP Deskjet 9800 manuals
Add to My Manuals
Save this manual to your list of manuals |
Page 38 highlights
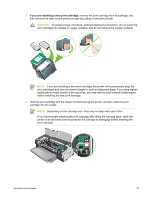
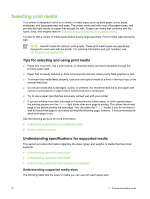
Maintaining the print cartridges The following tips will help maintain HP print cartridges and ensure consistent print quality: ■ Keep all print cartridges in their sealed packages until they are needed. Print cartridges should be stored at room temperatures between 15˚ to 35˚C (59˚ to 95˚F). ■ Do not remove the plastic tape covering the ink nozzles until you are ready to install the print cartridge in the printer. If the plastic tape has been removed from the print cartridge, do not attempt to reattach it. Reattaching the tape damages the print cartridge. CAUTION Do not drop the print cartridge. Dropping the print cartridge may damage it. Storing the print cartridges When the black or photo print cartridge is removed from the printer, store it in an airtight plastic container or in the Print Cartridge Protector. A Print Cartridge Protector is shipped with the photo print cartridges. NOTE If you store the print cartridge in an airtight plastic container, make sure that the tri-color, photo, and gray photo ink nozzles face down and that the black print cartridges are stored with the ink nozzles face up. To store the print cartridge in the Print Cartridge Protector 1 Insert the print cartridge into the protector and snap it securely in place. 2 To remove the print cartridge from the protector, press down and back on the tab inside the protector to release the print cartridge, and then remove the print cartridge. 28 3 Using print cartridges and accessories
-
 1
1 -
2
-
3
-
4
-
5
-
6
-
7
-
8
-
9
-
10
-
11
-
12
-
13
-
14
-
15
-
16
-
17
-
18
-
19
-
20
-
21
-
22
-
23
-
24
-
25
-
26
-
27
-
28
-
29
-
30
-
31
-
32
-
 33
33 -
 34
34 -
 35
35 -
 36
36 -
 37
37 -
 38
38 -
 39
39 -
 40
40 -
 41
41 -
 42
42 -
 43
43 -
44
-
45
-
46
-
47
-
48
-
49
-
50
-
51
-
52
-
53
-
54
-
55
-
56
-
57
-
58
-
59
-
60
-
61
-
62
-
63
-
64
-
65
-
66
-
67
-
68
-
69
-
70
-
71
-
72
-
73
-
74
-
75
-
76
-
77
-
78
-
79
-
80
-
81
-
82
-
83
-
84
-
85
-
86
-
87
-
88
-
89
-
90
-
91
-
92
-
93
-
94
-
95
-
96
-
97
-
98
-
99
-
100
-
101
-
102
-
103
-
104
-
105
-
106
-
107
-
108
-
109
-
110
-
111
-
112
-
113
-
114
-
115
-
116
-
117
-
118
-
119
-
120
-
121
-
122
-
123
-
124
-
125
-
126
-
127
-
128
-
129
-
130
-
131
-
132
-
133
-
134
-
135
-
136
-
137
-
138
-
139
-
140
-
141
-
142
-
143
-
144
-
145
-
146
-
147
-
148
-
149
-
150
-
151
-
152
-
153
-
154
-
155
-
156
-
157
-
158
-
159
-
160
-
161
-
162
-
163
-
164
-
165
-
166
-
167
-
168
-
169
-
170
-
171
-
172
 |
 |
