HP LaserJet 5p/mp Service Manual - Page 144
Warning, Caution
 |
View all HP LaserJet 5p/mp manuals
Add to My Manuals
Save this manual to your list of manuals |
Page 144 highlights
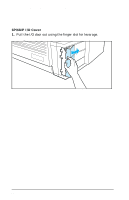
HP LaserJet 5P/5MP, 6P/6MP Printer Service Supplement Removal and Replacement Removal and Replacement Overview The removal and replacement procedures for many HP LaserJet 5P/5MP, 6P/6MP printer Field Replaceable Units (FRUs) are identical to the HP LaserJet 4L and 4P printers. This section describes only those differences unique to the HP LaserJet 5P/5MP, 6P/6MP for removing: • Power Door • I/O Cover • Left Side Cover • Top Cover • Tray 1 Pickup Assembly • Formatter Board Assembly • Fuser Assembly • DC Controller Assembly WARNING! Unplug the power cord from the power outlet before attempting to service the printer. If this warning is not followed, severe injury may result. Never operate or service the printer with the protective cover removed from the Laser/Scanner Assembly. The reflected beam, although invisible, can damage your eyes. CAUTION The printer contains parts that are electrostatic discharge (ESD) sensitive. Always service printers at an ESD protected workstation. 41
-
 1
1 -
2
-
3
-
4
-
5
-
6
-
7
-
8
-
9
-
10
-
11
-
12
-
13
-
14
-
15
-
16
-
17
-
18
-
19
-
20
-
21
-
22
-
23
-
24
-
25
-
26
-
27
-
28
-
29
-
30
-
31
-
32
-
33
-
34
-
35
-
36
-
37
-
38
-
39
-
40
-
41
-
42
-
43
-
44
-
45
-
46
-
47
-
48
-
49
-
50
-
51
-
52
-
53
-
54
-
55
-
56
-
57
-
58
-
59
-
60
-
61
-
62
-
63
-
64
-
65
-
66
-
67
-
68
-
69
-
70
-
71
-
72
-
73
-
74
-
75
-
76
-
77
-
78
-
79
-
80
-
81
-
82
-
83
-
84
-
85
-
86
-
87
-
88
-
89
-
90
-
91
-
92
-
93
-
94
-
95
-
96
-
97
-
98
-
99
-
100
-
101
-
102
-
103
-
104
-
105
-
106
-
107
-
108
-
109
-
110
-
111
-
112
-
113
-
114
-
115
-
116
-
117
-
118
-
119
-
120
-
121
-
122
-
123
-
124
-
125
-
126
-
127
-
128
-
129
-
130
-
131
-
132
-
133
-
134
-
135
-
136
-
137
-
138
-
 139
139 -
 140
140 -
 141
141 -
 142
142 -
 143
143 -
 144
144 -
 145
145 -
 146
146 -
 147
147 -
 148
148 -
 149
149 -
150
-
151
-
152
-
153
-
154
-
155
-
156
-
157
-
158
-
159
-
160
-
161
-
162
-
163
-
164
-
165
-
166
-
167
-
168
-
169
-
170
-
171
-
172
-
173
-
174
-
175
-
176
-
177
-
178
-
179
-
180
-
181
-
182
-
183
-
184
-
185
-
186
-
187
-
188
-
189
-
190
-
191
-
192
-
193
-
194
-
195
-
196
-
197
-
198
-
199
-
200
-
201
-
202
-
203
-
204
-
205
-
206
-
207
-
208
-
209
-
210
-
211
-
212
-
213
-
214
 |
 |