HP LaserJet 5p/mp Service Manual - Page 158
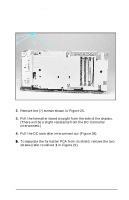
Slide the cover to the left and out of the printer.
 |
View all HP LaserJet 5p/mp manuals
Add to My Manuals
Save this manual to your list of manuals |
Page 158 highlights
HP LaserJet 5P/5MP, 6P/6MP Printer Service Supplement Removal and Replacement Removing the Fusing Assembly 1. Remove the top cover assemblies. 2. Locate the black plastic fuser cover at the back of the printer. Press the release tab (callout 1 in Figure 27). 3. Slide the cover all the way to the right. 4. Pull the left end of the strip toward you at a 45° angle. 5. Slide the cover to the left and out of the printer. 6. Remove the four screws (2 self-tapping screws, two machine screws with washers) directly below the fuser assembly. 7. Grasp the fuser by the green plastic handle and pull out from the printer. Figure 27 Removing the fuser cover. 55
-
 1
1 -
2
-
3
-
4
-
5
-
6
-
7
-
8
-
9
-
10
-
11
-
12
-
13
-
14
-
15
-
16
-
17
-
18
-
19
-
20
-
21
-
22
-
23
-
24
-
25
-
26
-
27
-
28
-
29
-
30
-
31
-
32
-
33
-
34
-
35
-
36
-
37
-
38
-
39
-
40
-
41
-
42
-
43
-
44
-
45
-
46
-
47
-
48
-
49
-
50
-
51
-
52
-
53
-
54
-
55
-
56
-
57
-
58
-
59
-
60
-
61
-
62
-
63
-
64
-
65
-
66
-
67
-
68
-
69
-
70
-
71
-
72
-
73
-
74
-
75
-
76
-
77
-
78
-
79
-
80
-
81
-
82
-
83
-
84
-
85
-
86
-
87
-
88
-
89
-
90
-
91
-
92
-
93
-
94
-
95
-
96
-
97
-
98
-
99
-
100
-
101
-
102
-
103
-
104
-
105
-
106
-
107
-
108
-
109
-
110
-
111
-
112
-
113
-
114
-
115
-
116
-
117
-
118
-
119
-
120
-
121
-
122
-
123
-
124
-
125
-
126
-
127
-
128
-
129
-
130
-
131
-
132
-
133
-
134
-
135
-
136
-
137
-
138
-
139
-
140
-
141
-
142
-
143
-
144
-
145
-
146
-
147
-
148
-
149
-
150
-
151
-
152
-
 153
153 -
 154
154 -
 155
155 -
 156
156 -
 157
157 -
 158
158 -
 159
159 -
 160
160 -
 161
161 -
 162
162 -
 163
163 -
164
-
165
-
166
-
167
-
168
-
169
-
170
-
171
-
172
-
173
-
174
-
175
-
176
-
177
-
178
-
179
-
180
-
181
-
182
-
183
-
184
-
185
-
186
-
187
-
188
-
189
-
190
-
191
-
192
-
193
-
194
-
195
-
196
-
197
-
198
-
199
-
200
-
201
-
202
-
203
-
204
-
205
-
206
-
207
-
208
-
209
-
210
-
211
-
212
-
213
-
214
 |
 |

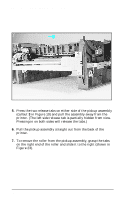
Removing the Fusing Assembly
1.
Remove the top cover assemblies.
2.
Locate the black plastic fuser cover at the back of the printer.
Press the release tab (callout
1
in Figure 27).
3.
Slide the cover all the way to the right.
4.
Pull the left end of the strip toward you at a 45° angle.
5.
Slide the cover to the left and out of the printer.
6.
Remove the four screws (2 self-tapping screws, two machine
screws with washers) directly below the fuser assembly.
7.
Grasp the fuser by the green plastic handle and pull out from
the printer.
Figure 27
Removing the fuser cover.
HP LaserJet 5P/5MP, 6P/6MP Printer Service Supplement
Removal and Replacement
55