HP LaserJet 5p/mp Service Manual - Page 146
P/5MP I/O Cover
 |
View all HP LaserJet 5p/mp manuals
Add to My Manuals
Save this manual to your list of manuals |
Page 146 highlights
HP LaserJet 5P/5MP, 6P/6MP Printer Service Supplement Removal and Replacement Removing the Power Door The Power Door is located on the right rear of the printer. 1. Ensure the power to the printer is turned OFF. 2. Grasp the power door by the finger slot directly above the power cord, and swing the rear of the door out and forward. The door easily tilts and lifts out. 3. Unplug the power cord from the printer power socket. Removing the I/O Cover The I/O Cover is located to the left rear of the printer. 5P/5MP I/O Cover 1. Locate the two release tabs shown in Figure 15. Press the tabs in, and swing the rear of the door out and forward. The door easily lifts away from the printer. Figure 15 5P/5MP I/O Cover Release Tabs 43
-
 1
1 -
2
-
3
-
4
-
5
-
6
-
7
-
8
-
9
-
10
-
11
-
12
-
13
-
14
-
15
-
16
-
17
-
18
-
19
-
20
-
21
-
22
-
23
-
24
-
25
-
26
-
27
-
28
-
29
-
30
-
31
-
32
-
33
-
34
-
35
-
36
-
37
-
38
-
39
-
40
-
41
-
42
-
43
-
44
-
45
-
46
-
47
-
48
-
49
-
50
-
51
-
52
-
53
-
54
-
55
-
56
-
57
-
58
-
59
-
60
-
61
-
62
-
63
-
64
-
65
-
66
-
67
-
68
-
69
-
70
-
71
-
72
-
73
-
74
-
75
-
76
-
77
-
78
-
79
-
80
-
81
-
82
-
83
-
84
-
85
-
86
-
87
-
88
-
89
-
90
-
91
-
92
-
93
-
94
-
95
-
96
-
97
-
98
-
99
-
100
-
101
-
102
-
103
-
104
-
105
-
106
-
107
-
108
-
109
-
110
-
111
-
112
-
113
-
114
-
115
-
116
-
117
-
118
-
119
-
120
-
121
-
122
-
123
-
124
-
125
-
126
-
127
-
128
-
129
-
130
-
131
-
132
-
133
-
134
-
135
-
136
-
137
-
138
-
139
-
140
-
 141
141 -
 142
142 -
 143
143 -
 144
144 -
 145
145 -
 146
146 -
 147
147 -
 148
148 -
 149
149 -
 150
150 -
 151
151 -
152
-
153
-
154
-
155
-
156
-
157
-
158
-
159
-
160
-
161
-
162
-
163
-
164
-
165
-
166
-
167
-
168
-
169
-
170
-
171
-
172
-
173
-
174
-
175
-
176
-
177
-
178
-
179
-
180
-
181
-
182
-
183
-
184
-
185
-
186
-
187
-
188
-
189
-
190
-
191
-
192
-
193
-
194
-
195
-
196
-
197
-
198
-
199
-
200
-
201
-
202
-
203
-
204
-
205
-
206
-
207
-
208
-
209
-
210
-
211
-
212
-
213
-
214
 |
 |

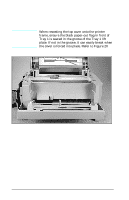
Removing the Power Door
The Power Door is located on the right rear of the printer.
1.
Ensure the power to the printer is turned OFF.
2.
Grasp the power door by the finger slot directly above the power
cord, and swing the rear of the door out and forward. The door
easily tilts and lifts out.
3.
Unplug the power cord from the printer power socket.
Removing the I/O Cover
The I/O Cover is located to the left rear of the printer.
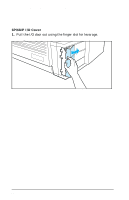
5P/5MP I/O Cover
1.
Locate the two release tabs shown in Figure 15. Press the tabs
in, and swing the rear of the door out and forward. The door
easily lifts away from the printer.
Figure 15
5P/5MP I/O Cover Release Tabs
HP LaserJet 5P/5MP, 6P/6MP Printer Service Supplement
Removal and Replacement
43