HP LaserJet 5p/mp Service Manual - Page 152
Removing Tray 1.
 |
View all HP LaserJet 5p/mp manuals
Add to My Manuals
Save this manual to your list of manuals |
Page 152 highlights
HP LaserJet 5P/5MP, 6P/6MP Printer Service Supplement Removal and Replacement Removing the Tray 1 Pickup Assembly 1. Remove Tray 1 by opening the tray at a 45° angle and pulling up on the tray (Figure 21). Figure 21 Removing Tray 1. 2. Unplug the two cables (Callout 2 in Figure 22) by grasping the cables where they attach to the plug and pulling straight back. 3. Route the cables through the right side of the printer chassis and bring them to the front. 4. Remove the 5 screws (callout 1 in Figure 22) from the front of the pickup assembly. (Two screws are adjacent in the lower left corner.) 49
-
 1
1 -
2
-
3
-
4
-
5
-
6
-
7
-
8
-
9
-
10
-
11
-
12
-
13
-
14
-
15
-
16
-
17
-
18
-
19
-
20
-
21
-
22
-
23
-
24
-
25
-
26
-
27
-
28
-
29
-
30
-
31
-
32
-
33
-
34
-
35
-
36
-
37
-
38
-
39
-
40
-
41
-
42
-
43
-
44
-
45
-
46
-
47
-
48
-
49
-
50
-
51
-
52
-
53
-
54
-
55
-
56
-
57
-
58
-
59
-
60
-
61
-
62
-
63
-
64
-
65
-
66
-
67
-
68
-
69
-
70
-
71
-
72
-
73
-
74
-
75
-
76
-
77
-
78
-
79
-
80
-
81
-
82
-
83
-
84
-
85
-
86
-
87
-
88
-
89
-
90
-
91
-
92
-
93
-
94
-
95
-
96
-
97
-
98
-
99
-
100
-
101
-
102
-
103
-
104
-
105
-
106
-
107
-
108
-
109
-
110
-
111
-
112
-
113
-
114
-
115
-
116
-
117
-
118
-
119
-
120
-
121
-
122
-
123
-
124
-
125
-
126
-
127
-
128
-
129
-
130
-
131
-
132
-
133
-
134
-
135
-
136
-
137
-
138
-
139
-
140
-
141
-
142
-
143
-
144
-
145
-
146
-
 147
147 -
 148
148 -
 149
149 -
 150
150 -
 151
151 -
 152
152 -
 153
153 -
 154
154 -
 155
155 -
 156
156 -
 157
157 -
158
-
159
-
160
-
161
-
162
-
163
-
164
-
165
-
166
-
167
-
168
-
169
-
170
-
171
-
172
-
173
-
174
-
175
-
176
-
177
-
178
-
179
-
180
-
181
-
182
-
183
-
184
-
185
-
186
-
187
-
188
-
189
-
190
-
191
-
192
-
193
-
194
-
195
-
196
-
197
-
198
-
199
-
200
-
201
-
202
-
203
-
204
-
205
-
206
-
207
-
208
-
209
-
210
-
211
-
212
-
213
-
214
 |
 |

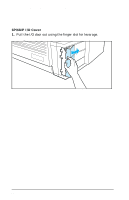
Removing the Tray 1 Pickup Assembly
1.
Remove Tray 1 by opening the tray at a 45° angle and pulling
up on the tray (Figure 21).
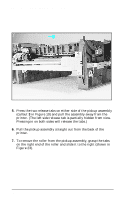
2.
Unplug the two cables (Callout
2
in Figure 22) by grasping the
cables where they attach to the plug and pulling straight back.
3.
Route the cables through the right side of the printer chassis
and bring them to the front.
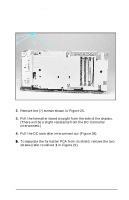
4.
Remove the 5 screws (callout
1
in Figure 22) from the front of
the pickup assembly. (Two screws are adjacent in the lower left
corner.)
Figure 21
Removing Tray 1.
HP LaserJet 5P/5MP, 6P/6MP Printer Service Supplement
Removal and Replacement
49