HP LaserJet 5p/mp Service Manual - Page 150
Releasing the Back Corner of the Top Cover
 |
View all HP LaserJet 5p/mp manuals
Add to My Manuals
Save this manual to your list of manuals |
Page 150 highlights
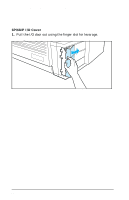
HP LaserJet 5P/5MP, 6P/6MP Printer Service Supplement Removal and Replacement 6. Lift the rear of the printer slightly. Grasp the lower right back corner. With your thumbs, flex the plastic toward you, up, and out. Figure 19 shows this process for the rear right corner. Repeat the process for the left rear corner. Note Note the position of the tabs and the catches carefully. This step may require considerable twisting and flexing of the plastic in order to free the release tabs. Figure 19 Releasing the Back Corner of the Top Cover 7. Lift the printer cover straight up. 47
-
 1
1 -
2
-
3
-
4
-
5
-
6
-
7
-
8
-
9
-
10
-
11
-
12
-
13
-
14
-
15
-
16
-
17
-
18
-
19
-
20
-
21
-
22
-
23
-
24
-
25
-
26
-
27
-
28
-
29
-
30
-
31
-
32
-
33
-
34
-
35
-
36
-
37
-
38
-
39
-
40
-
41
-
42
-
43
-
44
-
45
-
46
-
47
-
48
-
49
-
50
-
51
-
52
-
53
-
54
-
55
-
56
-
57
-
58
-
59
-
60
-
61
-
62
-
63
-
64
-
65
-
66
-
67
-
68
-
69
-
70
-
71
-
72
-
73
-
74
-
75
-
76
-
77
-
78
-
79
-
80
-
81
-
82
-
83
-
84
-
85
-
86
-
87
-
88
-
89
-
90
-
91
-
92
-
93
-
94
-
95
-
96
-
97
-
98
-
99
-
100
-
101
-
102
-
103
-
104
-
105
-
106
-
107
-
108
-
109
-
110
-
111
-
112
-
113
-
114
-
115
-
116
-
117
-
118
-
119
-
120
-
121
-
122
-
123
-
124
-
125
-
126
-
127
-
128
-
129
-
130
-
131
-
132
-
133
-
134
-
135
-
136
-
137
-
138
-
139
-
140
-
141
-
142
-
143
-
144
-
 145
145 -
 146
146 -
 147
147 -
 148
148 -
 149
149 -
 150
150 -
 151
151 -
 152
152 -
 153
153 -
 154
154 -
 155
155 -
156
-
157
-
158
-
159
-
160
-
161
-
162
-
163
-
164
-
165
-
166
-
167
-
168
-
169
-
170
-
171
-
172
-
173
-
174
-
175
-
176
-
177
-
178
-
179
-
180
-
181
-
182
-
183
-
184
-
185
-
186
-
187
-
188
-
189
-
190
-
191
-
192
-
193
-
194
-
195
-
196
-
197
-
198
-
199
-
200
-
201
-
202
-
203
-
204
-
205
-
206
-
207
-
208
-
209
-
210
-
211
-
212
-
213
-
214
 |
 |
6.
Lift the rear of the printer slightly. Grasp the lower right back
corner. With your thumbs, flex the plastic toward you, up, and
out. Figure 19 shows this process for the rear right corner.
Repeat the process for the left rear corner.
Note
Note the position of the tabs and the catches
carefully. This step may require considerable
twisting and flexing of the plastic in order to free
the release tabs.
7.
Lift the printer cover straight up.
Figure 19
Releasing the Back Corner of the Top Cover
HP LaserJet 5P/5MP, 6P/6MP Printer Service Supplement
Removal and Replacement
47