HP LaserJet 5p/mp Service Manual - Page 149
Removing the Top Cover Screws
 |
View all HP LaserJet 5p/mp manuals
Add to My Manuals
Save this manual to your list of manuals |
Page 149 highlights
HP LaserJet 5P/5MP, 6P/6MP Printer Service Supplement Removal and Replacement Removing the Top Cover 1. Remove the toner cartridge and paper cassette if they have not already been removed. 2. Remove the (4) self-tapping printer cover screws (Figure 18). Figure 18 Removing the Top Cover Screws 3. Grasp the lower left front corner of the top cover, and lift it forward and up. 4. Grasp the lower portion of the right front cover, and pull forward and up. 5. At the rear of the printer, lower the face-up output tray. 46
-
 1
1 -
2
-
3
-
4
-
5
-
6
-
7
-
8
-
9
-
10
-
11
-
12
-
13
-
14
-
15
-
16
-
17
-
18
-
19
-
20
-
21
-
22
-
23
-
24
-
25
-
26
-
27
-
28
-
29
-
30
-
31
-
32
-
33
-
34
-
35
-
36
-
37
-
38
-
39
-
40
-
41
-
42
-
43
-
44
-
45
-
46
-
47
-
48
-
49
-
50
-
51
-
52
-
53
-
54
-
55
-
56
-
57
-
58
-
59
-
60
-
61
-
62
-
63
-
64
-
65
-
66
-
67
-
68
-
69
-
70
-
71
-
72
-
73
-
74
-
75
-
76
-
77
-
78
-
79
-
80
-
81
-
82
-
83
-
84
-
85
-
86
-
87
-
88
-
89
-
90
-
91
-
92
-
93
-
94
-
95
-
96
-
97
-
98
-
99
-
100
-
101
-
102
-
103
-
104
-
105
-
106
-
107
-
108
-
109
-
110
-
111
-
112
-
113
-
114
-
115
-
116
-
117
-
118
-
119
-
120
-
121
-
122
-
123
-
124
-
125
-
126
-
127
-
128
-
129
-
130
-
131
-
132
-
133
-
134
-
135
-
136
-
137
-
138
-
139
-
140
-
141
-
142
-
143
-
 144
144 -
 145
145 -
 146
146 -
 147
147 -
 148
148 -
 149
149 -
 150
150 -
 151
151 -
 152
152 -
 153
153 -
 154
154 -
155
-
156
-
157
-
158
-
159
-
160
-
161
-
162
-
163
-
164
-
165
-
166
-
167
-
168
-
169
-
170
-
171
-
172
-
173
-
174
-
175
-
176
-
177
-
178
-
179
-
180
-
181
-
182
-
183
-
184
-
185
-
186
-
187
-
188
-
189
-
190
-
191
-
192
-
193
-
194
-
195
-
196
-
197
-
198
-
199
-
200
-
201
-
202
-
203
-
204
-
205
-
206
-
207
-
208
-
209
-
210
-
211
-
212
-
213
-
214
 |
 |

Removing the Top Cover
1.
Remove the toner cartridge and paper cassette if they have not
already been removed.
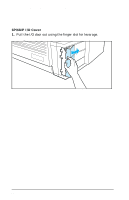
2.
Remove the (4) self-tapping printer cover screws (Figure 18).
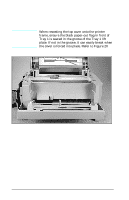
3.
Grasp the lower left front corner of the top cover, and lift it
forward and up.
4.
Grasp the lower portion of the right front cover, and pull
forward and up.
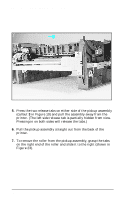
5.
At the rear of the printer, lower the face-up output tray.
Figure 18
Removing the Top Cover Screws
HP LaserJet 5P/5MP, 6P/6MP Printer Service Supplement
Removal and Replacement
46