HP R80xi HP OfficeJet R Series All-in-One - (English) Setup Guide and Faxing O - Page 11
Step 2 - Attach the Front-Panel Overlay
 |
UPC - 088698680193
View all HP R80xi manuals
Add to My Manuals
Save this manual to your list of manuals |
Page 11 highlights
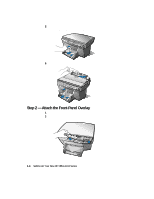
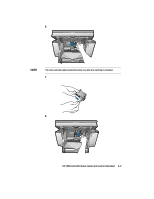
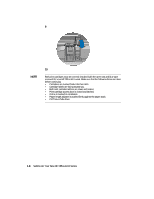
5 Remove the packaging materials (plastic wrap, cardboard insert, and packing tape) from the outside of the unit. 6 Remove the packaging materials from the ADF lid. Step 2 - Attach the Front-Panel Overlay 1 Align the front-panel overlay with the front panel buttons. 2 Push straight down firmly on both ends and the middle to snap the overlay into place. 1-4 Setting Up Your New HP OfficeJet R Series
-
 1
1 -
2
-
3
-
4
-
5
-
 6
6 -
 7
7 -
 8
8 -
 9
9 -
 10
10 -
 11
11 -
 12
12 -
 13
13 -
 14
14 -
 15
15 -
 16
16 -
17
-
18
-
19
-
20
-
21
-
22
-
23
-
24
-
25
-
26
-
27
-
28
-
29
-
30
-
31
-
32
-
33
-
34
-
35
-
36
-
37
-
38
-
39
-
40
-
41
-
42
-
43
-
44
-
45
-
46
-
47
-
48
-
49
-
50
-
51
-
52
-
53
-
54
-
55
-
56
-
57
-
58
-
59
-
60
-
61
-
62
-
63
 |
 |

1-4
Setting Up Your New HP OfficeJet R Series
5
Remove the packaging materials (plastic wrap, cardboard insert, and
packing tape) from the outside of the unit.
6
Remove the packaging materials from the ADF lid.
Step 2 — Attach the Front-Panel Overlay
1
Align the front-panel overlay with the front panel buttons.
2
Push straight down firmly on both ends and the middle to snap the
overlay into place.