HP R80xi HP OfficeJet R Series All-in-One - (English) Setup Guide and Faxing O - Page 24
Step 8 - Set Up for Faxing - review
 |
UPC - 088698680193
View all HP R80xi manuals
Add to My Manuals
Save this manual to your list of manuals |
Page 24 highlights
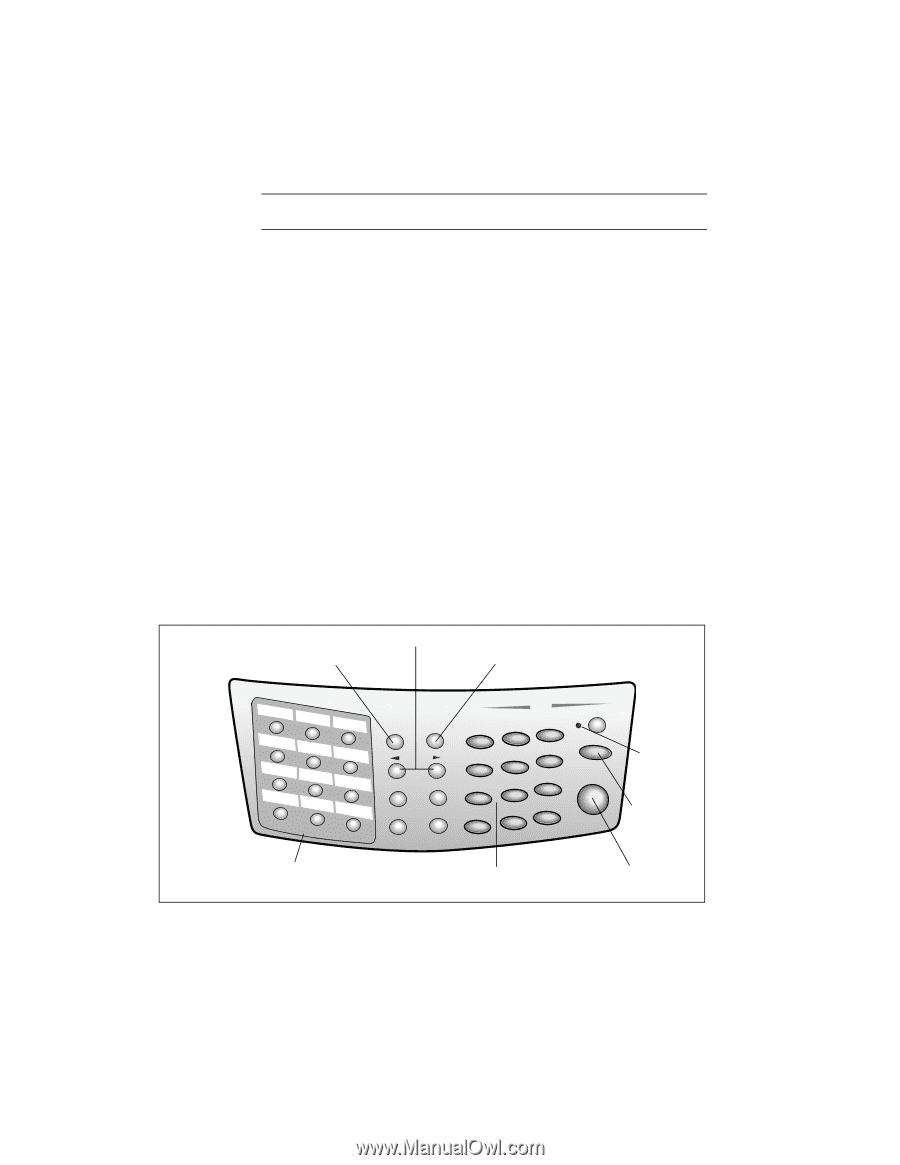
Changing the Front-Panel Language NOTE The HP OfficeJet product that contains the fax feature only supports English. To switch to a different language, do the following: 1 While holding down the Select/Resume button, press the Color Intensity button, and then release both buttons. The current language appears on the front-panel display. 2 Press the minus (-) or plus (+) button to scroll through the available languages until the language you need appears on the display. The available languages include: English, Español, Deutsch, Français, Italiano, Portugués, Nederlands, Dansk, Norsk, Svenska, and Suomi. 3 Press Select/Resume to choose the displayed language. The current paper size appears on the front-panel display. 4 Press the minus (-) or plus (+) button until the desired paper size appears on the display. 5 Press Select/Resume to choose the displayed paper size. Step 8 - Set Up for Faxing You are now ready to configure your HP OfficeJet to send and receive faxes. Reviewing the Fax Panel The following diagram highlights the main sections of the fax panel. Scroll through fax-setting options Access various fax settings Select or save a displayed entry 1 2 3 4 5 6 7 8 9 # 0 * One-Touch Speed Dials One-touch speed dialing ("Setting Up Speed Dialing" in Chapter 2) Fax Menu Enter/ Save Fax Resolution Fax Contrast Speed Dial Redial/ Pause 1 GHI 4 PQRS 7 Symbols * FA X ABC DEF 2 3 JKL MNO 5 6 TUV WXYZ 8 9 Space 0 # Auto Answer Stop Fax Start Fax Auto Answer light Stop a fax or exit the menu subsystem Dial fax numbers or enter text ("Sending Start a fax Faxes" or "Entering Text" in Chapter 2) HP OfficeJet R80 Setup Guide and Faxing Operation 1-17
-
 1
1 -
2
-
3
-
4
-
5
-
6
-
7
-
8
-
9
-
10
-
11
-
12
-
13
-
14
-
15
-
16
-
17
-
18
-
 19
19 -
 20
20 -
 21
21 -
 22
22 -
 23
23 -
 24
24 -
 25
25 -
 26
26 -
 27
27 -
 28
28 -
 29
29 -
30
-
31
-
32
-
33
-
34
-
35
-
36
-
37
-
38
-
39
-
40
-
41
-
42
-
43
-
44
-
45
-
46
-
47
-
48
-
49
-
50
-
51
-
52
-
53
-
54
-
55
-
56
-
57
-
58
-
59
-
60
-
61
-
62
-
63
 |
 |