HP R80xi HP OfficeJet R Series All-in-One - (English) Setup Guide and Faxing O - Page 15
Setting Up Your New HP OfficeJet R Series
 |
UPC - 088698680193
View all HP R80xi manuals
Add to My Manuals
Save this manual to your list of manuals |
Page 15 highlights
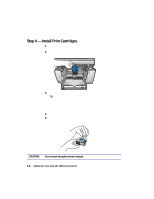
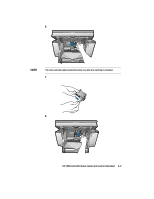
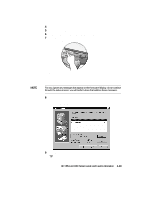
9 Lower each print-cartridge latch down onto the top of the cartridge, and push down until the latch locks firmly into place. NOTE 10 Close the print-cartridge access door. Both print cartridges must be correctly installed (with the green tab and blue tape removed) for your HP OfficeJet to work. Make sure that the following things are done before continuing: • Cartridges are pushed firmly into their slots. • Cartridge labels are facing toward you. • Both print-cartridge latches are down and locked. • Print-cartridge access door is closed and latched. • IN tray is pushed in completely. • Paper length adjuster is pushed firmly against the paper stack. • OUT tray is fully down. 1-8 Setting Up Your New HP OfficeJet R Series
-
 1
1 -
2
-
3
-
4
-
5
-
6
-
7
-
8
-
9
-
 10
10 -
 11
11 -
 12
12 -
 13
13 -
 14
14 -
 15
15 -
 16
16 -
 17
17 -
 18
18 -
 19
19 -
 20
20 -
21
-
22
-
23
-
24
-
25
-
26
-
27
-
28
-
29
-
30
-
31
-
32
-
33
-
34
-
35
-
36
-
37
-
38
-
39
-
40
-
41
-
42
-
43
-
44
-
45
-
46
-
47
-
48
-
49
-
50
-
51
-
52
-
53
-
54
-
55
-
56
-
57
-
58
-
59
-
60
-
61
-
62
-
63
 |
 |

1-8
Setting Up Your New HP OfficeJet R Series
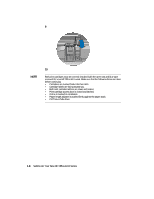
9
Lower each print-cartridge latch down onto the top of the cartridge, and
push down until the latch locks firmly into place.
10
Close the print-cartridge access door.
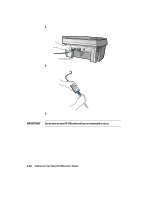
NOTE
Both print cartridges must be correctly installed (with the green tab and blue tape
removed) for your HP OfficeJet to work. Make sure that the following things are done
before continuing:
•
Cartridges are pushed firmly into their slots.
•
Cartridge labels are facing toward you.
•
Both print-cartridge latches are down and locked.
•
Print-cartridge access door is closed and latched.
•
IN tray is pushed in completely.
•
Paper length adjuster is pushed firmly against the paper stack.
•
OUT tray is fully down.