HP R80xi HP OfficeJet R Series All-in-One - (English) Setup Guide and Faxing O - Page 13
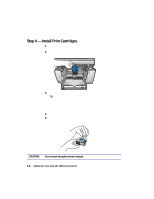
Step 4 - Install Print Cartridges - officejet cartridge
 |
UPC - 088698680193
View all HP R80xi manuals
Add to My Manuals
Save this manual to your list of manuals |
Page 13 highlights
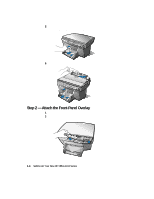
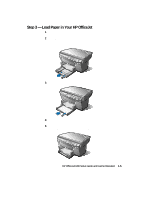
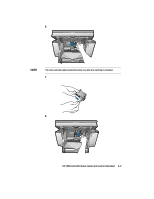
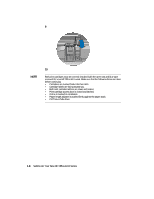
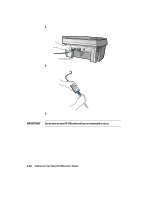
For information about loading specific paper types, see Chapter 2, "All About Paper," of the HP OfficeJet R Series Basic Operations Guide. For information about paper tray capacities, see Chapter 6, "Technical Information," of the HP OfficeJet R Series Customer Care Guide. Step 4 - Install Print Cartridges 1 Locate the print-cartridge access door on the front of the HP OfficeJet, just above the OUT tray. 2 Pull the latch on the print-cartridge access door toward you and raise it up until it is fully extended. 3 Remove the cardboard insert from the inside of the unit. TIP Save the packaging materials in case you ever need to move or ship your HP OfficeJet. The print-cartridge carriage will be in the middle of the access area. The carriage contains two slots designed to hold one color print cartridge and one black print cartridge. You should have received one of each type of cartridge with your new HP OfficeJet. 4 Raise both latches on the carriage. 5 Remove the color print cartridge (the thicker one) from its packaging and, being careful to touch only the black plastic, gently remove both the green pull tab and blue tape covering the nozzles. CAUTION Do not touch the gold-colored contacts. 1-6 Setting Up Your New HP OfficeJet R Series
-
 1
1 -
2
-
3
-
4
-
5
-
6
-
7
-
 8
8 -
 9
9 -
 10
10 -
 11
11 -
 12
12 -
 13
13 -
 14
14 -
 15
15 -
 16
16 -
 17
17 -
 18
18 -
19
-
20
-
21
-
22
-
23
-
24
-
25
-
26
-
27
-
28
-
29
-
30
-
31
-
32
-
33
-
34
-
35
-
36
-
37
-
38
-
39
-
40
-
41
-
42
-
43
-
44
-
45
-
46
-
47
-
48
-
49
-
50
-
51
-
52
-
53
-
54
-
55
-
56
-
57
-
58
-
59
-
60
-
61
-
62
-
63
 |
 |
