Invacare 3GAR Owners Manual 2 - Page 110
Installing Wheel Locks
 |
View all Invacare 3GAR manuals
Add to My Manuals
Save this manual to your list of manuals |
Page 110 highlights
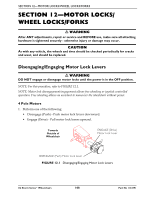
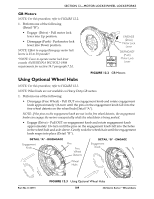
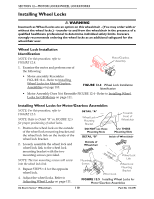
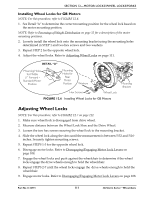
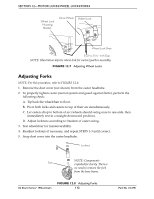
SECTION 12-MOTOR LOCKS/WHEEL LOCKS/FORKS Installing Wheel Locks ƽ WARNING Inasmuch as Wheel Locks are an option on this wheelchair - (You may order with or without the wheel locks.) - transfer to and from the wheelchair in the presence of a qualified healthcare professional to determine individual safety limits. Invacare strongly recommends ordering the wheel locks as an additional safeguard for the wheelchair user. Wheel Lock Installation Identification NOTE: For this procedure, refer to FIGURE 12.4. Motor/Gearbox Assembly 1. Examine the motor and perform one of the following: • Motor assembly Resembles FIGURE 12.4 - Refer to Installing Wheel Locks for Motor/Gearbox Assemblies on page 110. FIGURE 12.4 Wheel Lock Installation Identification • Motor Assembly Does Not Resemble FIGURE 12.4 - Refer to Installing Wheel Locks for GB Motors on page 111. Installing Wheel Locks for Motor/Gearbox Assemblies NOTE: For this procedure, refer to FIGURE 12.5. NOTE: Refer to Detail "B" in FIGURE 12.5 for proper positioning of wheel locks. 1. Position the wheel lock on the outside of the wheel lock mounting bracket and the wheel lock link on the inside of the wheel lock bracket. 2. Loosely assemble the wheel lock and wheel lock link to the wheel lock mounting bracket with the two mounting screws provided. NOTE: The two mounting screws will screw into the wheel lock link. 3. Repeat STEPS 1-2 for the opposite wheel lock. 4. Adjust the wheel locks. Refer to Adjusting Wheel Locks on page 111. DETAIL "A" Wheel Lock Mounting Bracket Towards Front of Wheelchair DO NOT use these Mounting Slots Use THESE Mounting Slots DETAIL "B" Inside of Wheelchair Outside of Wheelchair Mounting Screws Wheel Lock Wheel Lock Link Wheel Lock Mounting Bracket FIGURE 12.5 Installing Wheel Locks for Motor/Gearbox Assemblies 3G Storm Series® Wheelchairs 110 Part No 1134791
-
 1
1 -
2
-
3
-
4
-
5
-
6
-
7
-
8
-
9
-
10
-
11
-
12
-
13
-
14
-
15
-
16
-
17
-
18
-
19
-
20
-
21
-
22
-
23
-
24
-
25
-
26
-
27
-
28
-
29
-
30
-
31
-
32
-
33
-
34
-
35
-
36
-
37
-
38
-
39
-
40
-
41
-
42
-
43
-
44
-
45
-
46
-
47
-
48
-
49
-
50
-
51
-
52
-
53
-
54
-
55
-
56
-
57
-
58
-
59
-
60
-
61
-
62
-
63
-
64
-
65
-
66
-
67
-
68
-
69
-
70
-
71
-
72
-
73
-
74
-
75
-
76
-
77
-
78
-
79
-
80
-
81
-
82
-
83
-
84
-
85
-
86
-
87
-
88
-
89
-
90
-
91
-
92
-
93
-
94
-
95
-
96
-
97
-
98
-
99
-
100
-
101
-
102
-
103
-
104
-
 105
105 -
 106
106 -
 107
107 -
 108
108 -
 109
109 -
 110
110 -
 111
111 -
 112
112 -
 113
113 -
 114
114 -
 115
115 -
116
-
117
-
118
-
119
-
120
-
121
-
122
-
123
-
124
-
125
-
126
-
127
-
128
-
129
-
130
-
131
-
132
 |
 |
