Invacare 3GAR Owners Manual 2 - Page 115
Replacing Back or Headrest Upholstery
 |
View all Invacare 3GAR manuals
Add to My Manuals
Save this manual to your list of manuals |
Page 115 highlights
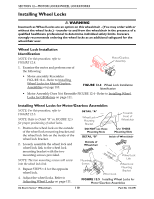
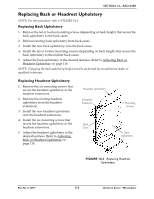
SECTION 14-RECLINER Replacing Back or Headrest Upholstery NOTE: For this procedure, refer to FIGURE 14.2. Replacing Back Upholstery 1. Remove the ten or twelve mounting screws (depending on back height) that secure the back upholstery to the back canes. 2. Remove existing back upholstery from back canes. 3. Install the new back upholstery onto the back canes. 4. Install the ten or twelve mounting screws (depending on back height) that secure the back upholstery to the recliner back canes. 5. Adjust the back upholstery to the desired tautness. Refer to Adjusting Back or Headrest Upholstery on page 116. NOTE: Changing the back upholstery height must be performed by an authorized dealer or qualified technician. Replacing Headrest Upholstery 1. Remove the six mounting screws that secure the headrest upholstery to the headrest extensions. 2. Remove the existing headrest upholstery from the headrest extensions. 3. Install the new headrest upholstery onto the headrest extensions. 4. Install the six mounting screws that secure the headrest upholstery to the headrest extensions. 5. Adjust the headrest upholstery to the desired tautness. Refer to Adjusting Back or Headrest Upholstery on page 116. Headrest Upholstery Headrest Extension Back Cane Mounting Screws Back Upholstery FIGURE 14.2 Replacing Headrest Upholstery Part No 1134791 115 3G Storm Series® Wheelchairs
-
 1
1 -
2
-
3
-
4
-
5
-
6
-
7
-
8
-
9
-
10
-
11
-
12
-
13
-
14
-
15
-
16
-
17
-
18
-
19
-
20
-
21
-
22
-
23
-
24
-
25
-
26
-
27
-
28
-
29
-
30
-
31
-
32
-
33
-
34
-
35
-
36
-
37
-
38
-
39
-
40
-
41
-
42
-
43
-
44
-
45
-
46
-
47
-
48
-
49
-
50
-
51
-
52
-
53
-
54
-
55
-
56
-
57
-
58
-
59
-
60
-
61
-
62
-
63
-
64
-
65
-
66
-
67
-
68
-
69
-
70
-
71
-
72
-
73
-
74
-
75
-
76
-
77
-
78
-
79
-
80
-
81
-
82
-
83
-
84
-
85
-
86
-
87
-
88
-
89
-
90
-
91
-
92
-
93
-
94
-
95
-
96
-
97
-
98
-
99
-
100
-
101
-
102
-
103
-
104
-
105
-
106
-
107
-
108
-
109
-
 110
110 -
 111
111 -
 112
112 -
 113
113 -
 114
114 -
 115
115 -
 116
116 -
 117
117 -
 118
118 -
 119
119 -
 120
120 -
121
-
122
-
123
-
124
-
125
-
126
-
127
-
128
-
129
-
130
-
131
-
132
 |
 |
