Invacare 3GAR Owners Manual 2 - Page 75
Adjusting Mechanical Elevating Legrests
 |
View all Invacare 3GAR manuals
Add to My Manuals
Save this manual to your list of manuals |
Page 75 highlights
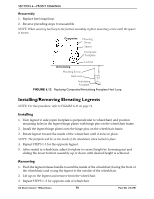
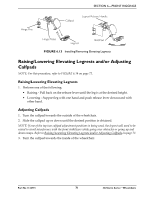
SECTION 6-FRONT RIGGINGS 4. Lift the elevating legrest up and position the mechanical elevating legrest push rod around the pin on the legrest as shown in FIGURE 6.17. 5. Press down on mechanical elevating legrest push rod until there is an audible "click". 6. Repeat STEPS 1-5 for the opposite elevating legrest. 7. If necessary, adjust elevating legrests. Refer to one of the following: • Adjusting Mechanical Elevating Legrests on page 75. • Adjusting Genius Legrests on page 77. Mounting Hole Mounting Pin NOTE: AT5544 shown. Genius legrest installs the same way. Legrest Release Handle Calfpad Footplate FIGURE 6.17 Installing/Removing Mechanical Elevating/Genius Legrests Removing 1. Lift up on the mechanical elevating legrest push rod and remove from the pin on the legrest as shown in FIGURE 6.17. 2. Push elevating legrest release handle toward the opposite side of the wheelchair and swing legrest to the outside of the wheelchair. 3. Lift up on elevating legrest and remove from wheelchair. 4. Repeat STEPS 1-3 for opposite side of wheelchair. Adjusting Mechanical Elevating Legrests NOTE: These procedures apply to wheelchairs with 2G Tarsys seating systems only. Calfpads NOTE: For this procedure, refer to FIGURE 6.18 on page 76. 1. Turn the calfpad toward the outside of the wheelchair. 2. Slide calfpad up or down until desired position is obtained. 3. Turn the calfpad toward the inside of the wheelchair. Part No 1134791 75 3G Storm Series® Wheelchairs
-
 1
1 -
2
-
3
-
4
-
5
-
6
-
7
-
8
-
9
-
10
-
11
-
12
-
13
-
14
-
15
-
16
-
17
-
18
-
19
-
20
-
21
-
22
-
23
-
24
-
25
-
26
-
27
-
28
-
29
-
30
-
31
-
32
-
33
-
34
-
35
-
36
-
37
-
38
-
39
-
40
-
41
-
42
-
43
-
44
-
45
-
46
-
47
-
48
-
49
-
50
-
51
-
52
-
53
-
54
-
55
-
56
-
57
-
58
-
59
-
60
-
61
-
62
-
63
-
64
-
65
-
66
-
67
-
68
-
69
-
 70
70 -
 71
71 -
 72
72 -
 73
73 -
 74
74 -
 75
75 -
 76
76 -
 77
77 -
 78
78 -
 79
79 -
 80
80 -
81
-
82
-
83
-
84
-
85
-
86
-
87
-
88
-
89
-
90
-
91
-
92
-
93
-
94
-
95
-
96
-
97
-
98
-
99
-
100
-
101
-
102
-
103
-
104
-
105
-
106
-
107
-
108
-
109
-
110
-
111
-
112
-
113
-
114
-
115
-
116
-
117
-
118
-
119
-
120
-
121
-
122
-
123
-
124
-
125
-
126
-
127
-
128
-
129
-
130
-
131
-
132
 |
 |
