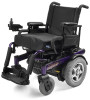
Invacare 3GAR Owners Manual 2 - Page 77
Adjusting Genius Legrests
 |
View all Invacare 3GAR manuals
Add to My Manuals
Save this manual to your list of manuals |
Page 77 highlights
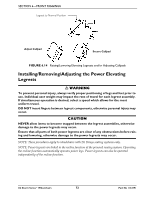
SECTION 6-FRONT RIGGINGS Adjusting Genius Legrests NOTE: These procedures apply to wheelchairs with 2G Tarsys seating systems only. Footplate Height NOTE: For this procedure, refer to FIGURE 6.20. 1. Note the angle of the footplate in relation to the legrest as shown in FIGURE 6.20. 2. Loosen, but DO NOT remove, the three hex bolts and locknuts that secure the footplate to the legrest. 3. Adjust the footplate to the desired height. 4. Line up the footplate to the angle noted in STEP 1. 5. While holding the footplate, tighten the three hex bolts and locknuts securely. Footplate Legrest Rear Hex Bolt and Locknut Hex Bolts and Locknuts Rear Hex Bolt and Locknut FIGURE 6.20 Adjusting Genius Legrests - Footplate Height/Footplate Angle Footplate Angle NOTE: For this procedure, refer to FIGURE 6.20 on page 77. 1. Note the angle of the footplate in relation to the legrest as shown in FIGURE 6.20. 2. Remove the rear hex bolt and locknut that secure the footplate to the legrest. 3. Move the footplate to the desired angle. 4. Install the hex bolt through the mounting holes that correspond to the desired footplate angle. 5. Install the locknut onto the hex bolt. 6. Line up the footplate to the angle noted in STEP 1. 7. While holding the footplate, tighten the hex bolt and locknut securely. Part No 1134791 77 3G Storm Series® Wheelchairs
-
 1
1 -
2
-
3
-
4
-
5
-
6
-
7
-
8
-
9
-
10
-
11
-
12
-
13
-
14
-
15
-
16
-
17
-
18
-
19
-
20
-
21
-
22
-
23
-
24
-
25
-
26
-
27
-
28
-
29
-
30
-
31
-
32
-
33
-
34
-
35
-
36
-
37
-
38
-
39
-
40
-
41
-
42
-
43
-
44
-
45
-
46
-
47
-
48
-
49
-
50
-
51
-
52
-
53
-
54
-
55
-
56
-
57
-
58
-
59
-
60
-
61
-
62
-
63
-
64
-
65
-
66
-
67
-
68
-
69
-
70
-
71
-
 72
72 -
 73
73 -
 74
74 -
 75
75 -
 76
76 -
 77
77 -
 78
78 -
 79
79 -
 80
80 -
 81
81 -
 82
82 -
83
-
84
-
85
-
86
-
87
-
88
-
89
-
90
-
91
-
92
-
93
-
94
-
95
-
96
-
97
-
98
-
99
-
100
-
101
-
102
-
103
-
104
-
105
-
106
-
107
-
108
-
109
-
110
-
111
-
112
-
113
-
114
-
115
-
116
-
117
-
118
-
119
-
120
-
121
-
122
-
123
-
124
-
125
-
126
-
127
-
128
-
129
-
130
-
131
-
132
 |
 |
