Invacare 3GAR Owners Manual 2 - Page 70
Installing/Removing Elevating Legrests
 |
View all Invacare 3GAR manuals
Add to My Manuals
Save this manual to your list of manuals |
Page 70 highlights
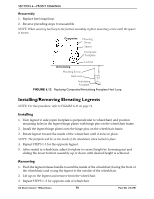
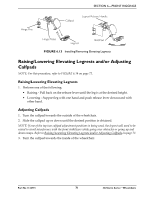
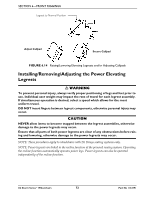
SECTION 6-FRONT RIGGINGS Reassembly 1. Replace heel strap/loop. 2. Reverse preceding steps to reassemble. NOTE: When securing heel loop to the footrest assembly, tighten mounting screw until the spacer is secure. Composite Mounting Screw Spacer Composite Footplate Locknut Articulating Mounting Screw Heel Loop Articulating Footplate FIGURE 6.12 Replacing Composite/Articulating Footplate Heel Loop Installing/Removing Elevating Legrests NOTE: For this procedure, refer to FIGURE 6.13 on page 71. Installing 1. Turn legrest to side (open footplate is perpendicular to wheelchair) and position mounting holes in the legrest hinge plates with hinge pins on the wheelchair frame. 2. Install the legrest hinge plates onto the hinge pins on the wheelchair frame. 3. Rotate legrest toward the inside of the wheelchair until it locks in place. NOTE: The footplate will be on the inside of the wheelchair when locked in place. 4. Repeat STEPS 1-3 for the opposite legrest. 5. After seated in wheelchair, adjust footplate to correct height by loosening nut and sliding the lower footrest assembly up or down until desired height is achieved. Removing 1. Push the legrest release handle toward the inside of the wheelchair (facing the front of the wheelchair) and swing the legrest to the outside of the wheelchair. 2. Lift up on the legrest and remove from the wheelchair. 3. Repeat STEPS 1- 2 for opposite side of wheelchair. 3G Storm Series® Wheelchairs 70 Part No 1134791
-
 1
1 -
2
-
3
-
4
-
5
-
6
-
7
-
8
-
9
-
10
-
11
-
12
-
13
-
14
-
15
-
16
-
17
-
18
-
19
-
20
-
21
-
22
-
23
-
24
-
25
-
26
-
27
-
28
-
29
-
30
-
31
-
32
-
33
-
34
-
35
-
36
-
37
-
38
-
39
-
40
-
41
-
42
-
43
-
44
-
45
-
46
-
47
-
48
-
49
-
50
-
51
-
52
-
53
-
54
-
55
-
56
-
57
-
58
-
59
-
60
-
61
-
62
-
63
-
64
-
 65
65 -
 66
66 -
 67
67 -
 68
68 -
 69
69 -
 70
70 -
 71
71 -
 72
72 -
 73
73 -
 74
74 -
 75
75 -
76
-
77
-
78
-
79
-
80
-
81
-
82
-
83
-
84
-
85
-
86
-
87
-
88
-
89
-
90
-
91
-
92
-
93
-
94
-
95
-
96
-
97
-
98
-
99
-
100
-
101
-
102
-
103
-
104
-
105
-
106
-
107
-
108
-
109
-
110
-
111
-
112
-
113
-
114
-
115
-
116
-
117
-
118
-
119
-
120
-
121
-
122
-
123
-
124
-
125
-
126
-
127
-
128
-
129
-
130
-
131
-
132
 |
 |
