JVC GS-TD1BUS Detailed User Guide - Page 101
Menu Settings
 |
View all JVC GS-TD1BUS manuals
Add to My Manuals
Save this manual to your list of manuals |
Page 101 highlights
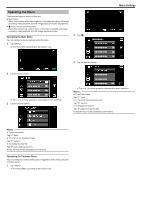
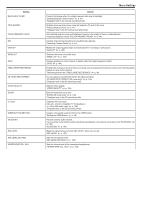
Setting BACKLIGHT COMP. TELE MACRO TOUCH PRIORITY AE/AF DIS GAIN UP WIND CUT GRID TIME-LAPSE RECORDING 3D VIDEO REC FORMAT VIDEO QUALITY ZOOM x.v.Color USER BUTTON SETTING 3D SOUND MIC LEVEL MIC LEVEL SETTING HEADPHONE VOL. ADJ. Menu Settings Details Corrects the image when the subject appears dark due to backlight. "Setting Backlight Compensation" (A p. 41) *Displayed only in the manual recording mode. Enables close-up shots when using the telephoto (T) end of the zoom. "Taking Close-up Shots" (A p. 41) *Displayed only in the 2D manual recording mode. Automatically adjusts focus and brightness based on the subjects' faces or selected area. "Capturing Subjects Clearly (TOUCH PRIORITY AE/AF)" (A p. 44) Camera shake during recording can be effectively reduced. "Reducing Camera Shake" (A p. 44) Makes the subject appear bright automatically when recording in dark places. "GAIN UP" (A p. 103) Reduces the noise caused by wind. "WIND CUT" (A p. 103) Displays gridlines to make it easier to detect when the subject appears slanted. "GRID" (A p. 104) Enables the changes of a scene that occur slowly over a long period to be shown within a short time by taking frames of it at a certain interval. "Recording at Intervals (TIME-LAPSE RECORDING)" (A p. 46) You can select a recording format for 3D video recording. "3D VIDEO REC FORMAT (3D mode only)" (A p. 104) *Displayed only in the 3D recording mode. Sets the video quality. "VIDEO QUALITY" (A p. 105) Sets the maximum zoom ratio. "ZOOM (2D mode only)" (A p. 106) *Displayed only in the 2D recording mode. Captures the true colors. (Use an x.v.Color compatible TV for playback.) "x.v.Color (2D mode only)" (A p. 106) *Displayed only in the 2D recording mode. Assigns a frequently used function to the USER button. "Setting the USER Button" (A p. 42) Records realistic audio sounds. You can enjoy more realistic audio sounds during playback of a video by recording it with "3D SOUND" set to "ON". "3D SOUND" (A p. 107) Make the adjustments such that "MIC LEVEL" does not turn red. "MIC LEVEL" (A p. 107) Sets the microphone level. "MIC LEVEL SETTING" (A p. 108) Sets the volume level of the connected headphones. "HEADPHONE VOL. ADJ." (A p. 108) 101
-
 1
1 -
2
-
3
-
4
-
5
-
6
-
7
-
8
-
9
-
10
-
11
-
12
-
13
-
14
-
15
-
16
-
17
-
18
-
19
-
20
-
21
-
22
-
23
-
24
-
25
-
26
-
27
-
28
-
29
-
30
-
31
-
32
-
33
-
34
-
35
-
36
-
37
-
38
-
39
-
40
-
41
-
42
-
43
-
44
-
45
-
46
-
47
-
48
-
49
-
50
-
51
-
52
-
53
-
54
-
55
-
56
-
57
-
58
-
59
-
60
-
61
-
62
-
63
-
64
-
65
-
66
-
67
-
68
-
69
-
70
-
71
-
72
-
73
-
74
-
75
-
76
-
77
-
78
-
79
-
80
-
81
-
82
-
83
-
84
-
85
-
86
-
87
-
88
-
89
-
90
-
91
-
92
-
93
-
94
-
95
-
 96
96 -
 97
97 -
 98
98 -
 99
99 -
 100
100 -
 101
101 -
 102
102 -
 103
103 -
 104
104 -
 105
105 -
 106
106 -
107
-
108
-
109
-
110
-
111
-
112
-
113
-
114
-
115
-
116
-
117
-
118
-
119
-
120
-
121
-
122
-
123
-
124
-
125
-
126
-
127
-
128
-
129
-
130
-
131
-
132
-
133
-
134
-
135
-
136
-
137
-
138
-
139
-
140
-
141
-
142
-
143
-
144
-
145
-
146
 |
 |
