JVC GS-TD1BUS Detailed User Guide - Page 38
Using Focus Assist, Adjusting Brightness, Tap BRIGHTNESS ADJUST.
 |
View all JVC GS-TD1BUS manuals
Add to My Manuals
Save this manual to your list of manuals |
Page 38 highlights
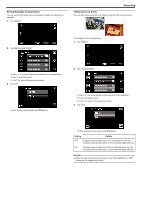
Recording Using Focus Assist Focused subject is outlined in color for more precise focus. 1 Tap "MENU". Adjusting Brightness You can adjust the brightness to your preferred level. 1 Tap "MENU". ..... .... 2 Tap "FOCUS ASSIST". 2 Tap "BRIGHTNESS ADJUST". 0 Tap ∧ or ∨ to move upward or downward for more selection. 0 Tap L to exit the menu. 0 Tap J to return to the previous screen. 3 Adjust the focus. 0 Tap ∧ or ∨ to move upward or downward for more selection. 0 Tap L to exit the menu. 0 Tap J to return to the previous screen. 3 Tap "MANUAL". 0 Tap E to focus on a distant subject. 0 Tap p to focus on a near subject. 4 Tap "SET" to confirm. 4 Adjust the brightness value. Memo : 0 The image becomes black and white while the outline of the focused object is displayed in the selected color. Change outline color if it becomes difficult to see. "FOCUS ASSIST COLOR" (A p. 112) 0 Compensation range during video recording: -6 to +6 0 Compensation range during still image recording: -2.0 to +2.0 0 Tap ∧ to increase the brightness. 0 Tap ∨ to decrease the brightness. 5 Tap "SET" to confirm. Memo : 0 Settings can be adjusted separately for videos and still images. 38
-
 1
1 -
2
-
3
-
4
-
5
-
6
-
7
-
8
-
9
-
10
-
11
-
12
-
13
-
14
-
15
-
16
-
17
-
18
-
19
-
20
-
21
-
22
-
23
-
24
-
25
-
26
-
27
-
28
-
29
-
30
-
31
-
32
-
 33
33 -
 34
34 -
 35
35 -
 36
36 -
 37
37 -
 38
38 -
 39
39 -
 40
40 -
 41
41 -
 42
42 -
 43
43 -
44
-
45
-
46
-
47
-
48
-
49
-
50
-
51
-
52
-
53
-
54
-
55
-
56
-
57
-
58
-
59
-
60
-
61
-
62
-
63
-
64
-
65
-
66
-
67
-
68
-
69
-
70
-
71
-
72
-
73
-
74
-
75
-
76
-
77
-
78
-
79
-
80
-
81
-
82
-
83
-
84
-
85
-
86
-
87
-
88
-
89
-
90
-
91
-
92
-
93
-
94
-
95
-
96
-
97
-
98
-
99
-
100
-
101
-
102
-
103
-
104
-
105
-
106
-
107
-
108
-
109
-
110
-
111
-
112
-
113
-
114
-
115
-
116
-
117
-
118
-
119
-
120
-
121
-
122
-
123
-
124
-
125
-
126
-
127
-
128
-
129
-
130
-
131
-
132
-
133
-
134
-
135
-
136
-
137
-
138
-
139
-
140
-
141
-
142
-
143
-
144
-
145
-
146
 |
 |
