JVC GS-TD1BUS Detailed User Guide - Page 33
Operation Buttons for Still Image Recording, Useful Settings for Recording, Caution
 |
View all JVC GS-TD1BUS manuals
Add to My Manuals
Save this manual to your list of manuals |
Page 33 highlights
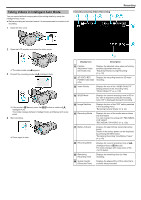
Operation Buttons for Still Image Recording . Operation Button Description 1 Parallax Adjustment Adjusts the 3D effect when 3D images are displayed on the LCD monitor. "Adjusting Parallax During Recording" (A p. 34) 2 / 3 T/W Zoom Allows the same functions as the zoom lever to be performed. Camera shake that often occurs when using the zoom lever can be minimized. "Zooming" (A p. 31) 4 Recording/ Playback Mode Switches between recording and playback modes. 5 Snapshot Q Functions as the SNAPSHOT button. However, focus cannot be set by pressing halfway. 6 LCD Monitor 3D/2D Switches the display on the LCD monitor Display between 3D and 2D. The image will be recorded in 3D even if the display on the LCD monitor is set to 2D. 7 MENU Displays the various menus of still image recording. "Operating the Menu" (A p. 99) 8 Display Button n Some displays disappear after approximately 3 seconds. Use the n button to change the displays as shown below. 0 Tap n button Displays appear for approximately 3 seconds with every tap. 0 Tap and hold n button Displays are fixed such that they do not disappear. After setting, the display button changes from n to m. Tap m to release the displays. Recording Useful Settings for Recording 0 When "QUICK RESTART" is set to "ON", this unit turns on immediately if you open the LCD monitor within 5 minutes after the power is turned off by closing the monitor. "QUICK RESTART" (A p. 124) 0 When "AUTO POWER OFF" is set to "ON", this unit turns itself off automatically to conserve power when it is not operated for 5 minutes. (only when using the battery pack) "AUTO POWER OFF" (A p. 124) 0 When "TOUCH PRIORITY AE/AF" is set to "FACE TRACKING", this unit detects faces and automatically adjusts its brightness and focus to record the faces more clearly. "Capturing Subjects Clearly (TOUCH PRIORITY AE/AF)" (A p. 44) 0 The image resolution can be changed. "IMAGE SIZE" (A p. 115) Caution : 0 Do not expose the lens to direct sunlight. 0 Do not use this unit in the rain, snow, or places with high humidity like the bathroom. 0 Do not use this unit in places subject to excessive humidity or dust, as well as places exposed to steam or smoke directly. 0 Do not remove the battery pack, AC adapter, or SD card when the access lamp is lighted. The recorded data may become unreadable. Memo : 0 Before recording an important scene, it is recommended to conduct a trial recording. 0 The digital image stabilizer does not work when recording still images. 33
-
 1
1 -
2
-
3
-
4
-
5
-
6
-
7
-
8
-
9
-
10
-
11
-
12
-
13
-
14
-
15
-
16
-
17
-
18
-
19
-
20
-
21
-
22
-
23
-
24
-
25
-
26
-
27
-
 28
28 -
 29
29 -
 30
30 -
 31
31 -
 32
32 -
 33
33 -
 34
34 -
 35
35 -
 36
36 -
 37
37 -
 38
38 -
39
-
40
-
41
-
42
-
43
-
44
-
45
-
46
-
47
-
48
-
49
-
50
-
51
-
52
-
53
-
54
-
55
-
56
-
57
-
58
-
59
-
60
-
61
-
62
-
63
-
64
-
65
-
66
-
67
-
68
-
69
-
70
-
71
-
72
-
73
-
74
-
75
-
76
-
77
-
78
-
79
-
80
-
81
-
82
-
83
-
84
-
85
-
86
-
87
-
88
-
89
-
90
-
91
-
92
-
93
-
94
-
95
-
96
-
97
-
98
-
99
-
100
-
101
-
102
-
103
-
104
-
105
-
106
-
107
-
108
-
109
-
110
-
111
-
112
-
113
-
114
-
115
-
116
-
117
-
118
-
119
-
120
-
121
-
122
-
123
-
124
-
125
-
126
-
127
-
128
-
129
-
130
-
131
-
132
-
133
-
134
-
135
-
136
-
137
-
138
-
139
-
140
-
141
-
142
-
143
-
144
-
145
-
146
 |
 |
