JVC GS-TD1BUS Detailed User Guide - Page 39
Setting Shutter Speed, Setting Aperture, SHUTTER SPEED accordingly.
 |
View all JVC GS-TD1BUS manuals
Add to My Manuals
Save this manual to your list of manuals |
Page 39 highlights
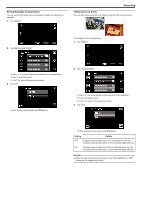
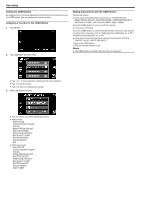
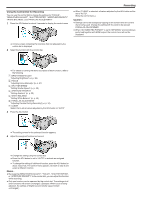
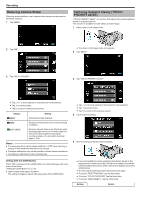
Setting Shutter Speed You can set the shutter speed to suit the type of subject. 1 Tap "MENU". Recording Setting Aperture You can adjust the aperture to capture an image with only the subject in focus. 1 Tap "MENU". 2 Tap "SHUTTER SPEED". 2 Tap "APERTURE PRIORITY". 0 Tap ∧ or ∨ to move upward or downward for more selection. 0 Tap L to exit the menu. 0 Tap J to return to the previous screen. 3 Tap "MANUAL". 0 Tap ∧ or ∨ to move upward or downward for more selection. 0 Tap L to exit the menu. 0 Tap J to return to the previous screen. 3 Tap "MANUAL". 4 Adjust the shutter speed. 4 Adjust the aperture. 0 Shutter speed can be set from 1/2 to 1/4000. (Up to 1/500 for still image.) 0 Tap ∧ to increase the shutter speed. 0 Tap ∨ to decrease the shutter speed. 5 Tap "SET" to confirm. 0 Aperture can be set from F1.2 to F5.6. 0 If you want the background to be in focus as well (larger aperture value), tap ∧. 0 If you want the background to appear blurry (smaller aperture value), tap ∨. 5 Tap "SET" to confirm. 0 After confirmation, the display for adjusting shutter speed disappears. Memo : 0 Settings can be adjusted separately for videos and still images. 0 While fast-moving subjects can be captured clearly by increasing "SHUTTER SPEED", the screen appears darker. When recording in dark places such as indoors, check the brightness of the LCD monitor and set "SHUTTER SPEED" accordingly. 0 After confirmation, the display for adjusting aperture disappears. Memo : 0 Settings can be adjusted separately for videos and still images. 0 When zoomed to the telephoto end, setting the aperture to the minimum value (F1.2) does not stop it down all the way. In this case, the aperture value is set according to the zoom and indicated in yellow. Set the zoom 39
-
 1
1 -
2
-
3
-
4
-
5
-
6
-
7
-
8
-
9
-
10
-
11
-
12
-
13
-
14
-
15
-
16
-
17
-
18
-
19
-
20
-
21
-
22
-
23
-
24
-
25
-
26
-
27
-
28
-
29
-
30
-
31
-
32
-
33
-
 34
34 -
 35
35 -
 36
36 -
 37
37 -
 38
38 -
 39
39 -
 40
40 -
 41
41 -
 42
42 -
 43
43 -
 44
44 -
45
-
46
-
47
-
48
-
49
-
50
-
51
-
52
-
53
-
54
-
55
-
56
-
57
-
58
-
59
-
60
-
61
-
62
-
63
-
64
-
65
-
66
-
67
-
68
-
69
-
70
-
71
-
72
-
73
-
74
-
75
-
76
-
77
-
78
-
79
-
80
-
81
-
82
-
83
-
84
-
85
-
86
-
87
-
88
-
89
-
90
-
91
-
92
-
93
-
94
-
95
-
96
-
97
-
98
-
99
-
100
-
101
-
102
-
103
-
104
-
105
-
106
-
107
-
108
-
109
-
110
-
111
-
112
-
113
-
114
-
115
-
116
-
117
-
118
-
119
-
120
-
121
-
122
-
123
-
124
-
125
-
126
-
127
-
128
-
129
-
130
-
131
-
132
-
133
-
134
-
135
-
136
-
137
-
138
-
139
-
140
-
141
-
142
-
143
-
144
-
145
-
146
 |
 |
