JVC GS-TD1BUS Detailed User Guide - Page 76
Copying Selected Files, Tap SELECT AND CREATE video or SELECT AND SAVE still
 |
View all JVC GS-TD1BUS manuals
Add to My Manuals
Save this manual to your list of manuals |
Page 76 highlights
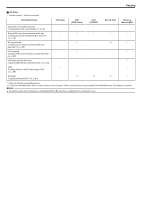
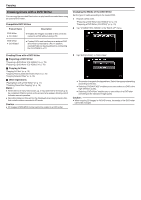
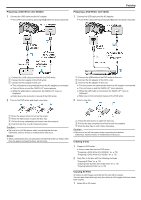
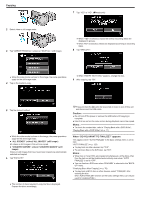
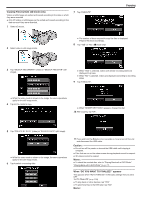
. .... ..... Copying 0 When two or more DVDs are created simultaneously, all the discs other than the last one will be finalized automatically even when "AUTO FINALIZE" is set to "OFF". 0 You can finalize a DVD even when "FINALIZE" is selected in the "BACK- UP" menu. "Finalizing Discs After Copying" (A p. 78) 0 To play back a BD-R disc on other devices, select "FINALIZE" after creating the disc. (The "AUTO FINALIZE" function on the basic settings menu can only be used for creating DVDs.) Copying Selected Files Select and copy the desired videos or still images individually. 1 Select 3D or 2D mode. 0 A check mark appears on the selected file. To remove the check mark, tap on the file again. 0 Tap "CHECK" to check the file. 0 While the video mode is shown in the image, the same operations apply for the still image mode. 7 After selecting all the files, tap "SAVE". 2 Select video or still image mode. 0 While the video mode is shown in the image, the same operations apply for the still image mode. 8 Tap "EXECUTE". 3 Tap "SELECT AND CREATE" (video) or "SELECT AND SAVE" (still image). 0 While the video mode is shown in the image, the same operations apply for the still image mode. 4 Tap on the media to copy. 0 The number of discs required to copy the files is displayed. Prepare the discs accordingly. 9 Tap "YES" or "NO". (A mode only) 5 Tap "SELECT FROM SCENES" (video) or "SELECT FROM IMAGES" (still image). 0 When "YES" is selected, videos with similar recording dates are displayed in groups. 0 When "NO" is selected, videos are displayed according to recording dates. 10 Tap "EXECUTE". 0 While the video mode is shown in the image, the same operations apply for the still image mode. 6 Tap on the videos or still images to copy. 76 0 When "INSERT NEXT DISC" appears, change the disc. 11 After copying, tap "OK".
-
 1
1 -
2
-
3
-
4
-
5
-
6
-
7
-
8
-
9
-
10
-
11
-
12
-
13
-
14
-
15
-
16
-
17
-
18
-
19
-
20
-
21
-
22
-
23
-
24
-
25
-
26
-
27
-
28
-
29
-
30
-
31
-
32
-
33
-
34
-
35
-
36
-
37
-
38
-
39
-
40
-
41
-
42
-
43
-
44
-
45
-
46
-
47
-
48
-
49
-
50
-
51
-
52
-
53
-
54
-
55
-
56
-
57
-
58
-
59
-
60
-
61
-
62
-
63
-
64
-
65
-
66
-
67
-
68
-
69
-
70
-
 71
71 -
 72
72 -
 73
73 -
 74
74 -
 75
75 -
 76
76 -
 77
77 -
 78
78 -
 79
79 -
 80
80 -
 81
81 -
82
-
83
-
84
-
85
-
86
-
87
-
88
-
89
-
90
-
91
-
92
-
93
-
94
-
95
-
96
-
97
-
98
-
99
-
100
-
101
-
102
-
103
-
104
-
105
-
106
-
107
-
108
-
109
-
110
-
111
-
112
-
113
-
114
-
115
-
116
-
117
-
118
-
119
-
120
-
121
-
122
-
123
-
124
-
125
-
126
-
127
-
128
-
129
-
130
-
131
-
132
-
133
-
134
-
135
-
136
-
137
-
138
-
139
-
140
-
141
-
142
-
143
-
144
-
145
-
146
 |
 |
