JVC GS-TD1BUS Detailed User Guide - Page 119
Common Menu
 |
View all JVC GS-TD1BUS manuals
Add to My Manuals
Save this manual to your list of manuals |
Page 119 highlights
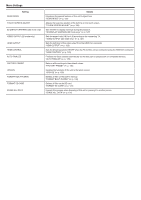
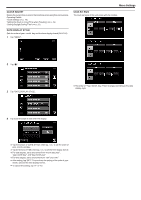
Common Menu 1 Select video or still image mode. 2 Tap "MENU". 3 Tap "Q". Menu Settings . .. Setting CLOCK ADJUST DATE DISPLAY STYLE LANGUAGE MONITOR BRIGHTNESS REC MEDIA FOR VIDEO REC MEDIA FOR IMAGE OPERATION SOUND AUTO POWER OFF QUICK RESTART REMOTE Details Resets the current time or sets to the local time when using this unit overseas. "Clock Setting" (A p. 19) "Setting the Clock to Local Time when Traveling" (A p. 25) "Setting Daylight Saving Time" (A p. 25) Sets the order of year, month, day and the time display format (24H/12H). "DATE DISPLAY STYLE" (A p. 121) The language on the display can be changed. "Changing the Display Language" (A p. 21) Sets the brightness of the LCD monitor. "MONITOR BRIGHTNESS" (A p. 122) Sets the recording/playback media of videos. "REC MEDIA FOR VIDEO" (A p. 122) Sets the recording/playback media of still images. "REC MEDIA FOR IMAGE" (A p. 123) Turns on or off the operation sound. "OPERATION SOUND" (A p. 123) Prevents the situation of forgetting to turn off the power when this is set. "AUTO POWER OFF" (A p. 124) Reduces the power consumption within 5 minutes after the LCD monitor is closed to 1/3 of that used during recording. "QUICK RESTART" (A p. 124) Enables remote control operation. "REMOTE" (A p. 125) 119
-
 1
1 -
2
-
3
-
4
-
5
-
6
-
7
-
8
-
9
-
10
-
11
-
12
-
13
-
14
-
15
-
16
-
17
-
18
-
19
-
20
-
21
-
22
-
23
-
24
-
25
-
26
-
27
-
28
-
29
-
30
-
31
-
32
-
33
-
34
-
35
-
36
-
37
-
38
-
39
-
40
-
41
-
42
-
43
-
44
-
45
-
46
-
47
-
48
-
49
-
50
-
51
-
52
-
53
-
54
-
55
-
56
-
57
-
58
-
59
-
60
-
61
-
62
-
63
-
64
-
65
-
66
-
67
-
68
-
69
-
70
-
71
-
72
-
73
-
74
-
75
-
76
-
77
-
78
-
79
-
80
-
81
-
82
-
83
-
84
-
85
-
86
-
87
-
88
-
89
-
90
-
91
-
92
-
93
-
94
-
95
-
96
-
97
-
98
-
99
-
100
-
101
-
102
-
103
-
104
-
105
-
106
-
107
-
108
-
109
-
110
-
111
-
112
-
113
-
 114
114 -
 115
115 -
 116
116 -
 117
117 -
 118
118 -
 119
119 -
 120
120 -
 121
121 -
 122
122 -
 123
123 -
 124
124 -
125
-
126
-
127
-
128
-
129
-
130
-
131
-
132
-
133
-
134
-
135
-
136
-
137
-
138
-
139
-
140
-
141
-
142
-
143
-
144
-
145
-
146
 |
 |
