JVC GS-TD1BUS Detailed User Guide - Page 32
Taking Still Images in Intelligent Auto Mode
 |
View all JVC GS-TD1BUS manuals
Add to My Manuals
Save this manual to your list of manuals |
Page 32 highlights
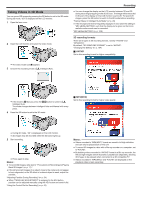
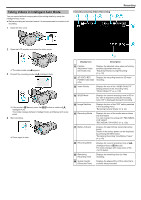
Recording Taking Still Images in Intelligent Auto Mode You can record without worrying about the setting details by using the Intelligent Auto mode. 1 Open the lens cover. Indications During Still Image Recording . . .. . . 2 Open the LCD monitor and select the still image mode. 0 The still image icon B appears. 3 Check if the recording mode is P Intelligent Auto. 0 If the mode is H Manual, press the H/T button to switch to P Intelligent Auto. The mode changes between Intelligent Auto and Manual with every press. 4 Set the focus on the subject. 0 When focused, the focus icon lights up in green. 5 Take a still image. 0 PHOTO lights up when a still image is being captured. Display Icon Description 1 Image Size Displays the icon of the image size. 0 The size of still images can be changed. "IMAGE SIZE" (A p. 115) 2 Shutter Speed Displays the shutter speed. 3 Focus Lights up in green when focused. 4 Recording in Progress Appears when a still image is being captured. 5 Remaining Number Displays the remaining number of shots for still of Shots image recording. 6 Recording Mode Press the i.AUTO button to switch the recording mode between P (Intelligent Auto) and H (Manual). 7 Display Button n Some displays disappear after approximately 3 seconds. Use the n button to change the displays as shown below. 0 Tap n button Displays appear for approximately 3 seconds with every tap. 0 Tap and hold n button Displays are fixed such that they do not disappear. After setting, the display button changes from n to m. Tap m to release the displays. 8 Battery Indicator 9 Recording Media 0 3D/2D Mode Displays the approximate remaining battery power. Details of the battery power can be displayed by pressing the INFO button. "Remaining Recording Time/Battery Power" (A p. 49) Displays the icon of the media where still images are recorded to. The recording media can be changed. "REC MEDIA FOR IMAGE" (A p. 123) Displays the current recording mode of 3D or 2D. "3D" is displayed during 3D recording, while "2D" is displayed during 2D recording. 32
-
 1
1 -
2
-
3
-
4
-
5
-
6
-
7
-
8
-
9
-
10
-
11
-
12
-
13
-
14
-
15
-
16
-
17
-
18
-
19
-
20
-
21
-
22
-
23
-
24
-
25
-
26
-
 27
27 -
 28
28 -
 29
29 -
 30
30 -
 31
31 -
 32
32 -
 33
33 -
 34
34 -
 35
35 -
 36
36 -
 37
37 -
38
-
39
-
40
-
41
-
42
-
43
-
44
-
45
-
46
-
47
-
48
-
49
-
50
-
51
-
52
-
53
-
54
-
55
-
56
-
57
-
58
-
59
-
60
-
61
-
62
-
63
-
64
-
65
-
66
-
67
-
68
-
69
-
70
-
71
-
72
-
73
-
74
-
75
-
76
-
77
-
78
-
79
-
80
-
81
-
82
-
83
-
84
-
85
-
86
-
87
-
88
-
89
-
90
-
91
-
92
-
93
-
94
-
95
-
96
-
97
-
98
-
99
-
100
-
101
-
102
-
103
-
104
-
105
-
106
-
107
-
108
-
109
-
110
-
111
-
112
-
113
-
114
-
115
-
116
-
117
-
118
-
119
-
120
-
121
-
122
-
123
-
124
-
125
-
126
-
127
-
128
-
129
-
130
-
131
-
132
-
133
-
134
-
135
-
136
-
137
-
138
-
139
-
140
-
141
-
142
-
143
-
144
-
145
-
146
 |
 |
