JVC GS-TD1BUS Detailed User Guide - Page 46
Recording at Intervals (TIME-LAPSE RECORDING), Setting SMILE LEVEL Display Still image only
 |
View all JVC GS-TD1BUS manuals
Add to My Manuals
Save this manual to your list of manuals |
Page 46 highlights
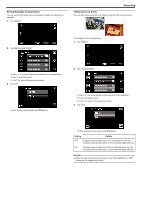
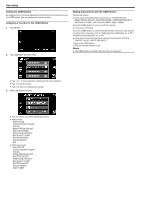
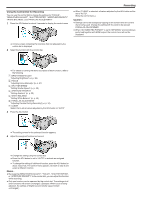
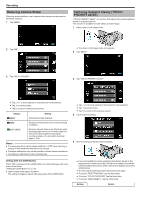
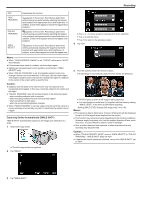
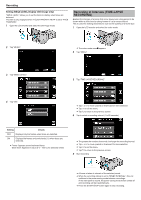
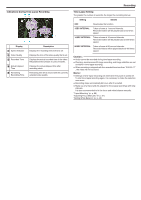
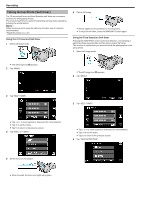
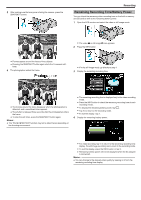
Recording Setting SMILE LEVEL Display (Still image only) "SMILE LEVEL" allows you to set the items to display when faces are detected. This item is only displayed when "TOUCH PRIORITY AE/AF" is set to "FACE TRACKING". 1 Open the LCD monitor and select the still image mode. Recording at Intervals (TIME-LAPSE RECORDING) Enables the changes of a scene that occur slowly over a long period to be shown within a short time by taking frames of it at a certain interval. This is useful for making observations such as the opening of a flower bud. 1 Open the LCD monitor and select the video mode. 2 Tap "MENU". 0 The video mode icon A appears. 2 Tap "MENU". ..... .... 3 Tap "SMILE LEVEL". 3 Tap "TIME-LAPSE RECORDING". 4 Tap "ON". 0 Tap ∧ or ∨ to move upward or downward for more selection. 0 Tap L to exit the menu. 0 Tap J to return to the previous screen. 4 Tap to select a recording interval (1 to 80 seconds). Setting Details OFF Displays only the frames when faces are detected. ON Displays the frames and smile levels (%) when faces are detected. 0 Frame: Appears around detected faces. Smile level: Appears in value (0 % - 100 %) for detected smiles. 0 The greater the number of seconds, the longer the recording interval. 0 Tap ∧ or ∨ to move upward or downward for more selection. 0 Tap L to exit the menu. 0 Tap J to return to the previous screen. 5 Start recording. 0 A frame is taken at intervals of the selected period. 0 When the recording interval is set to "80SEC INTERVAL", this unit switches to the power-saving mode between recordings. At the next point to record, the power-saving mode will be turned off and recording will start automatically. 0 Press the START/STOP button again to stop recording. 46
-
 1
1 -
2
-
3
-
4
-
5
-
6
-
7
-
8
-
9
-
10
-
11
-
12
-
13
-
14
-
15
-
16
-
17
-
18
-
19
-
20
-
21
-
22
-
23
-
24
-
25
-
26
-
27
-
28
-
29
-
30
-
31
-
32
-
33
-
34
-
35
-
36
-
37
-
38
-
39
-
40
-
 41
41 -
 42
42 -
 43
43 -
 44
44 -
 45
45 -
 46
46 -
 47
47 -
 48
48 -
 49
49 -
 50
50 -
 51
51 -
52
-
53
-
54
-
55
-
56
-
57
-
58
-
59
-
60
-
61
-
62
-
63
-
64
-
65
-
66
-
67
-
68
-
69
-
70
-
71
-
72
-
73
-
74
-
75
-
76
-
77
-
78
-
79
-
80
-
81
-
82
-
83
-
84
-
85
-
86
-
87
-
88
-
89
-
90
-
91
-
92
-
93
-
94
-
95
-
96
-
97
-
98
-
99
-
100
-
101
-
102
-
103
-
104
-
105
-
106
-
107
-
108
-
109
-
110
-
111
-
112
-
113
-
114
-
115
-
116
-
117
-
118
-
119
-
120
-
121
-
122
-
123
-
124
-
125
-
126
-
127
-
128
-
129
-
130
-
131
-
132
-
133
-
134
-
135
-
136
-
137
-
138
-
139
-
140
-
141
-
142
-
143
-
144
-
145
-
146
 |
 |
