JVC GS-TD1BUS Detailed User Guide - Page 81
Caution, Copying Selected Files
 |
View all JVC GS-TD1BUS manuals
Add to My Manuals
Save this manual to your list of manuals |
Page 81 highlights
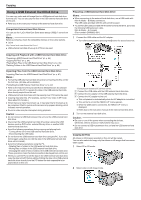
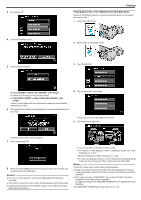
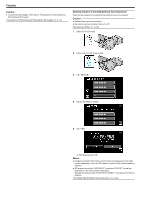
8 Tap "YES" or "NO". (A mode only) Copying 3 Tap "SELECT AND CREATE" (video) or "SELECT AND SAVE" (still image). ..... ..... 0 When "YES" is selected, videos with similar recording dates are displayed in groups. 0 When "NO" is selected, videos are displayed according to recording dates. 9 Tap "EXECUTE". 4 Tap on the media to copy. 0 When "INSERT NEXT DISC" appears, change the disc. 10 After copying, tap "OK". 5 Tap "SELECT FROM SCENES" (video) or "SELECT FROM IMAGES" (still image). 11 Press and hold the M button for 2 seconds or more to turn off this unit and disconnect the USB cable. Caution : 0 Do not turn off the power or remove the USB cable until copying is complete. 0 Files that are not on the index screen during playback cannot be copied. 0 3D videos cannot be copied. Memo : 0 To check the created disc, refer to "Playing Back with an External Blu-ray Drive". "Playing Back with an External Blu-ray Drive" (A p. 82) Copying Selected Files Select and copy the desired videos or still images individually. 1 Select 3D or 2D mode. 0 While the video mode is shown in the image, the same operations apply for the still image mode. 6 Tap on the videos or still images to copy. 0 A check mark appears on the selected file. To remove the check mark, tap on the file again. 0 Tap "CHECK" to check the file. 7 After selecting all the files, tap "SAVE". 2 Select video or still image mode. 81
-
 1
1 -
2
-
3
-
4
-
5
-
6
-
7
-
8
-
9
-
10
-
11
-
12
-
13
-
14
-
15
-
16
-
17
-
18
-
19
-
20
-
21
-
22
-
23
-
24
-
25
-
26
-
27
-
28
-
29
-
30
-
31
-
32
-
33
-
34
-
35
-
36
-
37
-
38
-
39
-
40
-
41
-
42
-
43
-
44
-
45
-
46
-
47
-
48
-
49
-
50
-
51
-
52
-
53
-
54
-
55
-
56
-
57
-
58
-
59
-
60
-
61
-
62
-
63
-
64
-
65
-
66
-
67
-
68
-
69
-
70
-
71
-
72
-
73
-
74
-
75
-
 76
76 -
 77
77 -
 78
78 -
 79
79 -
 80
80 -
 81
81 -
 82
82 -
 83
83 -
 84
84 -
 85
85 -
 86
86 -
87
-
88
-
89
-
90
-
91
-
92
-
93
-
94
-
95
-
96
-
97
-
98
-
99
-
100
-
101
-
102
-
103
-
104
-
105
-
106
-
107
-
108
-
109
-
110
-
111
-
112
-
113
-
114
-
115
-
116
-
117
-
118
-
119
-
120
-
121
-
122
-
123
-
124
-
125
-
126
-
127
-
128
-
129
-
130
-
131
-
132
-
133
-
134
-
135
-
136
-
137
-
138
-
139
-
140
-
141
-
142
-
143
-
144
-
145
-
146
 |
 |
