JVC GS-TD1BUS Detailed User Guide - Page 19
Clock Setting, Index Screen, Menu Screen
 |
View all JVC GS-TD1BUS manuals
Add to My Manuals
Save this manual to your list of manuals |
Page 19 highlights
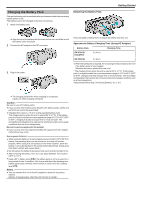
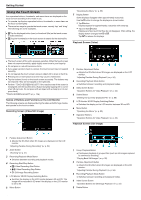
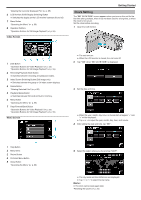
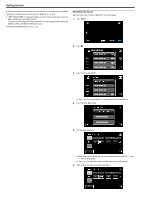
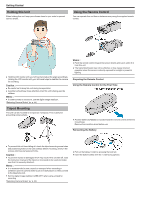
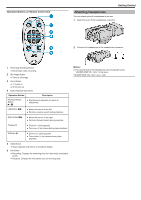
..... .. "Deleting the Currently Displayed File" (A p. 65) 6 LCD Monitor 3D/2D Display Switching Button 0 Switches the display on the LCD monitor between 3D and 2D. 7 Menu Button "Operating the Menu" (A p. 99) 8 Operation Buttons "Operation Buttons for Still Image Playback" (A p. 55) Index Screen Getting Started Clock Setting The "SET DATE/TIME!" screen appears when you turn on this unit for the first time after purchase, when it has not been used for a long time, or when the clock is not set yet. Set the clock before recording. 1 Open the LCD monitor. 1 Date Button "Operation Buttons for Video Playback" (A p. 53) "Operation Buttons for Still Image Playback" (A p. 55) 2 Recording/Playback Mode Button 0 Switches between recording and playback modes. 3 Index Screen Switching Button (Still image only) 0 Switches between the group or full index screen displays. 4 Delete Button "Deleting Selected Files" (A p. 65) 5 Playback Media Button 0 Switches between SD card and built-in memory. 6 Menu Button "Operating the Menu" (A p. 99) 7 Page Forward/Back Button "Operation Buttons for Video Playback" (A p. 53) "Operation Buttons for Still Image Playback" (A p. 55) Menu Screen 0 The unit turns on. 0 When the LCD monitor is closed, the unit turns off. 2 Tap "YES" when "SET DATE/TIME!" is displayed. 3 Set the date and time. 0 When the year, month, day, hour, or minute item is tapped, "∧" and "∨" will be displayed. 0 Tap ∧ or ∨ to adjust the year, month, day, hour, and minute. 4 After setting the date and time, tap "SET". 1 Help Button 2 Menu Items 3 Return Button 4 Common Menu Button 5 Close Button "Operating the Menu" (A p. 99) 5 Select the region where you live and tap "SAVE". 0 The city name and time difference are displayed. 0 Tap "" to select the city name. Memo : 0 The clock can be reset again later. "Resetting the Clock" (A p. 20) 19
-
 1
1 -
2
-
3
-
4
-
5
-
6
-
7
-
8
-
9
-
10
-
11
-
12
-
13
-
 14
14 -
 15
15 -
 16
16 -
 17
17 -
 18
18 -
 19
19 -
 20
20 -
 21
21 -
 22
22 -
 23
23 -
 24
24 -
25
-
26
-
27
-
28
-
29
-
30
-
31
-
32
-
33
-
34
-
35
-
36
-
37
-
38
-
39
-
40
-
41
-
42
-
43
-
44
-
45
-
46
-
47
-
48
-
49
-
50
-
51
-
52
-
53
-
54
-
55
-
56
-
57
-
58
-
59
-
60
-
61
-
62
-
63
-
64
-
65
-
66
-
67
-
68
-
69
-
70
-
71
-
72
-
73
-
74
-
75
-
76
-
77
-
78
-
79
-
80
-
81
-
82
-
83
-
84
-
85
-
86
-
87
-
88
-
89
-
90
-
91
-
92
-
93
-
94
-
95
-
96
-
97
-
98
-
99
-
100
-
101
-
102
-
103
-
104
-
105
-
106
-
107
-
108
-
109
-
110
-
111
-
112
-
113
-
114
-
115
-
116
-
117
-
118
-
119
-
120
-
121
-
122
-
123
-
124
-
125
-
126
-
127
-
128
-
129
-
130
-
131
-
132
-
133
-
134
-
135
-
136
-
137
-
138
-
139
-
140
-
141
-
142
-
143
-
144
-
145
-
146
 |
 |
