JVC GS-TD1BUS Detailed User Guide - Page 59
Playback, Caution
 |
View all JVC GS-TD1BUS manuals
Add to My Manuals
Save this manual to your list of manuals |
Page 59 highlights
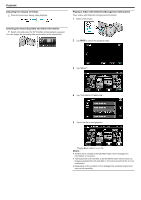
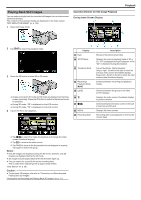
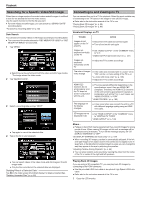
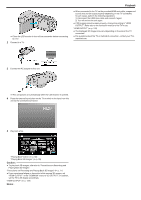
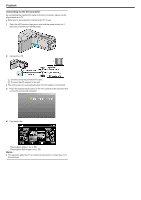
.... . 0 Close the LCD monitor to turn off the camcorder before connecting to a TV. 2 Connect to a TV. Playback 0 When connected to the TV via the provided HDMI mini cable, images and sounds may not be output properly depending on the TV connected. In such cases, perform the following operations. 1) Disconnect the HDMI mini cable and connect it again. 2) Turn off and on this unit again. 0 If 3D images cannot be seen properly, change the setting in "HDMI OUTPUT". Refer also to the instruction manual of the TV in use. "HDMI OUTPUT" (A p. 128) 0 The displayed 3D images may vary depending on the size of the TV connected. 0 For questions about the TV or method of connection, contact your TV's manufacturer. 3 Connect the AC adapter to this unit. 0 This unit powers on automatically when the LCD monitor is opened. 4 Press the external input button on the TV to switch to the input from this unit via the connected connector. 5 Play back a file. "Playing Back Videos" (A p. 52) "Playing Back Still Images" (A p. 55) Caution : 0 To play back 3D images, refer also to "Precautions on Recording and Playing Back 3D Images". "Precautions on Recording and Playing Back 3D Images" (A p. 11) 0 If you experience fatigue or discomfort while viewing 3D images, set "HDMI OUTPUT" in the "COMMON" menu to "2D OUTPUT". In addition, set the TV to 2D display accordingly. "HDMI OUTPUT" (A p. 128) Memo : 59
-
 1
1 -
2
-
3
-
4
-
5
-
6
-
7
-
8
-
9
-
10
-
11
-
12
-
13
-
14
-
15
-
16
-
17
-
18
-
19
-
20
-
21
-
22
-
23
-
24
-
25
-
26
-
27
-
28
-
29
-
30
-
31
-
32
-
33
-
34
-
35
-
36
-
37
-
38
-
39
-
40
-
41
-
42
-
43
-
44
-
45
-
46
-
47
-
48
-
49
-
50
-
51
-
52
-
53
-
 54
54 -
 55
55 -
 56
56 -
 57
57 -
 58
58 -
 59
59 -
 60
60 -
 61
61 -
 62
62 -
 63
63 -
 64
64 -
65
-
66
-
67
-
68
-
69
-
70
-
71
-
72
-
73
-
74
-
75
-
76
-
77
-
78
-
79
-
80
-
81
-
82
-
83
-
84
-
85
-
86
-
87
-
88
-
89
-
90
-
91
-
92
-
93
-
94
-
95
-
96
-
97
-
98
-
99
-
100
-
101
-
102
-
103
-
104
-
105
-
106
-
107
-
108
-
109
-
110
-
111
-
112
-
113
-
114
-
115
-
116
-
117
-
118
-
119
-
120
-
121
-
122
-
123
-
124
-
125
-
126
-
127
-
128
-
129
-
130
-
131
-
132
-
133
-
134
-
135
-
136
-
137
-
138
-
139
-
140
-
141
-
142
-
143
-
144
-
145
-
146
 |
 |
