Konica Minolta bizhub C552 bizhub C452/C552/C552DS/C652/C652DS Fax Driver Oper - Page 33
Sending a fax
 |
View all Konica Minolta bizhub C552 manuals
Add to My Manuals
Save this manual to your list of manuals |
Page 33 highlights
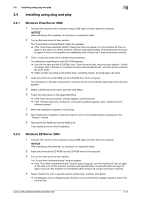
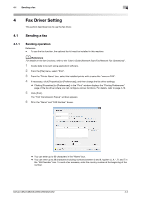
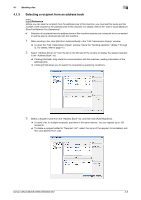
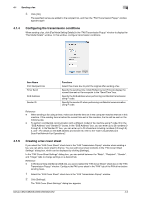
4.1 Sending a fax 4 4 Fax Driver Setting This section describes how to use the fax driver. 4.1 Sending a fax 4.1.1 Sending operation Reference - To use the fax function, the optional fax kit must be installed in this machine. d Reference For details on the fax functions, refer to the "User's Guide [Network Scan/Fax/Network Fax Operations]". 1 Create data to be sent using application software. 2 From the [File] menu, select "Print". 3 From the "Printer Name" box, select the installed printer with a name like "xxxxxxx FAX". 4 If necessary, click [Properties] (or [Preferences]), and then change the fax driver settings. % Clicking [Properties] (or [Preferences]) in the "Print" window displays the "Printing Preferences" page of the fax driver where you can configure various functions. For details, refer to page 4-10. 5 Click [Print]. The "FAX Transmission Popup" window appears. 6 Fill in the "Name" and "FAX Number" boxes. % You can enter up to 80 characters in the "Name" box. % You can enter up to 38 characters including numbers between 0 and 9, hyphen (-), #, *, P, and T in the "FAX Number" box. To send a fax overseas, enter the country number at the beginning of the number. bizhub C652/C652DS/C552/C552DS/C452 4-2
-
 1
1 -
2
-
3
-
4
-
5
-
6
-
7
-
8
-
9
-
10
-
11
-
12
-
13
-
14
-
15
-
16
-
17
-
18
-
19
-
20
-
21
-
22
-
23
-
24
-
25
-
26
-
27
-
 28
28 -
 29
29 -
 30
30 -
 31
31 -
 32
32 -
 33
33 -
 34
34 -
 35
35 -
 36
36 -
 37
37 -
 38
38 -
39
-
40
-
41
-
42
-
43
-
44
-
45
-
46
-
47
-
48
-
49
-
50
-
51
-
52
-
53
-
54
-
55
-
56
-
57
-
58
-
59
-
60
-
61
-
62
-
63
-
64
-
65
-
66
-
67
-
68
-
69
-
70
-
71
-
72
-
73
 |
 |
