Konica Minolta bizhub C552 bizhub C452/C552/C552DS/C652/C652DS Fax Driver Oper - Page 37
Configuring the transmission conditions, Creating a fax cover sheet
 |
View all Konica Minolta bizhub C552 manuals
Add to My Manuals
Save this manual to your list of manuals |
Page 37 highlights
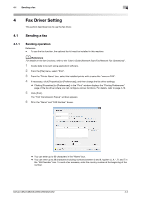
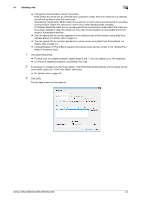
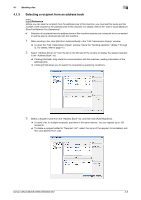
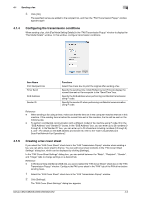
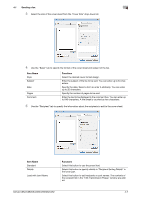
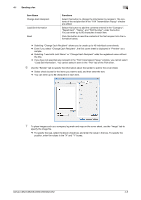
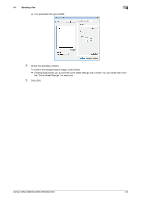
4.1 Sending a fax 4 4 Click [OK]. The specified names are added to the recipient list, and then the "FAX Transmission Popup" window appears again. 4.1.4 Configuring the transmission conditions When sending a fax, click [Fax Mode Setting Details] in the "FAX Transmission Popup" window to display the "Fax Mode Details" window. In this window, configure transmission conditions. Item Name Print Recipient File Timer Send SUB Address Sender ID Functions Select this check box to print the original after sending a fax. Specify the sending time. Click [Reflect Current Time] to display the current time set on the computer in the "Send Time" box. Specify the SUB address when performing confidential transmission using F code. Specify the sender ID when performing confidential communication using F code. Reference - When sending a fax using a timer, make sure that the time set in the computer matches that set in this machine. If the sending time is before the current time set in this machine, the fax will be sent on the following day. - To perform confidential communication with a different model of fax machine using F code, fill in the "SUB Address" and "Sender ID" boxes. In the "SUB Address" box, you can enter up to 20 numbers (0 through 9). In the"Sender ID" box, you can enter up to 20 characters including numbers (0 through 9), #, and *. For details on the SUB address and sender ID, refer to the "User's Guide [Network Scan/Fax/Network Fax Operations]". 4.1.5 Creating a fax cover sheet If you select the "FAX Cover Sheet" check box in the "FAX Transmission Popup" window when sending a fax, you can add a cover sheet to the fax. You can edit cover sheet contents in the "FAX Cover Sheet Settings" dialog box, which can be displayed by clicking [Settings]. In the "FAX Cover Sheet Settings" dialog box, you can switch between the "Basic", "Recipient", "Sender", and "Image" tabs to change settings on a desired tab. Reference - In Windows Vista x64/Server 2008 x64, you cannot select the "FAX Cover Sheet" check box in the "FAX Transmission Popup" window. Configure the FAX cover sheet in the "FAX" tab of the FAX driver before sending faxes. 1 Select the "FAX Cover Sheet" check box in the "FAX Transmission Popup" window. 2 Click [Settings]. The "FAX Cover Sheet Settings" dialog box appears. bizhub C652/C652DS/C552/C552DS/C452 4-6
-
 1
1 -
2
-
3
-
4
-
5
-
6
-
7
-
8
-
9
-
10
-
11
-
12
-
13
-
14
-
15
-
16
-
17
-
18
-
19
-
20
-
21
-
22
-
23
-
24
-
25
-
26
-
27
-
28
-
29
-
30
-
31
-
 32
32 -
 33
33 -
 34
34 -
 35
35 -
 36
36 -
 37
37 -
 38
38 -
 39
39 -
 40
40 -
 41
41 -
 42
42 -
43
-
44
-
45
-
46
-
47
-
48
-
49
-
50
-
51
-
52
-
53
-
54
-
55
-
56
-
57
-
58
-
59
-
60
-
61
-
62
-
63
-
64
-
65
-
66
-
67
-
68
-
69
-
70
-
71
-
72
-
73
 |
 |
