Konica Minolta bizhub C650 bizhub C650 PageScope Web Connections Operations Us - Page 58
User mode, If E-mail was selected.
 |
View all Konica Minolta bizhub C650 manuals
Add to My Manuals
Save this manual to your list of manuals |
Page 58 highlights
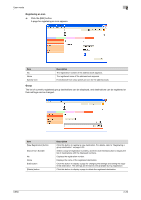
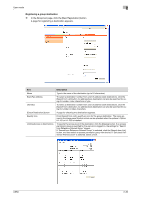
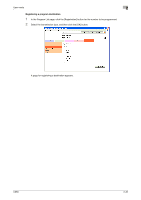
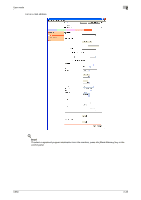
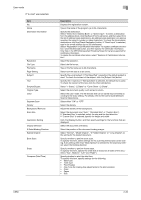
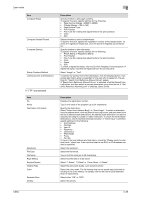
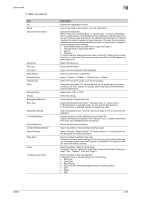
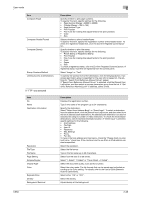
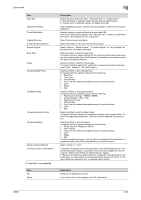
User mode If "E-mail" was selected. Item No. Name Destination Information Resolution File Type File Name Page Setting Subject Text Simplex/Duplex Original Type Color Separate Scan Density Background Removal Scan Size Application Setting Original Direction 2-Sided Binding Direction Special Original Book Scan Erase Compose (Date/Time) 2 Description Displays the registration number. Type in the name of the program (up to 24 characters). Specify the destination. Select "Select from Address Book" or "Direct Input". To select a destination from the address book, click the [Search from List] button, and then select from the list of address book destinations. An address book destination can also be searched for using its number or index characters. To check the transmission destinations, click the [Check Destination] button. If "Direct Input" is selected, type in the e-mail address (up to 320 characters). Select "Registration of Certification Information" to register certificate information. Click the [Browse] button, and then specify the certificate information. Only files in the DER (Distinguished Encoding Rules) format are supported for certificate information. To delete the certificate information, select "Deletion of Certification Information". Select the resolution. Select the file format. Type in the file name (up to 30 characters). Select how the data is to be saved. Specify the e-mail subject. If "Not Specified" is selected, the default subject is used. To check the content of the subject, click the [Subject List] button. Specify the e-mail text. If "Not Specified" is selected, the default text is used. To check the content of the text, click the [Text List] button. Select "1-Sided", "2-Sided" or "Cover Sheet + 2-Sided". Select the document quality, such as text or photo. Select the color mode. The file formats that can be saved may be limited according to the Color setting. For details, refer to the User's Guide [Network Scanner Operations]. Select either "ON" or "OFF". Select the density. Adjust the density of the background. Select the document size ("Auto", "Standard Size" or "Custom Size"). If "Standard Size" is selected, select the size and the feed direction. If "Custom Size" is selected, specify the height and width. Click the [Display] button, and then specify settings for the functions that are displayed. Select the document orientation. Select the position of the document binding margin. Select "Normal", "Mixed Original", "Z-Folded Original" or "Long Original" as the setting for the loaded document. Specify whether to perform book scan. To specify this item, select settings for the scanning method and center erasing. If any setting other than "Book Spread" is selected for the scanning method, select the binding direction. Specify whether to perform frame erase. To specify this item, specify the width that is erased on all sides of the document ("Top", "Bottom", "Left" and "Right"). Specify whether to print the date/time. To specify this item, specify settings for the following. • Date Type • Time Type • Print Position • Fine-Tune (for making fine adjustments to the print position) • Color • Pages • Size C650 2-34
-
 1
1 -
2
-
3
-
4
-
5
-
6
-
7
-
8
-
9
-
10
-
11
-
12
-
13
-
14
-
15
-
16
-
17
-
18
-
19
-
20
-
21
-
22
-
23
-
24
-
25
-
26
-
27
-
28
-
29
-
30
-
31
-
32
-
33
-
34
-
35
-
36
-
37
-
38
-
39
-
40
-
41
-
42
-
43
-
44
-
45
-
46
-
47
-
48
-
49
-
50
-
51
-
52
-
 53
53 -
 54
54 -
 55
55 -
 56
56 -
 57
57 -
 58
58 -
 59
59 -
 60
60 -
 61
61 -
 62
62 -
 63
63 -
64
-
65
-
66
-
67
-
68
-
69
-
70
-
71
-
72
-
73
-
74
-
75
-
76
-
77
-
78
-
79
-
80
-
81
-
82
-
83
-
84
-
85
-
86
-
87
-
88
-
89
-
90
-
91
-
92
-
93
-
94
-
95
-
96
-
97
-
98
-
99
-
100
-
101
-
102
-
103
-
104
-
105
-
106
-
107
-
108
-
109
-
110
-
111
-
112
-
113
-
114
-
115
-
116
-
117
-
118
-
119
-
120
-
121
-
122
-
123
-
124
-
125
-
126
-
127
-
128
-
129
-
130
-
131
-
132
-
133
-
134
-
135
-
136
-
137
-
138
-
139
-
140
-
141
-
142
-
143
-
144
-
145
-
146
-
147
-
148
-
149
-
150
-
151
-
152
-
153
-
154
-
155
-
156
-
157
-
158
-
159
-
160
-
161
-
162
-
163
-
164
-
165
 |
 |
