Kyocera KM-5530 Printing System Q Operation Guide (Functions)
Kyocera KM-5530 Manual
 |
View all Kyocera KM-5530 manuals
Add to My Manuals
Save this manual to your list of manuals |
Kyocera KM-5530 manual content summary:
- Kyocera KM-5530 | Printing System Q Operation Guide (Functions) - Page 1
1 Printer-related operation I 1. Operation Keys I 2. Procedure for Making Settings I 3. Menu Flow Chart I 4. Selecting the Printer Settings I 5. Options Chapter 2 Software-related operation I 1. Procedure for Installing and Printing with a Printer Driver I 2. Windows KX Driver I 3. Printer Driver - Kyocera KM-5530 | Printing System Q Operation Guide (Functions) - Page 2
the printing properties for the corresponding Printer Drivers. The explanations in this Operation Guide were written with the assumption that the user has a basic understanding of how to work in Microsoft Windows. For further information on using Windows, refer to your Microsoft Windows manual - Kyocera KM-5530 | Printing System Q Operation Guide (Functions) - Page 3
based on any third party claim. This limitation of remedies also applies to any developer of Programs supplied to IBM. IBM's and the developer's limitations of remedies are not cumulative. Such developer is an intended beneficiary of this Section. Some jurisdictions do not allow these limitations - Kyocera KM-5530 | Printing System Q Operation Guide (Functions) - Page 4
fonts in this printer are licensed from Japan-published specifications. Agfa Japan does not warrant that the Software is free from all bugs, errors and omissions. connection with the Software and Typefaces is repair or replacement of defective parts, upon their return to Agfa Japan. IN NO EVENT WILL - Kyocera KM-5530 | Printing System Q Operation Guide (Functions) - Page 5
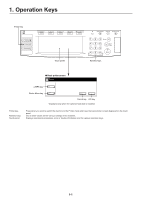
Touch panel: Press when you want to switch the machine to the Printer mode and have the basic printer screen displayed on the touch panel. Use to enter values for the various settings of this machine. Displays operational procedures, error or trouble information and the various operation keys. 1-1 - Kyocera KM-5530 | Printing System Q Operation Guide (Functions) - Page 6
the "e-MPS" key. The [Printer Menu] screen or [e-MPS] screen, as appropriate, will appear. • The "e-MPS" key is displayed only when the optional hard disk is installed. 3 Select the desired settings that you want to make. (Refer to "3. Menu Flow Chart" on page 3-1 for a list of the various settings - Kyocera KM-5530 | Printing System Q Operation Guide (Functions) - Page 7
3. Menu Flow Chart Printer menu Status Page print out 4-1 Selecting the interface network interface NetWare ON/OFF 4-5 NetWare Frame Type 4-5 TCP/IP ON/OFF 4-5 DHCP ON/OFF 4-5 IP address 4-5 Subnet Mask 4-6 Gateway address 4-6 Ether Talk ON/OFF 4-7 Network Card Status Page print - Kyocera KM-5530 | Printing System Q Operation Guide (Functions) - Page 8
3. Menu Flow Chart Selecting the emulation PCL6 Code set Line Printer Code set IBM Proprinter Code set DIABRO 630 Code set EPSON LQ-850 Code set KPDL KPDL Error Report print out ON/OFF KPDL (Auto) KPDL Error Report print out ON/OFF Auto emulation switching KC-GL KC-GL Page KC-GL Pen Font selection/ - Kyocera KM-5530 | Printing System Q Operation Guide (Functions) - Page 9
Paper Feed Source Duplex mode Stack select A4/Letter (8 1/2 x 11) usage ON/OFF RAM disk settings RAM disk ON/OFF Writing data Partition List print out RAM disk size Reading data Reading program data Deleting data Deleting font data Deleting program data Deleting macro data 3-3 4-17 4-17 4-18 4-18 - Kyocera KM-5530 | Printing System Q Operation Guide (Functions) - Page 10
3. Menu Flow Chart Hard disk settings Writing data Partition List print out Format hard disk Reading data Reading program data Deleting data Deleting font data Deleting program data Deleting macro data Memory card settings Writing data Partition List print out Format memory card Reading data Reading - Kyocera KM-5530 | Printing System Q Operation Guide (Functions) - Page 11
3. Menu Flow Chart ROM (option) settings Partition List print out Reading data Additional settings Form Feed Time Out Resource Protect mode Auto Continue ON/OFF and Recovery Time Service Maintenance menu Service Representative Status Page print out Printer Reset Dump received data 4-44 4-44 4-46 4- - Kyocera KM-5530 | Printing System Q Operation Guide (Functions) - Page 12
3. Menu Flow Chart e-MPS e-MPS settings Quick copy print out Private print/Stored job print out Virtual Mailbox data print out Virtual Mailbox Data List print out Code Job List print out e-MPS configurations 4-50 4-51 4-52 4-52 4-52 4-53 3-6 - Kyocera KM-5530 | Printing System Q Operation Guide (Functions) - Page 13
4. Selecting the Printer Settings 4-1 Status Page print out Prints out a list of such items as the printer default settings, memory volume, etc. G Accessing the Status Page print out screen Touch the "Print Status Page" key. The [Print Status Page] screen will appear. 1 Status Page print out Touch - Kyocera KM-5530 | Printing System Q Operation Guide (Functions) - Page 14
address. ^ Ether Talk ON/OFF OFF, ON & Network Card Status Page print out OFF, ON Prints out a Status page for the Network Card as well, when the standard Status Page (page 4-1) or that for use by your service representative (page 4-47) are printed out. A more detailed Status Page will be - Kyocera KM-5530 | Printing System Q Operation Guide (Functions) - Page 15
4. Selecting the Printer Settings G Accessing the Interface settings screen Touch the "Interface" key. The [Interface] screen will appear the desired TX/RX mode and then touch the "Close" key. The display will return to the [Printer Menu] screen. • To cancel the setting, touch the "Back" key. 4-3 - Kyocera KM-5530 | Printing System Q Operation Guide (Functions) - Page 16
4. Selecting the Printer Settings G Selecting the serial interface settings 1 Select "Serial" and then touch the "Detail" key. The [Serial] screen address %. Ether talk: Selects the Ether Talk setting ^. Option Status Page: Selects the setting for the Network Card Status Page print out &. 4-4 - Kyocera KM-5530 | Printing System Q Operation Guide (Functions) - Page 17
4. Selecting the Printer Settings 9 NetWare ON/OFF Select "ON" or "OFF", as desired, under the "Netware" setting and then touch the "Close" key. The display will return to the [Network] screen. • When "ON" is selected, the Frame Type settings will be displayed. • To cancel the setting, touch the " - Kyocera KM-5530 | Printing System Q Operation Guide (Functions) - Page 18
4. Selecting the Printer Settings 3 Use the numeric keys to input the first block of 3 digits of the address then press the sharp (#) key in order to input the - Kyocera KM-5530 | Printing System Q Operation Guide (Functions) - Page 19
4. Selecting the Printer Settings ^ Ether Talk ON/OFF Select "ON" or "OFF", as desired, and then touch the "Close" key. The display will return to the [Network] screen. • To cancel the setting, touch the "Back" key. & Network Card Status Page print out Select "ON" or "OFF", as desired, and then - Kyocera KM-5530 | Printing System Q Operation Guide (Functions) - Page 20
occurs. OFF, ON Select "ON" to have an Error Report printed out and "OFF" not to have any Error Report printed out. 4 Auto emulation switching Sets the back-up emulation mode when the emulation protocol has been set to KPDL (Auto). PCL6, Line Printer, IBM Proprinter, DIABRO 630, EPSON LQ-850, KC - Kyocera KM-5530 | Printing System Q Operation Guide (Functions) - Page 21
"Back" key. 3 Select the desired emulation and then touch the "Close" key. The display will return to the [Printer Menu] screen. • To cancel the setting, touch the "Back" key. 2 Code set 1 Select one of the following emulation protocols and then touch the "Detail" key. The selecting screen for the - Kyocera KM-5530 | Printing System Q Operation Guide (Functions) - Page 22
4. Selecting the Printer Settings 3 KPDL Error Report print out ON/OFF 1 Select one of the following emulation protocols and then touch the "Detail" key. The [KPDL (Auto)] screen will appear. KPDL, KPDL (Auto) 2 Select "ON" or "OFF", as desired, under the KPDL error setting and then touch the "Close - Kyocera KM-5530 | Printing System Q Operation Guide (Functions) - Page 23
4. Selecting the Printer Settings 6 KC-GL Pen 1 Use the "L" and "M" cursor keys to select the desired type of pen under the "Pen Adjust" setting and then touch the " - Kyocera KM-5530 | Printing System Q Operation Guide (Functions) - Page 24
the desired font. To select a font that is already installed in the printer, enter "I###" (with the desired font ID entered in place of ###). To verify font IDs, print out a Font List by following the procedure in "(18) Font List print out". It is possible to select a font other than those already - Kyocera KM-5530 | Printing System Q Operation Guide (Functions) - Page 25
the [Font] screen. • To cancel the setting, touch the "Back" key. 3 Select "Internal" and then touch the "Close" key. The display will return to the [Printer Menu] screen. • To cancel the setting, touch the "Back" key. 1 Selecting the font 1 Touch the "Font ID" key. The [Font ID] screen will appear - Kyocera KM-5530 | Printing System Q Operation Guide (Functions) - Page 26
and then touch the "Close" key. The display will return to the [Printer Menu] screen. • To cancel the setting, touch the "Back" key. 4 Font List print out Touch the "List of Font" key. The Font List will be printed out. G Optional font setting 1 Touch the "Change Interface" key. The [Interface - Kyocera KM-5530 | Printing System Q Operation Guide (Functions) - Page 27
4. Selecting the Printer Settings 1 Selecting a font 1 Touch the "Font ID" key. The [Font ID] screen will appear. 2 Select the font ID by following the same procedure as for the internal fonts. 4 Font List print out Touch the "List of Font" key. The font list will be printed out. 4-15 - Kyocera KM-5530 | Printing System Q Operation Guide (Functions) - Page 28
printer functions, select the various settings according to your printing needs. Item Available settings Remarks 1 Number of copies 001 - 999 2 Printing data to avoid any Print Overrun Error and, if necessary, automatically turn Page Protect "ON". If a Print Overrun Error does happen to occur - Kyocera KM-5530 | Printing System Q Operation Guide (Functions) - Page 29
4. Selecting the Printer Settings G Accessing the Page Settings screen Touch the "Page set" key. will return to the [Page set] screen. • To cancel the setting, touch the "Back" key. 2 Printing orientation 1 Use the "L" and "M" cursor keys to select "Orientation" and then touch the "Change" key. - Kyocera KM-5530 | Printing System Q Operation Guide (Functions) - Page 30
4. Selecting the Printer Settings 4 Select the desired printing orientation and then touch the "Close" key. The display will return to the [Page set] screen. • To cancel the setting, touch the "Back" key. 3 Printing reduction 1 Use the "L" and "M" cursor keys to select "Zoom" and then touch the " - Kyocera KM-5530 | Printing System Q Operation Guide (Functions) - Page 31
4. Selecting the Printer Settings 5 Linefeed (LF) action 1 Use the "L" and "M" cursor keys to select "LF Action" and then touch the "Change" key. The [LF Action] screen will appear. 2 - Kyocera KM-5530 | Printing System Q Operation Guide (Functions) - Page 32
4. Selecting the Printer Settings 3 Select the desired interface and then touch the "Close" key. The display will return to the [CR Action] screen. • To cancel the setting, touch - Kyocera KM-5530 | Printing System Q Operation Guide (Functions) - Page 33
printer functions, select the various settings according to your printing needs. Item Available settings 1 Smoothing mode ON/OFF Allows a printing ON Allows printing in a toner-saving mode. Use this mode for test pages, etc., when high printing quality is not required. 3 Printing Resolution - Kyocera KM-5530 | Printing System Q Operation Guide (Functions) - Page 34
4. Selecting the Printer Settings G Accessing the Printing Quality settings screen 1 Touch the "Print Quality" key. The [Print Quality] screen will mode ON/OFF 1. EcoPrint Mode: EcoPrint ON/OFF 2. Resolution: Printing Resolution 3. 3 Select the desired setting for each item and then touch the - Kyocera KM-5530 | Printing System Q Operation Guide (Functions) - Page 35
possible to perform paper settings for the 5 items shown in the following chart. For the most efficient use of the printer functions, select the various settings according to your printing needs. Item 1 Bypass mode If "First" is selected here and there is paper set in the bypass table, paper feed - Kyocera KM-5530 | Printing System Q Operation Guide (Functions) - Page 36
4. Selecting the Printer Settings G Accessing the Paper settings screen 1 Touch the "Paper Handling" key. The [Paper Handling] screen will appear. 2 Use the "L" and "M" cursor keys to select the - Kyocera KM-5530 | Printing System Q Operation Guide (Functions) - Page 37
hard disk is installed. IMPORTANT! The RAM Disk is created from that portion of the printer's memory that is normally available to the user. Thus, if the size of the RAM disk created is too large, printing is sent from the host computer. 3 Partition List print out 4 RAM disk size Sets the amount of - Kyocera KM-5530 | Printing System Q Operation Guide (Functions) - Page 38
4. Selecting the Printer Settings Item 9 Deleting program data Deletes the selected program data from the RAM disk. 0 Deleting macro data Deletes the selected macro data from the RAM - Kyocera KM-5530 | Printing System Q Operation Guide (Functions) - Page 39
is received from a computer, "Processing" will be displayed in the [Printer Menu] screen. Once the operation is completed, "Waiting" will be displayed. 3 Partition List print out Touch the "List of Partitions" key. A Partition List will be printed out. 4 RAM disk size 1 Touch the "RAM DISK Size" key - Kyocera KM-5530 | Printing System Q Operation Guide (Functions) - Page 40
Mode] screen, touch the "Cancel" key. 3 Touch the "Enter" key. The display will return to the basic printer screen and the data will be read. • "Processing" will be displayed in the basic printer screen while the data is being read. 6 Reading program data 1 Touch the "Program" key under the "Read - Kyocera KM-5530 | Printing System Q Operation Guide (Functions) - Page 41
] screen, touch the "Cancel" key. 3 Touch the "Delete" key. The display will return to the basic printer screen and the data will be deleted. • "Processing" will be displayed in the basic printer screen while the data is being deleted. 8 Deleting font data 1 Touch the "Font" key under the "Delete - Kyocera KM-5530 | Printing System Q Operation Guide (Functions) - Page 42
, touch the "Cancel" key. 3 Touch the "Delete" key. The display will return to the basic printer screen and the program data will be deleted. • "Processing" will be displayed in the basic printer screen while the program data is being deleted. 0 Deleting macro data 1 Touch the "Macro" key under - Kyocera KM-5530 | Printing System Q Operation Guide (Functions) - Page 43
use of the printer functions, select the various settings according to your printing needs. Item 1 Writing data If "Write Data" is selected here, the machine will enter a "waiting for data" state until data is sent from the host computer. 2 Partition List print out 3 Format hard disk If "Yes - Kyocera KM-5530 | Printing System Q Operation Guide (Functions) - Page 44
Partition List will be printed out. 3 Format hard disk 1 Touch the "Format" key. • It is only possible to format the hard disk when there is a format error on the disk. In any other case, the hard disk will NOT be formatted. 2 Touch the "Yes" key. The display will return to the basic printer screen - Kyocera KM-5530 | Printing System Q Operation Guide (Functions) - Page 45
to select the program data that you want to be read. • If you want to return to the [Hard Disk] screen, touch the "Cancel" key. 3 Touch the "Enter" key. The display will return to the basic printer screen and the program data will be read. • "Processing" will be displayed in the basic - Kyocera KM-5530 | Printing System Q Operation Guide (Functions) - Page 46
keys to select the font data that you want to delete. • If you want to return to the [Hard Disk] screen, touch the "Cancel" key. 3 Touch the "Delete" key. The display will return to the basic printer screen and the font data will be deleted. • "Processing" will be displayed in the basic - Kyocera KM-5530 | Printing System Q Operation Guide (Functions) - Page 47
keys to select the program data that you want to delete. • If you want to return to the [Hard Disk] screen, touch the "Cancel" key. 3 Touch the "Delete" key. The display will return to the basic printer screen and the program data will be deleted. • "Processing" will be displayed in the basic - Kyocera KM-5530 | Printing System Q Operation Guide (Functions) - Page 48
OFF (O) BEFORE inserting or removing the Memory Card. About the memory card settings It is possible to perform memory card settings for the 11 items shown in the following chart. For the most efficient use of the printer functions, select the various settings according to your printing needs. Item - Kyocera KM-5530 | Printing System Q Operation Guide (Functions) - Page 49
4. Selecting the Printer Settings Item Available settings Remarks 6 Reading program data Reads the selected program data from the memory card. Select from among the program partition names that - Kyocera KM-5530 | Printing System Q Operation Guide (Functions) - Page 50
operation is completed, "Waiting" will be displayed. 2 Partition List print out Touch the "List of Partitions" key. A Partition List will be printed out. 3 Format memory card 1 Touch the "Format" key. • ALWAYS format the memory card using this printer. 2 Touch the "Yes" key. The display will return - Kyocera KM-5530 | Printing System Q Operation Guide (Functions) - Page 51
[Memory Card] screen, touch the "Cancel" key. 3 Touch the "Enter" key. The display will return to the basic printer screen and the data will be read. • "Processing" will be displayed in the basic printer screen while the data is being read. 5 Reading font data 1 Touch the "Fonts" key under the "Read - Kyocera KM-5530 | Printing System Q Operation Guide (Functions) - Page 52
"Macro" key under the "Read" setting. 2 Touch the "Yes" key. The display will return to the basic printer screen and the macro data will be read. • "Processing" will be displayed in the basic printer screen while the macro data is being read. • If you select "No" here, the macro data will not - Kyocera KM-5530 | Printing System Q Operation Guide (Functions) - Page 53
] screen, touch the "Cancel" key. 3 Touch the "Delete" key. The display will return to the basic printer screen and the data will be deleted. • "Processing" will be displayed in the basic printer screen while the data is being deleted. 9 Deleting font data 1 Touch the "Font" key under the "Delete - Kyocera KM-5530 | Printing System Q Operation Guide (Functions) - Page 54
, touch the "Cancel" key. 3 Touch the "Delete" key. The display will return to the basic printer screen and the program data will be deleted. • "Processing" will be displayed in the basic printer screen while the program data is being deleted. ! Deleting macro data 1 Touch the "Macro" key under - Kyocera KM-5530 | Printing System Q Operation Guide (Functions) - Page 55
2 items shown in the following chart. For the most efficient use of the printer functions, select the various settings according to your printing needs. Item 1 Partition List print out Available settings List of Partitions Remarks 2 Reading data Reads the selected data from ROM (option). Select - Kyocera KM-5530 | Printing System Q Operation Guide (Functions) - Page 56
4. Selecting the Printer Settings G Accessing the ROM (option) settings screen Touch the "Option ROM" key. The [Option ROM] screen will appear. 1 Partition List print out Touch the "List of Partitions" key. A Partition List will be printed out. 2 Reading data 1 Touch the "Data" key under the "Read" - Kyocera KM-5530 | Printing System Q Operation Guide (Functions) - Page 57
to have the error state released and printing continue after a service personnel. Print Status Page 5 Printer Reset Resets only the Printer Board without the need to turn off power to the machine. Printer Reset 6 Dump received data Data received by the printer is printed out in hex code - Kyocera KM-5530 | Printing System Q Operation Guide (Functions) - Page 58
4. Selecting the Printer Settings G Accessing the Additional settings screen Touch the "Others" key. The [Others] screen will appear. 1 Form Feed Time Out 1 Use the "L" and "M" cursor keys to - Kyocera KM-5530 | Printing System Q Operation Guide (Functions) - Page 59
4. Selecting the Printer Settings 3 Auto Continue ON/OFF and Recovery Time 1 Use the "L" setting, touch the "Back" key. 4 Service Maintenance menu 1 Touch the "Service" key. 2 Service Representative Status Page print out Touch the "Print Status Page" key. A Service Representative Status Page will be - Kyocera KM-5530 | Printing System Q Operation Guide (Functions) - Page 60
" key. 2 Touch the "Yes" key. The Printer Board will be reset. • If you select "No" here, the display will return to the [Others] screen. 6 Dump received data 1 Touch the "Print HEX-DUMP" key. 2 Touch the "Yes" key. A hex-dump of the received data will be printed out. • If you select "No" here, the - Kyocera KM-5530 | Printing System Q Operation Guide (Functions) - Page 61
which is designated for the "Virtual Mailbox (VMB)" setting in the printer driver. 4 Virtual Mailbox Data List print out Print out of the Virtual Mailbox List 5 Code Job List print out Print out of the Cod JOB List 6 e-MPS configurations Number of quick copy jobs, The following maximum size - Kyocera KM-5530 | Printing System Q Operation Guide (Functions) - Page 62
4. Selecting the Printer Settings G Accessing the e-MPS settings screen Touch the "e-MPS" key. The [e-MPS] screen will appear. 1 Quick copy print out 1 Touch the "Quick Copy" key. 2 Use the "L" and "M" cursor keys to select your user name and then touch the "Next" key. 3 Use the "L" and "M" cursor - Kyocera KM-5530 | Printing System Q Operation Guide (Functions) - Page 63
4. Selecting the Printer Settings 2 Private print/Stored job print out 1 Touch the "Private/Stored" key. 2 Use the "L" and "M" cursor keys to select your user name and then touch the "Next" key. 3 Use the "L" and "M" cursor keys to select the desired job. 4 Use the "+" and/or "-" key or the numeric - Kyocera KM-5530 | Printing System Q Operation Guide (Functions) - Page 64
" key and printing will begin. • If you want to cancel printing, touch the "CANCEL" key. 4 Virtual Mailbox Data List print out Touch the "List of VMB" key. A Virtual Mailbox Data List will be printed out. 5 Code Job List print out Touch the "List of Code JOB" key. A Code Job List will be printed out - Kyocera KM-5530 | Printing System Q Operation Guide (Functions) - Page 65
4. Selecting the Printer Settings 6 e-MPS configurations 1 Touch the "Configuration" key. 2 registered. • To cancel the setting, touch the "Back" key. 4 Temporary protection for code job size/Permanent protection for code job size/VMB size Use the "L" and "M" cursor keys to select the desired item - Kyocera KM-5530 | Printing System Q Operation Guide (Functions) - Page 66
e-MPS function. Barcode Reader If the optional barcode reader is installed in this machine, the machine can read barcodes that are in the job list and print the corresponding data that is saved on the hard disk. For detailed information, refer to the Instruction Manual for the Barcode Reader. 5-1 - Kyocera KM-5530 | Printing System Q Operation Guide (Functions) - Page 67
Printing with a Printer Driver 1-1 Included printer drivers The following printer drivers are included with this product. * Each type of printer driver has a version appropriate to a specific model of copy machine. Be sure to choose the driver that is appropriate for your copier. Driver type KX - Kyocera KM-5530 | Printing System Q Operation Guide (Functions) - Page 68
1. Procedure for Installing and Printing with a Printer Driver 1-2 System Conditions G Windows 95/98 Recommended requirements CD-ROM drive CPU RAM HDD Pentium 90 MHz or more 16 MB or more 10 MB or more 1 drive G Windows NT 4.0 Recommended requirements CD-ROM drive CPU RAM HDD Pentium 90 MHz or - Kyocera KM-5530 | Printing System Q Operation Guide (Functions) - Page 69
. I [Network] Click to display the KM-NET VIEWER's installation menu. Follow the instructions displayed on the screen to install the KM-NET VIEWER. I Documentation Click to display the manual (PDF) supplied with the printer driver. To open this PDF manual, Adobe Acrobat Reader (developed to view PDF - Kyocera KM-5530 | Printing System Q Operation Guide (Functions) - Page 70
and Printing with a Printer Driver 1-4 Installing the Printer Driver (Windows) Install the printer driver as follows: * The printer can be connected to the computer by one of the following two methods: local or network. If you want to connect them through network, refer to the operation manual of - Kyocera KM-5530 | Printing System Q Operation Guide (Functions) - Page 71
regarding each printer driver. 8 All available options will be displayed. Select the items that you want to install and then click on the [Next] button. 9 Select the connection type: Local or Network. • Local: The printer is connected directly to the parallel port. • Network: The printer is - Kyocera KM-5530 | Printing System Q Operation Guide (Functions) - Page 72
1. Procedure for Installing and Printing with a Printer Driver 11 Select a printer port. From the list, select the desired port, then click Next. * Normally, set to LPT1. * When installing the printer driver for Windows NT, the Add LPR Port button will appear below the box, so press the button to - Kyocera KM-5530 | Printing System Q Operation Guide (Functions) - Page 73
with this product. 1 Start Windows. 2 Insert the printer driver installer CD-ROM into the CD-ROM drive on your computer. The window shown on the right will appear. 3 Click on [Driver Tools] and then on [Remove Drivers] from the subsequent menu. The [Remove Printer Drivers] dialog box will appear - Kyocera KM-5530 | Printing System Q Operation Guide (Functions) - Page 74
and Printing with a Printer Driver 1-6 Printing The following is an example procedure for printing using a printer driver under the conditions and environment noted below. • OS: Windows 98 • Printer driver: KPDL2 Driver • Application: Wordpad • Printing conditions: Print and staple - Kyocera KM-5530 | Printing System Q Operation Guide (Functions) - Page 75
Printing with a Printer Driver 6 G Printing from the application Use the application that you want to use to open the document that you want to print. 7 Select [Print] in the [File] menu. The [Print be printed. Select this printer in the [Name] field. Click on [Properties]. The Properties window will - Kyocera KM-5530 | Printing System Q Operation Guide (Functions) - Page 76
printer driver. * Depending upon the model of your copier, there may be functions that are not supported or that require optional equipment to be installed. Even if the settings for such functions are performed, they will not be effective. * Refer to the Instruction Manual for Windows regarding - Kyocera KM-5530 | Printing System Q Operation Guide (Functions) - Page 77
Windows KX Driver 2-2 Media Tab I Paper Size: Allows you to select a standard size of paper size. The following sizes of paper can be used with this printer have the image printed upside-down. for 55 ppm copier). I Media Type specific type of paper, select "Auto Media Selection". The factory default - Kyocera KM-5530 | Printing System Q Operation Guide (Functions) - Page 78
Windows KX Driver 2-2-1 Custom Paper Size dialog box I Setting a custom paper size Perform the following procedure in order to register a custom size when you want to print click on the desired size to select it and then click on the "Remove" button. 2 Type into the "Name" field the name you want to - Kyocera KM-5530 | Printing System Q Operation Guide (Functions) - Page 79
2. Windows KX Driver 2-2-2 Advanced Media Settings I Cover Mode: Allows you to add a cover page (front or front and back cover page). The paper for the cover page will be fed from the manual feed tray. Front Feeds a paper from the manual feed tray and attaches it as the front cover. Front and Back - Kyocera KM-5530 | Printing System Q Operation Guide (Functions) - Page 80
2. Windows KX Driver 2-3 Layout Tab I Pages per Sheet: Allows you to print reduced images of multiple (1, 2, 4, 6, 9, 16 or 25) pages onto a single sheet of paper. This function is called "N-Up" printing (where "N" equals the number of image pages). Reduction of the images is calculated - Kyocera KM-5530 | Printing System Q Operation Guide (Functions) - Page 81
2. Windows KX Driver 2-4 Imaging Tab I Print Quality Selects the quality at which printing will be accomplished. [High Quality Enables printing at the highest quality possible for the printer being used. [Proof Prints at a resolution of 600 dpi. * This [Proof] function is not available when - Kyocera KM-5530 | Printing System Q Operation Guide (Functions) - Page 82
2. Windows KX Driver 2-4-1 Print Quality Settings dialog box I Resolution Specifies the printing resolution (number of dots per inch) to be used when printing. Select between "1200 dpi Fast", "600 dpi" and "300 dpi". Depending upon the emulation protocol being used, the "1200 dpi Fast" setting may - Kyocera KM-5530 | Printing System Q Operation Guide (Functions) - Page 83
2. Windows KX Driver 2-5 Prologue/Epilogue Tab I Disable Feature Make sure there is NO check mark in this checkbox if you want to use the printer's overlay function. The overlay function will allow you to have selected macro data printed out on top of your documents. I Add Click on this button when - Kyocera KM-5530 | Printing System Q Operation Guide (Functions) - Page 84
2. Windows KX Driver 2-6 Output Tab I Output to: Specifies the location of ejection of printed copies. Selection is possible when the optional output devices are installed. [Printer Default Copies will be ejected into the location that is selected in the "Stack select" setting of the printer as the - Kyocera KM-5530 | Printing System Q Operation Guide (Functions) - Page 85
2. Windows KX Driver I Staple Stapling is possible if the optional finisher is installed. * The "Rotated" as the "Orientation" setting in the "Media" Tab. I Offset This mode groups prints made from multiple originals and ejects them each one slightly shifted from the precious one. Offsetting is - Kyocera KM-5530 | Printing System Q Operation Guide (Functions) - Page 86
Copy This mode allows you to use the operation panel to print out an additional number of copies for a specific print job whenever necessary. The factory default setting for the number of print jobs that can be saved on the hard disk of the printer is 32 (up to 50 possible under e-MPS settings). If - Kyocera KM-5530 | Printing System Q Operation Guide (Functions) - Page 87
2. Windows KX Driver 3 If you selected [Private Print] or [Job Storage], input a password in the [Access Code] field. This password can be any 4-digit number from 0000 to 9999. You will need to input this password from the printer operation panel in order to print out. Even if you selected "Job - Kyocera KM-5530 | Printing System Q Operation Guide (Functions) - Page 88
2. Windows KX Driver Selecting a virtual mailbox 4 Place a check in the [Job Storage (e-MPS)] Defined Names] list and click on the [OK] button. 7 Select [Application Defined] or [Custom] under [Job Name]. If you selected [Custom], input a user name. 8 Click on the [OK] button. Printing using the - Kyocera KM-5530 | Printing System Q Operation Guide (Functions) - Page 89
2. Windows KX Driver I How to perform barcode printing * The optional Barcode Reader must be installed in order to perform barcode printing. 1 Click in ], input a user name. 4 Click on the [OK] button. Barcode printing will now be possible. I Tandem print * If you connect 2 copiers together you will - Kyocera KM-5530 | Printing System Q Operation Guide (Functions) - Page 90
2. Windows KX Driver 2-7 Device Settings Tab I Device Options If any optional devices are installed, put a check mark in the checkbox for that . G Tandem Unit Perform this setting when the optional tandem Unit is installed. Select this option When using two copier in tandem fo printing purposes. 2-15 - Kyocera KM-5530 | Printing System Q Operation Guide (Functions) - Page 91
2. Windows KX Driver G Hard Disk Perform this setting when the optional Hard Disk is installed. In order to register a Virtual Mailbox, put a check mark in the checkbox next to [Hard Disk] and then double-click on the [Optional Hard Disk] name to access the [Hard Disk Settings] dialog box. G RAM - Kyocera KM-5530 | Printing System Q Operation Guide (Functions) - Page 92
Copy Management is turned ON, even if you send a print command with a DOS "COPY" command, printing will not be possible if you do not use a printer driver. I Set Password Click on this button if you want to add a password to this setting. The [Set Password] dialogue box will appear. Note If, for any - Kyocera KM-5530 | Printing System Q Operation Guide (Functions) - Page 93
2. Windows KX Driver I Registering management codes 1 Click on the "Edit list" button. The "Code list" dialog box will appear. 2 Click on the "Add" button. The "Add Code" dialog box will appear. 3 Type in the desired information in the "Code" and "Description" fields and then click on the "OK" - Kyocera KM-5530 | Printing System Q Operation Guide (Functions) - Page 94
of Adobe Acrobat Reader is supplied in folder. C: [README] This file contains information which is not explained in the manuals. Please read this file before using the printer driver. D: [Welcome.pdf] Kyocera Mita Digital Library screen will appear. Click the available model on screen. The online - Kyocera KM-5530 | Printing System Q Operation Guide (Functions) - Page 95
3. Printer Driver for Macintosh 2 Double-Click on the icon for the CD-ROM disk. The content of the CD-ROM will be displayed. 3 The installer by country and by language is supplied in "Driver" folder. Double-Click the available driver installer to start. The installation screen will appear. 4 Click - Kyocera KM-5530 | Printing System Q Operation Guide (Functions) - Page 96
once on the LaserWriter 8 icon. Select the name of this printer in the [Select a PostScript Printer] list and then click on 9 the [Create] button. * The name of this printer can be verified by printing out a Status Page from the printer's operation panel. A dialog box for selecting the appropriate
-
 1
1 -
 2
2 -
 3
3 -
 4
4 -
 5
5 -
 6
6 -
 7
7 -
8
-
9
-
10
-
11
-
12
-
13
-
14
-
15
-
16
-
17
-
18
-
19
-
20
-
21
-
22
-
23
-
24
-
25
-
26
-
27
-
28
-
29
-
30
-
31
-
32
-
33
-
34
-
35
-
36
-
37
-
38
-
39
-
40
-
41
-
42
-
43
-
44
-
45
-
46
-
47
-
48
-
49
-
50
-
51
-
52
-
53
-
54
-
55
-
56
-
57
-
58
-
59
-
60
-
61
-
62
-
63
-
64
-
65
-
66
-
67
-
68
-
69
-
70
-
71
-
72
-
73
-
74
-
75
-
76
-
77
-
78
-
79
-
80
-
81
-
82
-
83
-
84
-
85
-
86
-
87
-
88
-
89
-
90
-
91
-
92
-
93
-
94
-
95
-
96
 |
 |
Operation Guide
<Functions Edition>
Q
Introduction
Chapter 1
Printer-related operation
■
1. Operation Keys
■
2. Procedure for Making Settings
■
3. Menu Flow Chart
■
4. Selecting the Printer Settings
■
5. Options
Chapter 2
Software-related operation
■
1. Procedure for Installing and Printing
with a Printer Driver
■
2. Windows KX Driver
■
3. Printer Driver for Macintosh