Linksys SPA922 Cisco SPA9000 Voice System Using Setup Wizard Installation and - Page 123
Configuring Your AA Script, Default, Basic, Advanced, Basic AA, Ring Receptionist
 |
UPC - 745883570836
View all Linksys SPA922 manuals
Add to My Manuals
Save this manual to your list of manuals |
Page 123 highlights
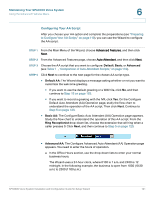
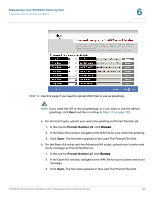
Maintaining Your SPA9000 Voice System Using the Advanced Features Menu 6 Configuring Your AA Script After you choose your AA option and complete the preparations (see "Preparing to Configure Your AA Script," on page 119), you can use the Wizard to configure the AA script. STEP 1 From the Main Menu of the Wizard, choose Advanced Features, and then click Next. STEP 2 From the Advanced Features page, choose Auto Attendant, and then click Next. STEP 3 Choose the AA script that you want to configure: Default, Basic, or Advanced (see Table1 , 'Comparison of Auto Attendant Scripts," on page118). STEP 4 Click Next to continue to the next page for the chosen AA script type. • Default AA: The Wizard displays a message asking whether or not you want to customize the welcome greeting. • If you want to use the default greeting or a WAV file, click No, and then continue to Step 13 on page 125. • If you want to record a greeting with the IVR, click Yes. On the Configure Default Auto Attendant (AA) Operation page, study the flow chart to understand the operation of the AA script. Then click Next. Continue to Step 5 on page 123. • Basic AA: The Configure Basic Auto Attendant (AA) Operation page appears. Study the flow chart to understand the operation of this AA script. From the Ring Receptionist drop-down list, choose the extension that will ring when a caller presses 0. Click Next, and then continue to Step 5 on page 123. • Advanced AA: The Configure Advanced Auto Attendant (AA) Operation page appears. You need to enter the hours of operation. a. In the Office Hours section, use the drop-down lists to enter your normal business hours. The Wizard uses a 24-hour clock, where 0100 is 1 a.m. and 2400 is 12 midnight. In the following example, the business is open from 1030 (10:30 a.m.) to 2300 (11:00 p.m.). SPA9000 Voice System Installation and Configuration Guide for Setup Wizard 121
-
 1
1 -
2
-
3
-
4
-
5
-
6
-
7
-
8
-
9
-
10
-
11
-
12
-
13
-
14
-
15
-
16
-
17
-
18
-
19
-
20
-
21
-
22
-
23
-
24
-
25
-
26
-
27
-
28
-
29
-
30
-
31
-
32
-
33
-
34
-
35
-
36
-
37
-
38
-
39
-
40
-
41
-
42
-
43
-
44
-
45
-
46
-
47
-
48
-
49
-
50
-
51
-
52
-
53
-
54
-
55
-
56
-
57
-
58
-
59
-
60
-
61
-
62
-
63
-
64
-
65
-
66
-
67
-
68
-
69
-
70
-
71
-
72
-
73
-
74
-
75
-
76
-
77
-
78
-
79
-
80
-
81
-
82
-
83
-
84
-
85
-
86
-
87
-
88
-
89
-
90
-
91
-
92
-
93
-
94
-
95
-
96
-
97
-
98
-
99
-
100
-
101
-
102
-
103
-
104
-
105
-
106
-
107
-
108
-
109
-
110
-
111
-
112
-
113
-
114
-
115
-
116
-
117
-
 118
118 -
 119
119 -
 120
120 -
 121
121 -
 122
122 -
 123
123 -
 124
124 -
 125
125 -
 126
126 -
 127
127 -
 128
128 -
129
-
130
-
131
-
132
-
133
-
134
-
135
-
136
-
137
-
138
-
139
-
140
-
141
-
142
-
143
-
144
-
145
-
146
-
147
-
148
-
149
-
150
-
151
-
152
-
153
-
154
-
155
-
156
-
157
-
158
-
159
-
160
-
161
-
162
-
163
 |
 |
