Linksys SPA922 Cisco SPA9000 Voice System Using Setup Wizard Installation and - Page 141
Replacing a Phone (Experts Only), Add New, Voice Mail, Save / Load Configuration
 |
UPC - 745883570836
View all Linksys SPA922 manuals
Add to My Manuals
Save this manual to your list of manuals |
Page 141 highlights
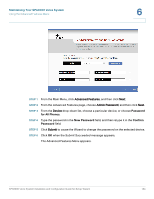
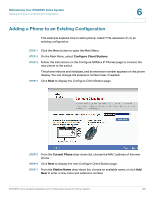
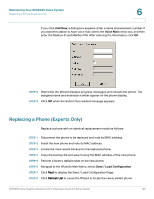
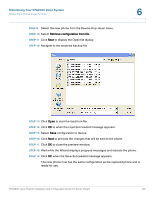
Maintaining Your SPA9000 Voice System Replacing a Phone (Experts Only) 6 If you click Add New, a dialog box appears. Enter a name and extension number. If you want this station to have voice mail, select the Voice Mail check box, and then enter the Mailbox ID and Mailbox PIN. After entering the information, click OK. STEP 8 Wait while the Wizard displays progress messages and reboots the phone. The assigned name and extension number appear on the phone display. STEP 9 Click OK when the Submit Succeeded message appears. Replacing a Phone (Experts Only) Replace a phone with an identical replacement model as follows: STEP 1 Disconnect the phone to be replaced and note its MAC address. STEP 2 Install the new phone and note its MAC address. STEP 3 Locate the most recent backup for the replaced phone. STEP 4 Copy the backup file and save it using the MAC address of the new phone. STEP 5 Perform a factory default reset on the new phone. STEP 6 Navigate to the Wizard's Main Menu, select Save / Load Configuration. STEP 7 Click Next to display the Save / Load Configuration Page. STEP 8 Click Refresh List to cause the Wizard to locate the newly added phone. SPA9000 Voice System Installation and Configuration Guide for Setup Wizard 139
-
 1
1 -
2
-
3
-
4
-
5
-
6
-
7
-
8
-
9
-
10
-
11
-
12
-
13
-
14
-
15
-
16
-
17
-
18
-
19
-
20
-
21
-
22
-
23
-
24
-
25
-
26
-
27
-
28
-
29
-
30
-
31
-
32
-
33
-
34
-
35
-
36
-
37
-
38
-
39
-
40
-
41
-
42
-
43
-
44
-
45
-
46
-
47
-
48
-
49
-
50
-
51
-
52
-
53
-
54
-
55
-
56
-
57
-
58
-
59
-
60
-
61
-
62
-
63
-
64
-
65
-
66
-
67
-
68
-
69
-
70
-
71
-
72
-
73
-
74
-
75
-
76
-
77
-
78
-
79
-
80
-
81
-
82
-
83
-
84
-
85
-
86
-
87
-
88
-
89
-
90
-
91
-
92
-
93
-
94
-
95
-
96
-
97
-
98
-
99
-
100
-
101
-
102
-
103
-
104
-
105
-
106
-
107
-
108
-
109
-
110
-
111
-
112
-
113
-
114
-
115
-
116
-
117
-
118
-
119
-
120
-
121
-
122
-
123
-
124
-
125
-
126
-
127
-
128
-
129
-
130
-
131
-
132
-
133
-
134
-
135
-
 136
136 -
 137
137 -
 138
138 -
 139
139 -
 140
140 -
 141
141 -
 142
142 -
 143
143 -
 144
144 -
 145
145 -
 146
146 -
147
-
148
-
149
-
150
-
151
-
152
-
153
-
154
-
155
-
156
-
157
-
158
-
159
-
160
-
161
-
162
-
163
 |
 |
