Linksys SPA922 Cisco SPA9000 Voice System Using Setup Wizard Installation and - Page 27
Getting to Know the SLM224P Switch - reset factory defaults
 |
UPC - 745883570836
View all Linksys SPA922 manuals
Add to My Manuals
Save this manual to your list of manuals |
Page 27 highlights
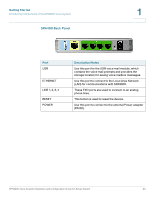
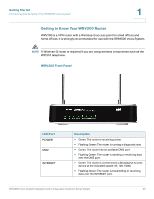
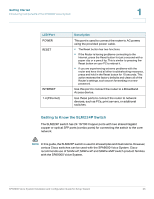
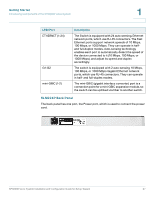
Getting Started Introducing Components of the SPA9000 Voice System 1 LED/Port POWER RESET INTERNET 1-4 (Ethernet) Description This port is used to connect the router to AC power, using the provided power cable. • The Reset button has two functions: • If the Router is having problems connecting to the Internet, press the Reset button for just a second with a paper clip or a pencil tip. This is similar to pressing the Reset button on your PC to reboot it. • If you are experiencing extreme problems with the router and have tried all other troubleshooting measures, press and hold in the Reset button for 10 seconds. This action restores the factory defaults and clears all of the Router's settings, such as port forwarding or a new password. Use this port to connect the router to a Broadband Access device. Use these ports to connect the router to network devices, such as PCs, print servers, or additional switches. Getting to Know the SLM224P Switch The SLM224P switch has 24 10/100 Copper ports with two shared Gigabit copper or optical SFP ports (combo ports) for connecting the switch to the core network. NOTE In this guide, the SLM224P switch is used in all examples and illustrations. However, various Cisco switches can be used with the SPA9000 Voice System. Cisco recommends use of SLMxxxP, SRWxxxP and SRWxxxMP switch product families with the SPA9000 Voice System. SPA9000 Voice System Installation and Configuration Guide for Setup Wizard 25
-
 1
1 -
2
-
3
-
4
-
5
-
6
-
7
-
8
-
9
-
10
-
11
-
12
-
13
-
14
-
15
-
16
-
17
-
18
-
19
-
20
-
21
-
 22
22 -
 23
23 -
 24
24 -
 25
25 -
 26
26 -
 27
27 -
 28
28 -
 29
29 -
 30
30 -
 31
31 -
 32
32 -
33
-
34
-
35
-
36
-
37
-
38
-
39
-
40
-
41
-
42
-
43
-
44
-
45
-
46
-
47
-
48
-
49
-
50
-
51
-
52
-
53
-
54
-
55
-
56
-
57
-
58
-
59
-
60
-
61
-
62
-
63
-
64
-
65
-
66
-
67
-
68
-
69
-
70
-
71
-
72
-
73
-
74
-
75
-
76
-
77
-
78
-
79
-
80
-
81
-
82
-
83
-
84
-
85
-
86
-
87
-
88
-
89
-
90
-
91
-
92
-
93
-
94
-
95
-
96
-
97
-
98
-
99
-
100
-
101
-
102
-
103
-
104
-
105
-
106
-
107
-
108
-
109
-
110
-
111
-
112
-
113
-
114
-
115
-
116
-
117
-
118
-
119
-
120
-
121
-
122
-
123
-
124
-
125
-
126
-
127
-
128
-
129
-
130
-
131
-
132
-
133
-
134
-
135
-
136
-
137
-
138
-
139
-
140
-
141
-
142
-
143
-
144
-
145
-
146
-
147
-
148
-
149
-
150
-
151
-
152
-
153
-
154
-
155
-
156
-
157
-
158
-
159
-
160
-
161
-
162
-
163
 |
 |
