Olympus DM-620 DM-620 Detailed Instructions (English) - Page 74
Playback File, Everyday, Preset 1, Preset 3
 |
View all Olympus DM-620 manuals
Add to My Manuals
Save this manual to your list of manuals |
Page 74 highlights
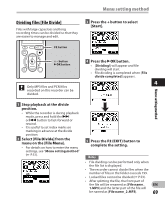
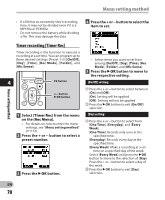
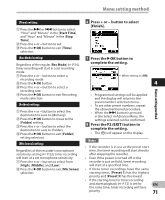
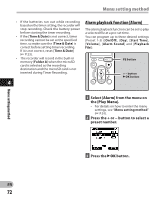
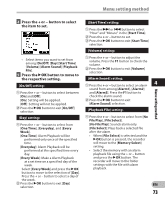
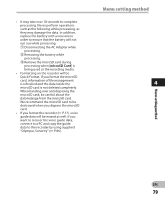
Menu setting method • Select the folder using the + or - buttons and press the `OK button to move to file selection. Use the + or - button to select the file in the same way. 2 Press the `OK button to exit [Playback File] selection. 6 Press + or − button to select [Finish]. Notes • If [Everyday] is selected, the alarm will sound at the scheduled time every day unless alarm playback is canceled. • The alarm will sound for five minutes and then stop. In such a case, even if a file is selected for Alarm Playback, it will not be automatically played. • If three alarm playback have the same starting times, [Preset 1] has the highest priority and [Preset 3] has the lowest. • If the recorder is in use or if operations are being performed at the scheduled time, the Alarm Playback function will not be available. • The alarm will sound at the scheduled 4 7 Press the `OK button to time even if the power is turned off or the recorder is set to Hold mode. The complete the setting. recorder begins to play the selected file when you press any button, and stops playing when you press the STOP (4) button. When setting to [ON] • If the selected file is moved, erased or the microSD card removed, file playback will not be performed and only the alarm will sound. • If the starting times for timer recording • Programmed settings will be applied and the display will return to the preset number selection menu. • To set other preset numbers, repeat the abovementioned procedure. • When the 9 button is pressed in the Select in Advance Menu, the settings selected can be confirmed. 8 Press the F2 (EXIT) button to complete the setting. and alarm playback are set for the same time, timer recording will have priority (☞ P.70). • If the recorder is formatted (☞ P.77), alarm data will also be erased, so you won't be able to set an alarm. When the data has been erased by accident, connect to PC and copy the alarm sound data to the recorder by using the supplied "Olympus Sonority" (☞ P.86). • The [A] will appear on the display. Menu setting method EN 74
-
 1
1 -
2
-
3
-
4
-
5
-
6
-
7
-
8
-
9
-
10
-
11
-
12
-
13
-
14
-
15
-
16
-
17
-
18
-
19
-
20
-
21
-
22
-
23
-
24
-
25
-
26
-
27
-
28
-
29
-
30
-
31
-
32
-
33
-
34
-
35
-
36
-
37
-
38
-
39
-
40
-
41
-
42
-
43
-
44
-
45
-
46
-
47
-
48
-
49
-
50
-
51
-
52
-
53
-
54
-
55
-
56
-
57
-
58
-
59
-
60
-
61
-
62
-
63
-
64
-
65
-
66
-
67
-
68
-
 69
69 -
 70
70 -
 71
71 -
 72
72 -
 73
73 -
 74
74 -
 75
75 -
 76
76 -
 77
77 -
 78
78 -
 79
79 -
80
-
81
-
82
-
83
-
84
-
85
-
86
-
87
-
88
-
89
-
90
-
91
-
92
-
93
-
94
-
95
-
96
-
97
-
98
-
99
-
100
-
101
-
102
-
103
-
104
-
105
-
106
-
107
-
108
-
109
-
110
-
111
-
112
-
113
 |
 |
