Olympus DM-620 DM-620 Detailed Instructions (English) - Page 76
Changing the USB class, USB Settings] - not charging
 |
View all Olympus DM-620 manuals
Add to My Manuals
Save this manual to your list of manuals |
Page 76 highlights
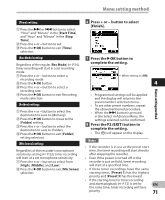
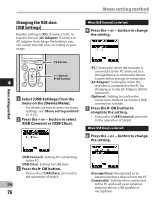
Menu setting method Changing the USB class [USB Settings] Besides setting to [PC] (Connect to PC to transfer files) or [AC Adapter] (Connect to AC adapter to recharge the battery), you can switch the USB class according to your usage. When [USB Connect] is selected: 4 Press the + or − button to change the setting. F2 button + − button `OK button 4 1 Select [USB Settings] from the menu on the [Device Menu]. [PC]: Setting for when the recorder is connected to the PC and used as a storage device or composite device. Connected as storage or composite. [AC Adapter]: Setting for when the recorder is connected to the PC for charging or to the AC Adapter (A514) (optional). [Optional]: Setting to confirm the connection method each time a USB connection is made. • For details on how to enter the menu settings, see "Menu setting method" (☞ P.51). 2 Press the + or − button to select [USB Connect] or [USB Class]. 5 Press the ` OK button to complete the setting. • If you select [USB Connect], proceed to the operation of Step 8. When [USB Class] is selected: 6 Press the + or − button to change the setting. Menu setting method [USB Connect]: Setting for connecting to the PC. [USB Class]: Setting for USB class. 3 Press the ` OK button. • If you select [USB Class], proceed to the operation of Step 6. EN 76 [Storage Class]: Recognized as an external memory device from the PC. [Composite]: Setting when connected to the PC and used as an external memory device, USB speaker or microphone.
-
 1
1 -
2
-
3
-
4
-
5
-
6
-
7
-
8
-
9
-
10
-
11
-
12
-
13
-
14
-
15
-
16
-
17
-
18
-
19
-
20
-
21
-
22
-
23
-
24
-
25
-
26
-
27
-
28
-
29
-
30
-
31
-
32
-
33
-
34
-
35
-
36
-
37
-
38
-
39
-
40
-
41
-
42
-
43
-
44
-
45
-
46
-
47
-
48
-
49
-
50
-
51
-
52
-
53
-
54
-
55
-
56
-
57
-
58
-
59
-
60
-
61
-
62
-
63
-
64
-
65
-
66
-
67
-
68
-
69
-
70
-
 71
71 -
 72
72 -
 73
73 -
 74
74 -
 75
75 -
 76
76 -
 77
77 -
 78
78 -
 79
79 -
 80
80 -
 81
81 -
82
-
83
-
84
-
85
-
86
-
87
-
88
-
89
-
90
-
91
-
92
-
93
-
94
-
95
-
96
-
97
-
98
-
99
-
100
-
101
-
102
-
103
-
104
-
105
-
106
-
107
-
108
-
109
-
110
-
111
-
112
-
113
 |
 |
