Panasonic DMC-FX5 Digital Still Camera - Page 111
the camera., Turn on the TV and switch to component input.
 |
UPC - 037988977581
View all Panasonic DMC-FX5 manuals
Add to My Manuals
Save this manual to your list of manuals |
Page 111 highlights
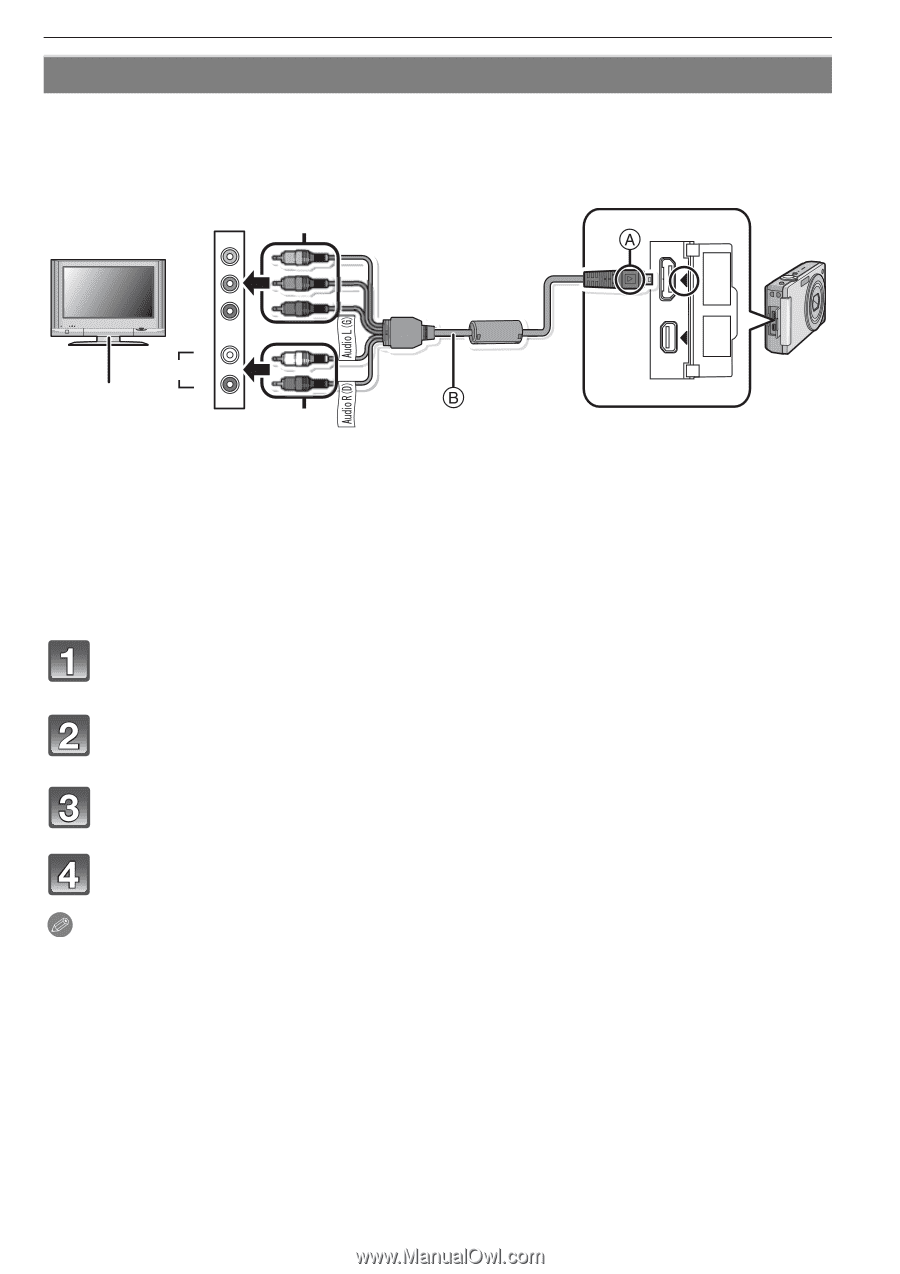
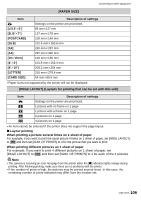
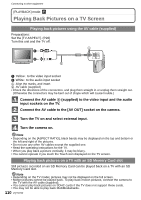
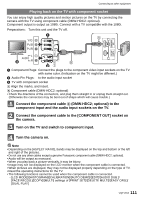
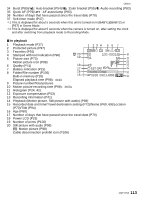
Connecting to other equipment Playing back on the TV with component socket You can enjoy high quality pictures and motion pictures on the TV by connecting the camera with the TV using component cable (DMW-HDC2: optional). Component output is output as 1080i. Connect with a TV compatible with the 1080i. Preparations: Turn this unit and the TV off. Y/G PB/B PR/R OUT AV OUT/ COMPONENT DIGITAL #WFKQ 4 & #WFKQ . ) L AUDIO R 1 Component Plugs: Connect the plugs to the component video input sockets on the TV with same color. (Indication on the TV might be different.) 2 Audio Pin Plugs: to the audio input socket 3 TV with component socket A Align the marks, and insert. B Component cable (DMW-HDC2: optional) • Check the directions of the connectors, and plug them straight in or unplug them straight out. (Otherwise the connectors may be bent out of shape which will cause trouble.) Connect the component cable B (DMW-HDC2; optional) to the component input and the audio input sockets on the TV. Connect the component cable to the [COMPONENT OUT] socket on the camera. Turn on the TV and switch to component input. Turn the camera on. Note • Depending on the [ASPECT RATIO], bands may be displayed on the top and bottom or the left and right of the pictures. • Do not use any other cables except a genuine Panasonic component cable (DMW-HDC2; optional). • Audio will be output as monaural. • When you play back a picture vertically, it may be blurry. • Image may not be displayed on the LCD monitor when the component cable is connected. • When pictures are displayed, they may not be displayed properly depending on the type of TV. • Read the operating instructions for the TV. • The following functions cannot be used when the component cable is connected. - [LCD MODE]/[HISTOGRAM]/[CALIBRATION]/[AUTO DEMO]/[EDIT]/[AUDIO DUB.]/ [FACE RECOG.]/[COPY]/[MULTI] settings of [PRINT SET]/[DELETE MULTI]/[EASY ORG.]/ [DUAL PLAY] VQT1Y62 111
-
 1
1 -
2
-
3
-
4
-
5
-
6
-
7
-
8
-
9
-
10
-
11
-
12
-
13
-
14
-
15
-
16
-
17
-
18
-
19
-
20
-
21
-
22
-
23
-
24
-
25
-
26
-
27
-
28
-
29
-
30
-
31
-
32
-
33
-
34
-
35
-
36
-
37
-
38
-
39
-
40
-
41
-
42
-
43
-
44
-
45
-
46
-
47
-
48
-
49
-
50
-
51
-
52
-
53
-
54
-
55
-
56
-
57
-
58
-
59
-
60
-
61
-
62
-
63
-
64
-
65
-
66
-
67
-
68
-
69
-
70
-
71
-
72
-
73
-
74
-
75
-
76
-
77
-
78
-
79
-
80
-
81
-
82
-
83
-
84
-
85
-
86
-
87
-
88
-
89
-
90
-
91
-
92
-
93
-
94
-
95
-
96
-
97
-
98
-
99
-
100
-
101
-
102
-
103
-
104
-
105
-
 106
106 -
 107
107 -
 108
108 -
 109
109 -
 110
110 -
 111
111 -
 112
112 -
 113
113 -
 114
114 -
 115
115 -
 116
116 -
117
-
118
-
119
-
120
-
121
-
122
-
123
-
124
-
125
-
126
-
127
-
128
-
129
-
130
-
131
-
132
-
133
-
134
-
135
-
136
-
137
-
138
-
139
-
140
-
141
-
142
-
143
-
144
 |
 |