Panasonic DMC-FX5 Digital Still Camera - Page 71
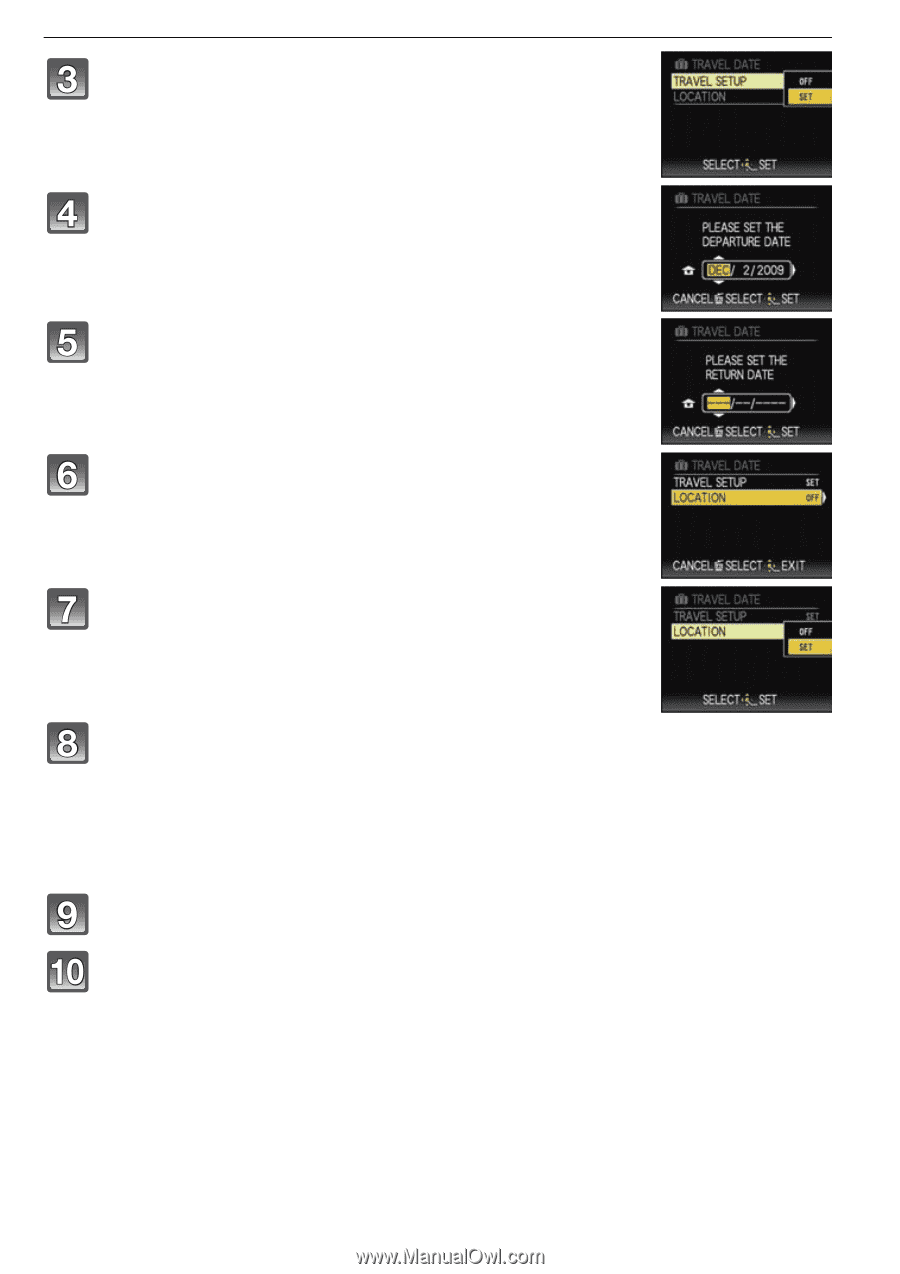
day, and then press [MENU/SET]., to set the return date year/month
 |
UPC - 037988977581
View all Panasonic DMC-FX5 manuals
Add to My Manuals
Save this manual to your list of manuals |
Page 71 highlights
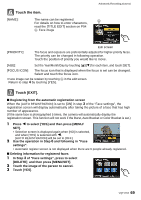
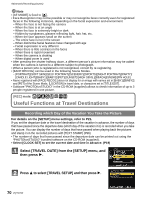
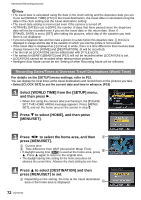
Advanced (Recording pictures) Press 4 to select [SET] and then press [MENU/SET]. Press 3/4/2/1 to set the departure date (year/ month/day), and then press [MENU/SET]. Press 3/4/2/1 to set the return date (year/month/ day), and then press [MENU/SET]. • If you do not want to set the return date, press [MENU/SET] while the date bar is displayed. Press 4 to select [LOCATION] and then press 1. Press 4 to select [SET] and then press [MENU/SET]. Enter the location. 1 Press 3/4/2/1 to select text and then press [MENU/SET] to register. 2 Press 3/4/2/1 to move the cursor to [EXIT] and then press [MENU/SET] to end text input. • Press [DISPLAY] to switch text between [A] (capitals), [a] (lower case) and [&/1] (special characters and numbers). Press [MENU/SET] twice to close the menu. Take a picture. • The number of days that have passed since the departure date is displayed for about 5 seconds if this unit is turned on etc. after setting the travel date or when the travel date is set. • When the travel date is set, [-] appears on the lower right of the screen. ∫ Canceling the travel date The travel date is automatically canceled if the current date is after the return date. If you want to cancel the travel date before the end of the vacation, select [OFF] on the screen shown in step 3 or 7 and then press [MENU/SET] twice. If the [TRAVEL SETUP] is set to [OFF] in step 3, [LOCATION] will be also set to [OFF]. VQT1Y62 71
-
 1
1 -
2
-
3
-
4
-
5
-
6
-
7
-
8
-
9
-
10
-
11
-
12
-
13
-
14
-
15
-
16
-
17
-
18
-
19
-
20
-
21
-
22
-
23
-
24
-
25
-
26
-
27
-
28
-
29
-
30
-
31
-
32
-
33
-
34
-
35
-
36
-
37
-
38
-
39
-
40
-
41
-
42
-
43
-
44
-
45
-
46
-
47
-
48
-
49
-
50
-
51
-
52
-
53
-
54
-
55
-
56
-
57
-
58
-
59
-
60
-
61
-
62
-
63
-
64
-
65
-
 66
66 -
 67
67 -
 68
68 -
 69
69 -
 70
70 -
 71
71 -
 72
72 -
 73
73 -
 74
74 -
 75
75 -
 76
76 -
77
-
78
-
79
-
80
-
81
-
82
-
83
-
84
-
85
-
86
-
87
-
88
-
89
-
90
-
91
-
92
-
93
-
94
-
95
-
96
-
97
-
98
-
99
-
100
-
101
-
102
-
103
-
104
-
105
-
106
-
107
-
108
-
109
-
110
-
111
-
112
-
113
-
114
-
115
-
116
-
117
-
118
-
119
-
120
-
121
-
122
-
123
-
124
-
125
-
126
-
127
-
128
-
129
-
130
-
131
-
132
-
133
-
134
-
135
-
136
-
137
-
138
-
139
-
140
-
141
-
142
-
143
-
144
 |
 |