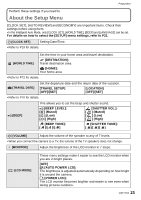
Panasonic DMC-FX5 Digital Still Camera - Page 24
Display Size], Guide Line], Histogram], Highlight], Pattern] - camera
 |
UPC - 037988977581
View all Panasonic DMC-FX5 manuals
Add to My Manuals
Save this manual to your list of manuals |
Page 24 highlights
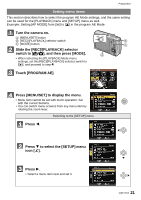
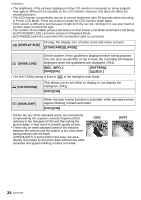
Preparation • The brightness of the pictures displayed on the LCD monitor is increased so some subjects may appear different from actuality on the LCD monitor. However, this does not affect the recorded pictures. • The LCD monitor automatically returns to normal brightness after 30 seconds when recording in Power LCD Mode. Press any button to make the LCD monitor bright again. • If the screen is difficult to see because of light from the sun etc. shining on it, use your hand or another object to block the light. • The number of recordable pictures decreases in Auto Power LCD Mode and Power LCD Mode. • [AUTO POWER LCD] cannot be selected in Playback Mode. • [LCD MODE] cannot be used when the component cable is connected. Change the display size of some icons and menu screens. [DISPLAY SIZE] [STANDARD]/[LARGE] [GUIDE LINE] Set the pattern of the guidelines displayed when taking pictures. You can also set whether or not to have the recording information displayed when the guidelines are displayed. (P41) [REC. INFO.]: [OFF]/[ON] [PATTERN]: [ ]/[ ] • The [PATTERN] setting is fixed to [ ] in the Intelligent Auto Mode. [HISTOGRAM] This allows you to set either to display or not display the histogram. (P42) [OFF]/[ON] [HIGHLIGHT] When the auto review function is activated, white saturated areas appear blinking in black and white. [OFF]/[ON] • If there are any white saturated areas, we recommend compensating the exposure towards negative (P53) referring to the histogram (P42) and then taking the picture again. It may result in a better quality picture. • There may be white saturated areas if the distance between the camera and the subject is too close when taking pictures with the flash. If [HIGHLIGHT] is set to [ON] in this case, the area directly illuminated by the photo flash will become white saturated and appear blinking in black and white. [ON] [OFF] 24 VQT1Y62
-
 1
1 -
2
-
3
-
4
-
5
-
6
-
7
-
8
-
9
-
10
-
11
-
12
-
13
-
14
-
15
-
16
-
17
-
18
-
 19
19 -
 20
20 -
 21
21 -
 22
22 -
 23
23 -
 24
24 -
 25
25 -
 26
26 -
 27
27 -
 28
28 -
 29
29 -
30
-
31
-
32
-
33
-
34
-
35
-
36
-
37
-
38
-
39
-
40
-
41
-
42
-
43
-
44
-
45
-
46
-
47
-
48
-
49
-
50
-
51
-
52
-
53
-
54
-
55
-
56
-
57
-
58
-
59
-
60
-
61
-
62
-
63
-
64
-
65
-
66
-
67
-
68
-
69
-
70
-
71
-
72
-
73
-
74
-
75
-
76
-
77
-
78
-
79
-
80
-
81
-
82
-
83
-
84
-
85
-
86
-
87
-
88
-
89
-
90
-
91
-
92
-
93
-
94
-
95
-
96
-
97
-
98
-
99
-
100
-
101
-
102
-
103
-
104
-
105
-
106
-
107
-
108
-
109
-
110
-
111
-
112
-
113
-
114
-
115
-
116
-
117
-
118
-
119
-
120
-
121
-
122
-
123
-
124
-
125
-
126
-
127
-
128
-
129
-
130
-
131
-
132
-
133
-
134
-
135
-
136
-
137
-
138
-
139
-
140
-
141
-
142
-
143
-
144
 |
 |
