Pioneer AVH-X8500BHS Owner's Manual - Page 38
Adjusting source levels, Setting the subtitle language, Audio adjustments, Setting up the video player - dvd
 |
View all Pioneer AVH-X8500BHS manuals
Add to My Manuals
Save this manual to your list of manuals |
Page 38 highlights
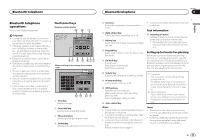
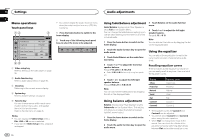
Section 17 Audio adjustments 18 Adjusting source levels With SLA (source level adjustment), the volume levels of each source can be adjusted to prevent significant differences between sources. ! Settings are based on the FM volume level, which remains unchanged. 1 Press the home button to switch to the home display. 2 Touch the audio function key to open the audio menu. 3 Compare the FM volume level with the level of the source you wish to adjust. 4 Touch Source Level Adjuster on the audio function menu. 5 Touch or ume. Range: +4 to -4 to adjust the source vol- Notes ! Source Level Adjuster is not available when FM is selected as the source. ! The AM volume level can also be adjusted with this function. ! Video CD, CD, compressed audio, DivX, MPEG-1, MPEG-2 and MPEG-4 are automatically set to the same source level adjustment volume. ! When an iPod and a USB storage device are connected to USB input 1 or USB input 2, the source level adjustment volume for each is automatically set to the same level for each USB input. USB input 1 and USB input 2 are not automatically set to the same setting. 38 En Setting up the video player Setting the subtitle language You can set a desired subtitle language. When available, the subtitles will be displayed in the selected language. Registering the code. 1 Press the home button to switch to the home display. Setting the audio language You can set the preferred audio language. 2 Touch the video setup key to open the video setup menu. 1 Press the home button to switch to the home display. 3 Touch Subtitle Language on the Video Setup menu. A subtitle language menu is displayed. 4 Touch the desired language. The subtitle language is set. # If you have selected Others, refer to When you select Others on page 38. Notes ! If the selected language is not available, the language specified on the disc is displayed. ! You can also switch the subtitle language by touching the switch subtitle languages key during playback. ! The setting made here will not be affected even if the subtitle language is switched during playback using the switch subtitle languages key. When you select Others A language code input display is shown when Others is selected. Refer to Language code chart for DVD on page 68. % Touch 0 to 9 to input the language code. # To cancel the entered numbers, touch C. # To register the code, touch the following touch panel key. 2 Touch the video setup key to open the video setup menu. 3 Touch Audio Language on the Video Setup menu. An audio language menu is displayed. 4 Touch the desired language. The audio language is set. # If you have selected Others, refer to When you select Others on page 38. Notes ! If the selected language is not available, the language specified on the disc is used. ! You can also switch the audio language by touching the switch audio languages key during playback. ! The setting made here will not be affected even if the audio language is switched during playback using the switch audio languages key. Setting the menu language You can set the preferred language in which the menus recorded on a disc are displayed. 1 Press the home button to switch to the home display.
-
 1
1 -
2
-
3
-
4
-
5
-
6
-
7
-
8
-
9
-
10
-
11
-
12
-
13
-
14
-
15
-
16
-
17
-
18
-
19
-
20
-
21
-
22
-
23
-
24
-
25
-
26
-
27
-
28
-
29
-
30
-
31
-
32
-
 33
33 -
 34
34 -
 35
35 -
 36
36 -
 37
37 -
 38
38 -
 39
39 -
 40
40 -
 41
41 -
 42
42 -
 43
43 -
44
-
45
-
46
-
47
-
48
-
49
-
50
-
51
-
52
-
53
-
54
-
55
-
56
-
57
-
58
-
59
-
60
-
61
-
62
-
63
-
64
-
65
-
66
-
67
-
68
-
69
-
70
-
71
-
72
-
73
-
74
-
75
-
76
-
77
-
78
-
79
-
80
-
81
-
82
-
83
-
84
-
85
-
86
-
87
-
88
-
89
-
90
-
91
-
92
-
93
-
94
-
95
-
96
-
97
-
98
-
99
-
100
-
101
-
102
-
103
-
104
-
105
-
106
-
107
-
108
-
109
-
110
-
111
-
112
-
113
-
114
-
115
-
116
-
117
-
118
-
119
-
120
-
121
-
122
-
123
-
124
-
125
-
126
-
127
-
128
-
129
-
130
-
131
-
132
-
133
-
134
-
135
-
136
-
137
-
138
-
139
-
140
-
141
-
142
-
143
-
144
-
145
-
146
-
147
-
148
-
149
-
150
-
151
-
152
-
153
-
154
-
155
-
156
-
157
-
158
-
159
-
160
-
161
-
162
-
163
-
164
-
165
-
166
-
167
-
168
-
169
-
170
-
171
-
172
-
173
-
174
-
175
-
176
-
177
-
178
-
179
-
180
-
181
-
182
-
183
-
184
-
185
-
186
-
187
-
188
-
189
-
190
-
191
-
192
-
193
-
194
-
195
-
196
-
197
-
198
-
199
-
200
-
201
-
202
-
203
-
204
-
205
-
206
-
207
-
208
-
209
-
210
-
211
-
212
-
213
-
214
-
215
-
216
-
217
-
218
-
219
-
220
-
221
-
222
-
223
-
224
-
225
-
226
-
227
-
228
 |
 |