Pioneer AVH-X8500BHS Owner's Manual - Page 47
Adjusting the response, positions of the touch panels, Touch Panel Calibration, Using an AUX source - factory reset
 |
View all Pioneer AVH-X8500BHS manuals
Add to My Manuals
Save this manual to your list of manuals |
Page 47 highlights
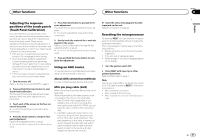
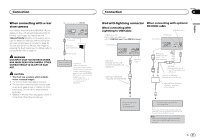
Other functions Other functions Adjusting the response positions of the touch panels (Touch Panel Calibration) If you feel that the touch panel keys on the screen deviate from the actual positions that respond to your touch, adjust the response positions of the touch panel. There are two adjustment methods: four-point adjustment, in which you touch four corners of the screen; and 16-point adjustment, in which you make fine-adjustments on the entire screen. ! Park your car in a safe place and use this function. Do not operate it while driving. ! Touch the screen gently for adjustment. Forcefully pressing the touch panel may damage the touch panel. Do not use a sharp pointed tool such as a ballpoint pen or mechanical pen. Doing so may damage the screen. ! If the touch panel cannot be adjusted properly, consult your local Pioneer dealer. 1 Turn the source off. Refer to Turning the source ON/OFF on page 8. 2 Press and hold the home button to start Touch Panel Calibration. The four-point touch panel adjustment screen appears. When two-point appears at once, touch both. 3 Touch each of the arrows on the four corners of the screen. # To cancel the adjustment, press and hold the home button. 4 Press the home button to complete fourpoint adjustment. Data for the adjusted position is saved. # Do not turn off the engine while the data is being saved. 5 Press the home button to proceed to 16point adjustment. The 16-point touch panel adjustment screen appears. # To cancel the adjustment, press and hold the home button. 6 Gently touch the center of the + mark displayed on the screen. After you touch all the marks, the data for the adjusted position is saved. # Do not turn off the engine while the data is being saved. 7 Press and hold the home button to complete the adjustment. Using an AUX source An auxiliary device or portable device sold separately can be connected to this unit. About AUX connection methods You can connect auxiliary devices to this unit. Mini pin plug cable (AUX) When connecting an auxiliary device using a mini plug cable iPods and portable audio/video players can be connected to this unit via mini plug cable. ! If an iPod with video capabilities is con- nected to this unit via 3.5 mm plug (four pole) cable (such as the CD-V150M), you can enjoy the video contents of the connected iPod. ! A portable audio/video player can be connected by using a 3.5 mm plug (four pole) with an RCA cable (sold separately). However, depending on the cable, a reverse connection between the red (right side audio) cable and yellow (video) cable may be required in order for the sound and video image to be reproduced correctly. % Insert the stereo mini plug into the AUX input jack on this unit. Refer to Connection on page 49. Resetting the microprocessor By pressing RESET, you can reset the microprocessor to its initial settings without changing the bookmark information. The microprocessor must be reset in the following situations: ! Before using this unit for the first time after installation ! If the unit fails to operate properly ! When strange or incorrect messages appear on the display 1 Turn the ignition switch OFF. 2 Press RESET with a pen tip or other pointed instrument. Refer to What's what on page 7. Note Switch your engine ON or set the ignition switch to ACC ON before pressing RESET in the following situations: ! After completing connections ! When erasing all stored settings ! When resetting the unit to its initial (factory) set- tings Section 23 En 47 English
-
 1
1 -
2
-
3
-
4
-
5
-
6
-
7
-
8
-
9
-
10
-
11
-
12
-
13
-
14
-
15
-
16
-
17
-
18
-
19
-
20
-
21
-
22
-
23
-
24
-
25
-
26
-
27
-
28
-
29
-
30
-
31
-
32
-
33
-
34
-
35
-
36
-
37
-
38
-
39
-
40
-
41
-
 42
42 -
 43
43 -
 44
44 -
 45
45 -
 46
46 -
 47
47 -
 48
48 -
 49
49 -
 50
50 -
 51
51 -
 52
52 -
53
-
54
-
55
-
56
-
57
-
58
-
59
-
60
-
61
-
62
-
63
-
64
-
65
-
66
-
67
-
68
-
69
-
70
-
71
-
72
-
73
-
74
-
75
-
76
-
77
-
78
-
79
-
80
-
81
-
82
-
83
-
84
-
85
-
86
-
87
-
88
-
89
-
90
-
91
-
92
-
93
-
94
-
95
-
96
-
97
-
98
-
99
-
100
-
101
-
102
-
103
-
104
-
105
-
106
-
107
-
108
-
109
-
110
-
111
-
112
-
113
-
114
-
115
-
116
-
117
-
118
-
119
-
120
-
121
-
122
-
123
-
124
-
125
-
126
-
127
-
128
-
129
-
130
-
131
-
132
-
133
-
134
-
135
-
136
-
137
-
138
-
139
-
140
-
141
-
142
-
143
-
144
-
145
-
146
-
147
-
148
-
149
-
150
-
151
-
152
-
153
-
154
-
155
-
156
-
157
-
158
-
159
-
160
-
161
-
162
-
163
-
164
-
165
-
166
-
167
-
168
-
169
-
170
-
171
-
172
-
173
-
174
-
175
-
176
-
177
-
178
-
179
-
180
-
181
-
182
-
183
-
184
-
185
-
186
-
187
-
188
-
189
-
190
-
191
-
192
-
193
-
194
-
195
-
196
-
197
-
198
-
199
-
200
-
201
-
202
-
203
-
204
-
205
-
206
-
207
-
208
-
209
-
210
-
211
-
212
-
213
-
214
-
215
-
216
-
217
-
218
-
219
-
220
-
221
-
222
-
223
-
224
-
225
-
226
-
227
-
228
 |
 |