Pioneer AVH-X8500BHS Owner's Manual - Page 54
Fastening the front panel, Installing the microphone, Installation, on the sun visor
 |
View all Pioneer AVH-X8500BHS manuals
Add to My Manuals
Save this manual to your list of manuals |
Page 54 highlights
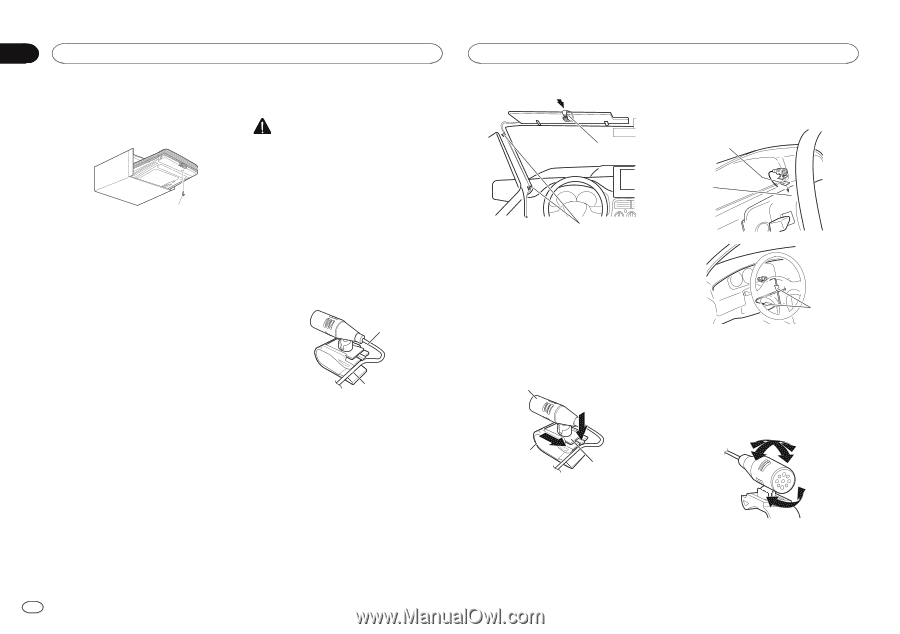
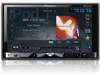
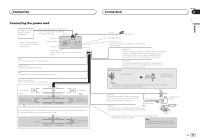
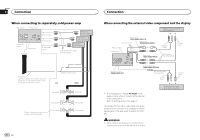
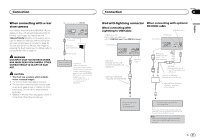
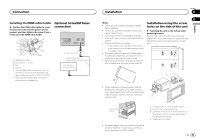
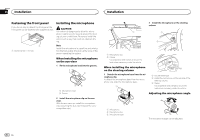
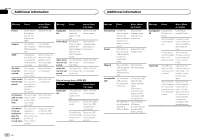
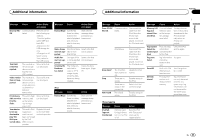
Section 25 Installation Installation Fastening the front panel If you do not plan to detach the front panel, the front panel can be fastened with supplied screw. 1 1 Screw (2 mm × 6 mm) Installing the microphone CAUTION It is extremely dangerous to allow the microphone lead to become wound around the steering column or shift lever. Be sure to install the unit in such a way that it will not obstruct driving. Note Install the microphone in a position and orientation that will enable it to pick up the voice of the person operating the system. When installing the microphone on the sun visor 1 Fit the microphone lead into the groove. 1 2 1 Microphone lead 2 Groove 2 Install the microphone clip on the sun visor. With the sun visor up, install the microphone clip. (Lowering the sun visor reduces the voice recognition rate.) 2 Install the microphone on the steering column. 1 1 2 2 1 Microphone clip 2 Clamp Use separately sold clamps to secure the lead where necessary inside the vehicle. When installing the microphone on the steering column 1 Detach the microphone base from the microphone clip. To detach the microphone base from the microphone clip, slide the microphone base. 1 3 1 Double-sided tape 2 Install the microphone on the rear side of the steering column. 3 Clamp Use separately sold clamps to secure the lead where necessary inside the vehicle. Adjusting the microphone angle 2 3 1 Microphone 2 Microphone clip 3 Microphone base The microphone angle can be adjusted. 54 En
-
 1
1 -
2
-
3
-
4
-
5
-
6
-
7
-
8
-
9
-
10
-
11
-
12
-
13
-
14
-
15
-
16
-
17
-
18
-
19
-
20
-
21
-
22
-
23
-
24
-
25
-
26
-
27
-
28
-
29
-
30
-
31
-
32
-
33
-
34
-
35
-
36
-
37
-
38
-
39
-
40
-
41
-
42
-
43
-
44
-
45
-
46
-
47
-
48
-
 49
49 -
 50
50 -
 51
51 -
 52
52 -
 53
53 -
 54
54 -
 55
55 -
 56
56 -
 57
57 -
 58
58 -
 59
59 -
60
-
61
-
62
-
63
-
64
-
65
-
66
-
67
-
68
-
69
-
70
-
71
-
72
-
73
-
74
-
75
-
76
-
77
-
78
-
79
-
80
-
81
-
82
-
83
-
84
-
85
-
86
-
87
-
88
-
89
-
90
-
91
-
92
-
93
-
94
-
95
-
96
-
97
-
98
-
99
-
100
-
101
-
102
-
103
-
104
-
105
-
106
-
107
-
108
-
109
-
110
-
111
-
112
-
113
-
114
-
115
-
116
-
117
-
118
-
119
-
120
-
121
-
122
-
123
-
124
-
125
-
126
-
127
-
128
-
129
-
130
-
131
-
132
-
133
-
134
-
135
-
136
-
137
-
138
-
139
-
140
-
141
-
142
-
143
-
144
-
145
-
146
-
147
-
148
-
149
-
150
-
151
-
152
-
153
-
154
-
155
-
156
-
157
-
158
-
159
-
160
-
161
-
162
-
163
-
164
-
165
-
166
-
167
-
168
-
169
-
170
-
171
-
172
-
173
-
174
-
175
-
176
-
177
-
178
-
179
-
180
-
181
-
182
-
183
-
184
-
185
-
186
-
187
-
188
-
189
-
190
-
191
-
192
-
193
-
194
-
195
-
196
-
197
-
198
-
199
-
200
-
201
-
202
-
203
-
204
-
205
-
206
-
207
-
208
-
209
-
210
-
211
-
212
-
213
-
214
-
215
-
216
-
217
-
218
-
219
-
220
-
221
-
222
-
223
-
224
-
225
-
226
-
227
-
228
 |
 |