Ricoh Aficio SP 4310N Manuals - Page 164
Replacing the Friction Pad, Check the box contains the following items
 |
View all Ricoh Aficio SP 4310N manuals
Add to My Manuals
Save this manual to your list of manuals |
Page 164 highlights
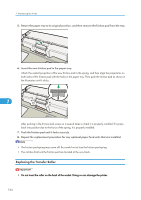
7. Maintaining the Printer 2. Check the box contains the following items: CEE111 1. Friction Pad × 3 See p.164 "Replacing the Transfer Roller". 2. Transfer Roller (with gloves) See p.162 "Replacing the Friction Pad". 3. Paper Feed Roller × 3 See p.168 "Replacing the Paper Feed Roller". 4. Fusing Unit See p.171 "Replacing the Fusing Unit". 7 Replacing the Friction Pad Replace all the friction pads in the tray. The following procedure shows how to replace the tray's friction pad (Tray 1) and the other are for the paper feed unit(s) (Tray 2, 3). 1. Pull out the paper tray until it stops. 162 CEE010
-
 1
1 -
2
-
3
-
4
-
5
-
6
-
7
-
8
-
9
-
10
-
11
-
12
-
13
-
14
-
15
-
16
-
17
-
18
-
19
-
20
-
21
-
22
-
23
-
24
-
25
-
26
-
27
-
28
-
29
-
30
-
31
-
32
-
33
-
34
-
35
-
36
-
37
-
38
-
39
-
40
-
41
-
42
-
43
-
44
-
45
-
46
-
47
-
48
-
49
-
50
-
51
-
52
-
53
-
54
-
55
-
56
-
57
-
58
-
59
-
60
-
61
-
62
-
63
-
64
-
65
-
66
-
67
-
68
-
69
-
70
-
71
-
72
-
73
-
74
-
75
-
76
-
77
-
78
-
79
-
80
-
81
-
82
-
83
-
84
-
85
-
86
-
87
-
88
-
89
-
90
-
91
-
92
-
93
-
94
-
95
-
96
-
97
-
98
-
99
-
100
-
101
-
102
-
103
-
104
-
105
-
106
-
107
-
108
-
109
-
110
-
111
-
112
-
113
-
114
-
115
-
116
-
117
-
118
-
119
-
120
-
121
-
122
-
123
-
124
-
125
-
126
-
127
-
128
-
129
-
130
-
131
-
132
-
133
-
134
-
135
-
136
-
137
-
138
-
139
-
140
-
141
-
142
-
143
-
144
-
145
-
146
-
147
-
148
-
149
-
150
-
151
-
152
-
153
-
154
-
155
-
156
-
157
-
158
-
 159
159 -
 160
160 -
 161
161 -
 162
162 -
 163
163 -
 164
164 -
 165
165 -
 166
166 -
 167
167 -
 168
168 -
 169
169 -
170
-
171
-
172
-
173
-
174
-
175
-
176
-
177
-
178
-
179
-
180
-
181
-
182
-
183
-
184
-
185
-
186
-
187
-
188
-
189
-
190
-
191
-
192
-
193
-
194
-
195
-
196
-
197
-
198
-
199
-
200
-
201
-
202
-
203
-
204
-
205
-
206
-
207
-
208
-
209
-
210
-
211
-
212
-
213
-
214
-
215
-
216
-
217
-
218
-
219
-
220
-
221
-
222
-
223
-
224
-
225
-
226
-
227
-
228
-
229
-
230
-
231
-
232
-
233
-
234
-
235
-
236
-
237
-
238
-
239
-
240
-
241
-
242
-
243
-
244
-
245
-
246
-
247
-
248
-
249
-
250
-
251
-
252
 |
 |

2.
Check the box contains the following items:
CEE111
1.
Friction Pad × 3
See p.164 "Replacing the Transfer Roller".
2.
Transfer Roller (with gloves)
See p.162 "Replacing the Friction Pad".
3.
Paper Feed Roller × 3
See p.168 "Replacing the Paper Feed Roller".
4.
Fusing Unit
See p.171 "Replacing the Fusing Unit".
Replacing the Friction Pad
Replace all the friction pads in the tray. The following procedure shows how to replace the tray's friction
pad (Tray 1) and the other are for the paper feed unit(s) (Tray 2, 3).
1.
Pull out the paper tray until it stops.
CEE010
7. Maintaining the Printer
162
7