Ricoh Aficio SP 4310N Manuals - Page 74
in [Security Options]. Depending on settings, [Machine Data Encryption] might not appear.
 |
View all Ricoh Aficio SP 4310N manuals
Add to My Manuals
Save this manual to your list of manuals |
Page 74 highlights
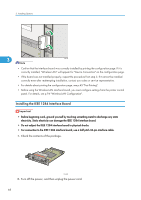
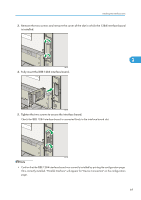
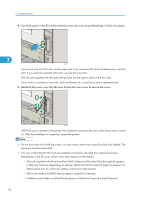
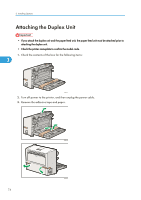
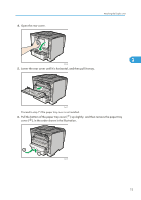
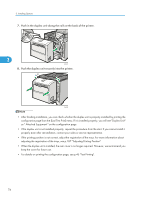
3. Installing Options 4. Carefully push in the SD card (notched corner downward and leading), it clicks into place. 3 CEE152 If you insert only one SD card, use the upper slot. If you insert two SD cards simultaneously, use both slots. If you insert the optional VM card, use only the lower slot. The SD card supplied with the optional hard disk can be used in either of the two slots. If you want to use three or more SD cards simultaneously, consult your service representative. 5. Reattach the cover over the SD card. Fasten the one screw to secure the cover. 1 3 2 CEE077 If ELP-NX card is inserted in the printer, the installation automatically starts when the printer is turned on. After the installation is completed, restart the printer. • Do not touch the card while the printer is in use. It may come loose, even if pushed only slightly. The slot cover must be reattached. • You can confirm that the SD card was installed correctly by checking the control panel menu. Depending on the SD card, certain menu items appear on the display. • SD card supplied with the optional hard disk: Make sure [Machine Data Encryption] appears in [Security Options]. Depending on settings, [Machine Data Encryption] might not appear. For details about how to confirm this setting, consult your administrator. • IPDS card: Make sure [IPDS Menu] appears under [Print Settings]. • NetWare card: Make sure [NetWare] appears in [Effective Protocol] under [Network]. 72
-
 1
1 -
2
-
3
-
4
-
5
-
6
-
7
-
8
-
9
-
10
-
11
-
12
-
13
-
14
-
15
-
16
-
17
-
18
-
19
-
20
-
21
-
22
-
23
-
24
-
25
-
26
-
27
-
28
-
29
-
30
-
31
-
32
-
33
-
34
-
35
-
36
-
37
-
38
-
39
-
40
-
41
-
42
-
43
-
44
-
45
-
46
-
47
-
48
-
49
-
50
-
51
-
52
-
53
-
54
-
55
-
56
-
57
-
58
-
59
-
60
-
61
-
62
-
63
-
64
-
65
-
66
-
67
-
68
-
 69
69 -
 70
70 -
 71
71 -
 72
72 -
 73
73 -
 74
74 -
 75
75 -
 76
76 -
 77
77 -
 78
78 -
 79
79 -
80
-
81
-
82
-
83
-
84
-
85
-
86
-
87
-
88
-
89
-
90
-
91
-
92
-
93
-
94
-
95
-
96
-
97
-
98
-
99
-
100
-
101
-
102
-
103
-
104
-
105
-
106
-
107
-
108
-
109
-
110
-
111
-
112
-
113
-
114
-
115
-
116
-
117
-
118
-
119
-
120
-
121
-
122
-
123
-
124
-
125
-
126
-
127
-
128
-
129
-
130
-
131
-
132
-
133
-
134
-
135
-
136
-
137
-
138
-
139
-
140
-
141
-
142
-
143
-
144
-
145
-
146
-
147
-
148
-
149
-
150
-
151
-
152
-
153
-
154
-
155
-
156
-
157
-
158
-
159
-
160
-
161
-
162
-
163
-
164
-
165
-
166
-
167
-
168
-
169
-
170
-
171
-
172
-
173
-
174
-
175
-
176
-
177
-
178
-
179
-
180
-
181
-
182
-
183
-
184
-
185
-
186
-
187
-
188
-
189
-
190
-
191
-
192
-
193
-
194
-
195
-
196
-
197
-
198
-
199
-
200
-
201
-
202
-
203
-
204
-
205
-
206
-
207
-
208
-
209
-
210
-
211
-
212
-
213
-
214
-
215
-
216
-
217
-
218
-
219
-
220
-
221
-
222
-
223
-
224
-
225
-
226
-
227
-
228
-
229
-
230
-
231
-
232
-
233
-
234
-
235
-
236
-
237
-
238
-
239
-
240
-
241
-
242
-
243
-
244
-
245
-
246
-
247
-
248
-
249
-
250
-
251
-
252
 |
 |
